
Standardize the onboarding process for a CRM system
Example workshop for creating a project component for an onboarding project
HandwerkerPro, an innovative software company, specializes in developing CRM solutions for small and medium-sized trade businesses. Its cloud-based CraftManager software helps plumbers, painters, electricians, and other tradespeople manage customer relationships, create quotes, schedule jobs, and issue invoices—all in one central place, including from mobile devices at the job site.
The core product is mature and has been very well received. HandwerkerPro regularly wins new customers who want to introduce CraftManager. But this is exactly where a major challenge lies: Onboarding new customers is time-consuming, complex, and not standardized.

Every new customer brings different requirements: Some want to import their existing customers from Excel, while others already use an old system whose data must be migrated. Some need intensive training for their entire team, while others are tech-savvy and get up to speed quickly. Some businesses want custom quote and invoice templates, while others are happy with the standard templates.
For the HandwerkerPro team, every onboarding involves considerable coordination. There are many recurring steps—from the initial kickoff meeting, technical system configuration, data migration, and creation of custom templates to training and go-live support. Because every onboarding is handled individually, employees often forget important steps, delays occur, and customers wait longer than necessary for the system to become fully operational. There is also no reliable estimate of how much effort a typical onboarding actually requires.
Workshop Objective
To solve these challenges, HandwerkerPro has decided to develop a standardized project component for customer onboarding. This component should:
- Clearly structure the entire onboarding process and serve as a template
- Speed up and simplify project planning for every new onboarding
- Document every necessary step clearly so that no one forgets important tasks
- Be flexible enough to accommodate individual customer needs
- Enable realistic effort estimates so resources can be planned more effectively
- Make targeted use of lessons learned from previous onboardings to continuously improve the process
In this workshop, we will develop the structure and content of this project component. Together, we will define:
- Which recurring subtasks CRM onboarding includes
- Which dependencies and sequences exist between the tasks
- Which information, checklists, and data points are needed to manage the project
- How to design the component so that it can adapt flexibly to different customer situations
- How conditions can ensure that only the work packages that are actually needed become visible
By the end of the workshop, there should be an initial draft of the project component that can be used as a template for all future CRM onboardings in HandwerkerPro’s planning system.
Workshop Framework
[!WARNING] Excerpt from the workshop minutes

Sarah Bergmann has gathered the team in the meeting room. The team is sitting around the large conference table. Sarah Bergmann is leading the discussion, while Michael König has Leadtime open on a screen projected onto the large monitor. Coffee cups are on the table and notepads are ready.
Participants:
Sarah Bergmann (Managing Director): Workshop initiator, with a strategic overview of customer acquisition and onboarding quality.
Tim Weber (Customer Success Manager): Primarily responsible for supporting new customers during onboarding and coordinating the entire project.
Lisa Hoffmann (Implementation Specialist): Responsible for technical system setup, data migration, and CRM system configuration.
Daniel Krause (Head of Training): Conducts user training and creates training materials for customers.
Julia Neumann (Support Specialist): Supports customers during the go-live phase and with technical questions after implementation.
Michael König (Senior Project Manager): Leadtime specialist who supports the workshop and implements the project component in parallel with the discussion.
Workshop Phase 1: Defining the main areas of onboarding
Team Discussion
[!WARNING] Excerpt from the workshop minutes
Sarah Bergmann: “All right, let’s get started. Our first goal is to define the major topic areas, the so-called Epics. These are the main blocks of our onboarding process that everything else is organized around. Each Epic represents a clearly defined area that runs through the entire project like a common thread.”
Tim Weber: “They’re basically the main chapters, so we don’t end up drowning in a hundred individual tasks again later, right?”
Sarah: “Exactly. These Epics help us structure the onboarding clearly. If we define them well today, we’ll save ourselves from chaos with every new customer. Michael, you have Leadtime open, right?”
Michael König: “Yes, ready. I’ll create the Epics live as we go.”
Sarah: “Great. Let’s collect the major topics—what are the big chunks that cost us time and fray our nerves during every onboarding?”
Tim: “Definitely the initial kickoff with the customer. That’s where we clarify expectations, goals, and who has which role on their side. It’s always the first major step.”
Sarah: “Yes, that’s definitely its own Epic. Michael, please create it as ‘Project Kickoff’.”
(Michael types and creates “Project Kickoff” as an Epic.)
Lisa Hoffmann: “Data migration and system configuration—that’s the heart of it for us. Importing customer data, customizing fields, configuring workflows, and creating email templates. That often takes the longest.”
Sarah: “Absolutely. I’d call that ‘System Setup & Data Migration’. Michael?”
(Michael creates “System Setup & Data Migration” as an Epic.)
Daniel Krause: “Training. User training is essential so that the customer actually uses the system. We need to plan who will be trained, what the content will be, and how many sessions are needed.”
Sarah: “Exactly, ‘User Training’ as its own Epic. Michael, please add it.”
(Michael creates “User Training” as an Epic.)
Julia Neumann: “Go-Live Support. The phase when the system actually goes into production. We need to stay close so no one panics if something doesn’t work or questions come up.”
Sarah: “Right, ‘Go-Live & Support’ fits well. Michael, please add it.”
(Michael creates “Go-Live & Support” as an Epic.)
Sarah: “That gives us four major areas already: Project Kickoff, System Setup & Data Migration, User Training, and Go-Live & Support. Are we missing anything?”
(The team thinks for a moment.)
Tim: “Maybe another Epic for preparation? Before we kick off with the customer—internal coordination, creating the project, checking the checklists?”
Sarah: “Good point. Then let’s add ‘Internal Project Preparation’ and put it right at the beginning. Michael?”
(Michael creates “Internal Project Preparation” as an Epic and moves it to the first position.)
Sarah: “Okay, now we have: Internal Project Preparation, Project Kickoff, System Setup & Data Migration, User Training, and Go-Live & Support. The order also matches the typical sequence. Before we continue, one important point: We repeatedly encounter things that are so extensive they are practically projects of their own. In those cases, it can make sense to create a separate component rather than just an Epic—a separate building kit that we can reuse every time.”
Lisa: “Yes, creating custom quote templates comes to mind immediately. Some customers want fully customized quotes—with their own logo, text blocks, and special fields. It’s a huge undertaking every time.”
Sarah: “Exactly, that’s a good example. We don’t create a template like that for every customer, but whenever we do, the process is similar. That’s the perfect candidate for its own component.”
Michael: “So not an Epic, but a separate component, right?”
Sarah: “Right. Michael, please create one called ‘Create Custom Quote Template’. We can store the typical steps there, such as briefing, design draft, review, and technical implementation—and next time, we can simply reuse it.”
(Michael creates the “Create Custom Quote Template” component.)
Sarah: “Great. That gives us the broad outline: One ‘CRM Onboarding’ component with 5 Epics for the main areas. Plus a second component for creating custom templates. We’ll leave that one empty for now because it would take us too far afield. Today, we’re focusing only on the onboarding itself.”
Tim: “That already adds some structure.”
Implementation in Leadtime
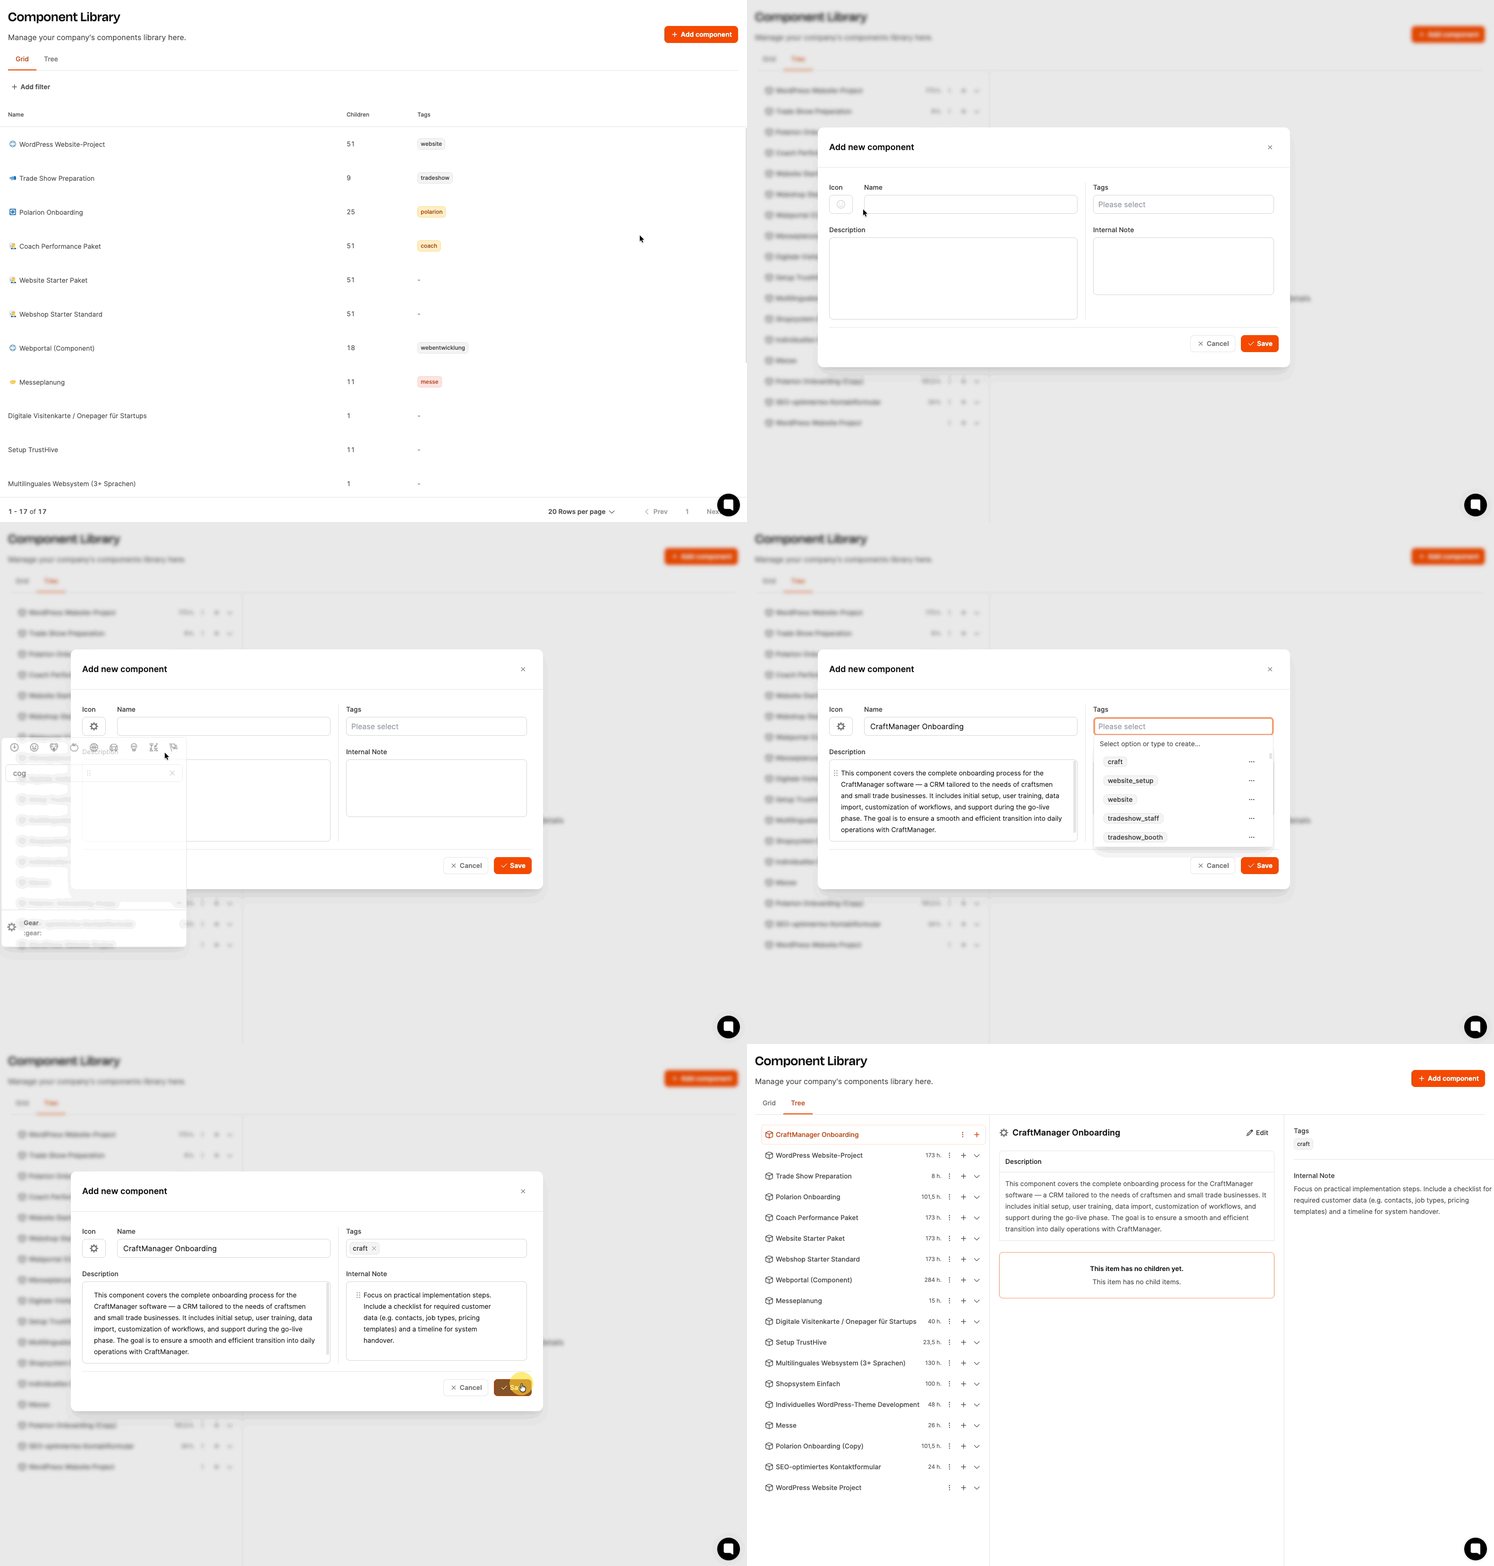
Step 1: Create a new project component
-
In the left-hand menu, navigate to Administration → Component Library.
-
Click Add Component in the top right.
-
A dialog opens. Fill in the following fields:
- Icon: Choose a suitable icon so the component is easier to recognize in the overview (for example, a gear icon for “Onboarding”).
- Name: Give the component a precise name, such as “CRM Onboarding”.
- Description: Describe the purpose of the component. For example: “Standardized process for onboarding new CRM customers. Covers every step from project preparation to go-live support.”
- Tags: Tags are used later to assign tickets. Recommendation: Use a simplified version of the component name as a tag, such as “onboarding”.
- Internal note: Store internal guidance or work instructions here for people who will work with the component later. For example: “This component is used for all new customer projects. Please conduct the kickoff meeting before the project starts and complete all form fields carefully.”
-
Click Save.
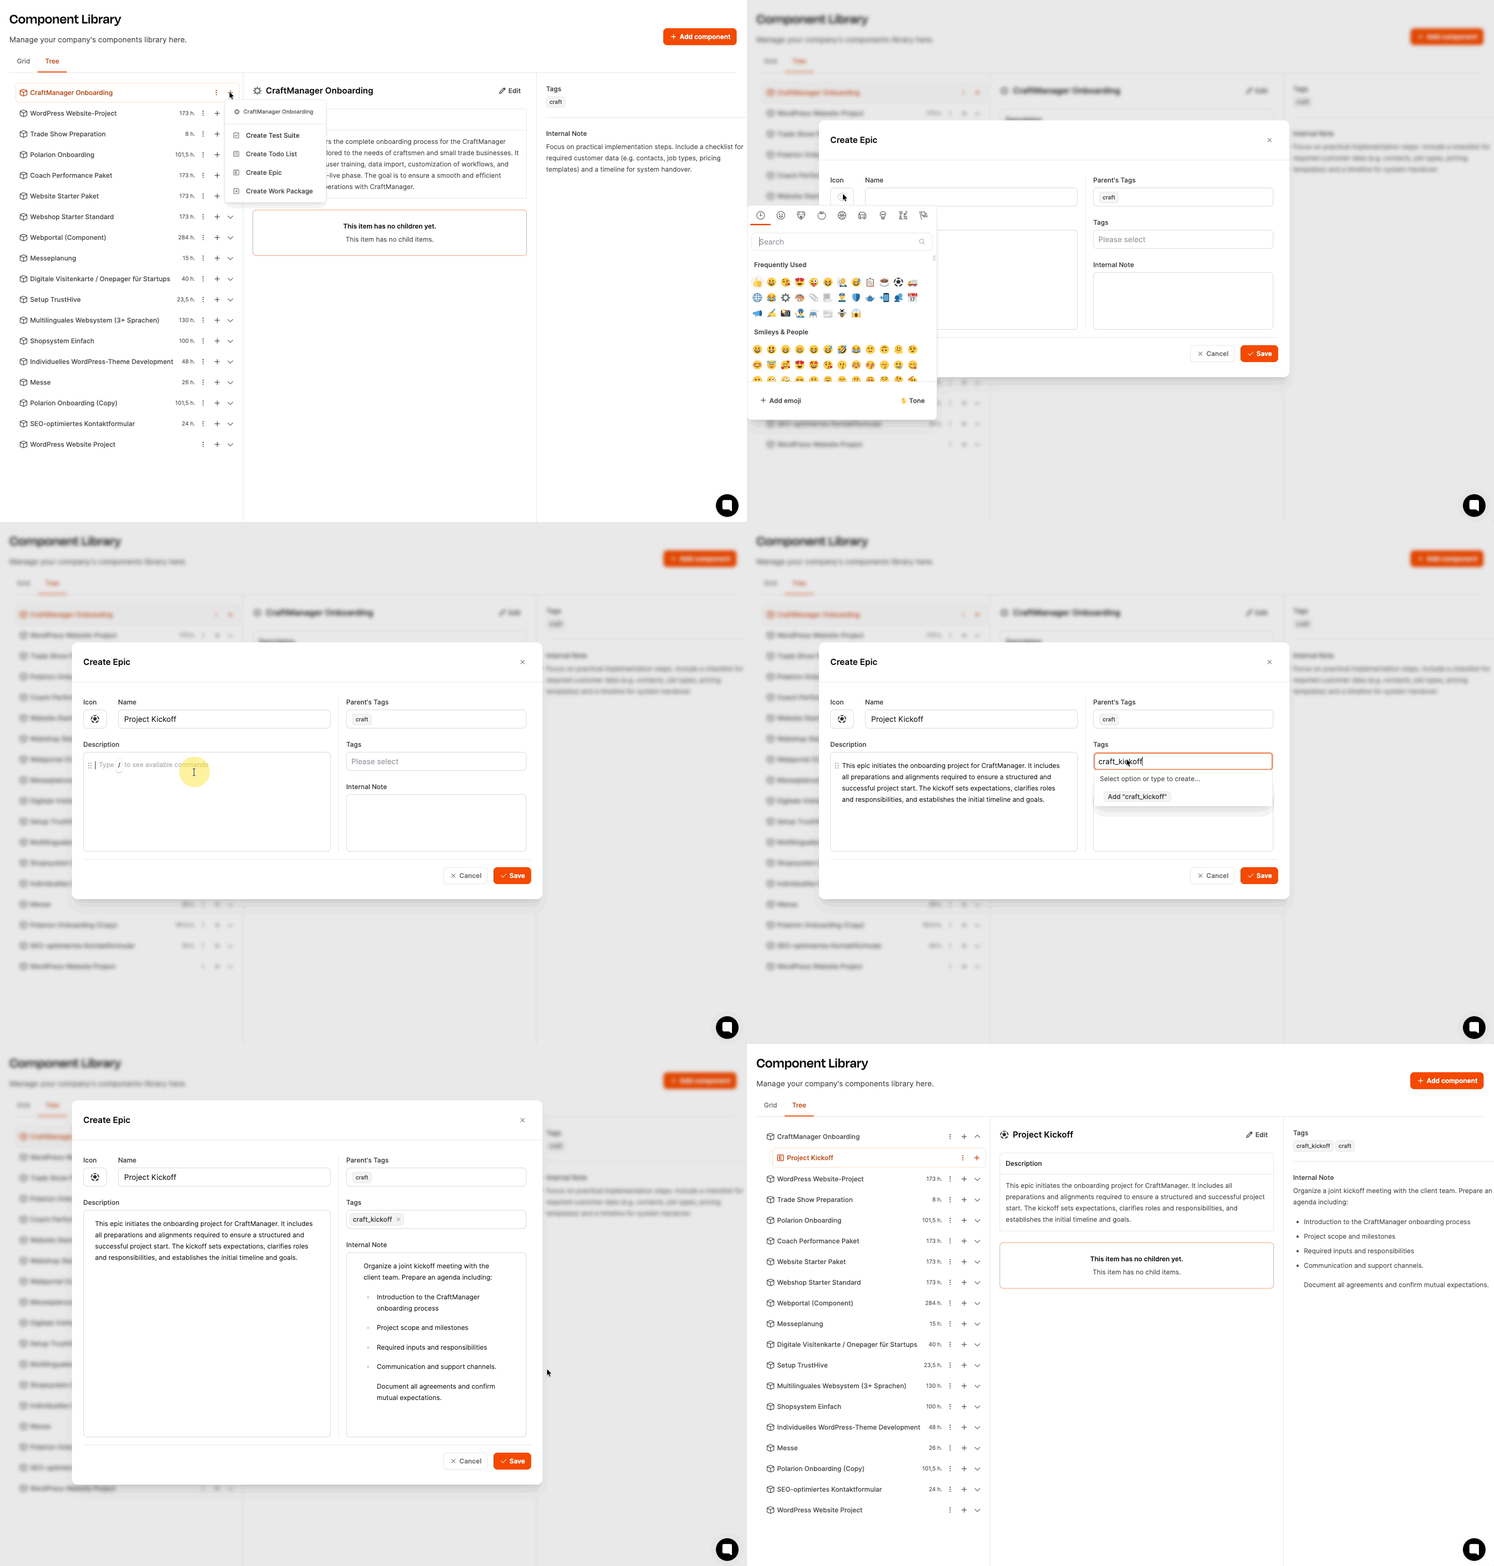
Step 2: Add Epics to the component
-
Select the newly created “CRM Onboarding” component in the overview.
-
Switch to the tree view (the default view for further work).
-
Click the plus icon next to the component name to add building blocks to the component.
-
Select Create epic from the context menu.
-
Fill in the fields:
- Icon: Optional, to make it easier to distinguish visually (for example, a calendar icon for “Project Kickoff”).
- Name: Name of the work area or phase, such as “Internal Project Preparation”.
- Description: Explain the content, the WHAT of the Epic. For example: “Internal preparation of the onboarding project before the customer becomes involved. Includes project creation, internal coordination, and checklist preparation.”
- Tags: Use a tag that will also be applied later to all related work packages, checklists, or tests, such as “onboarding_preparation”.
- Internal note: Enter implementation instructions here for the team that will implement this Epic later. The goal is to describe the HOW. For example: “Please ensure that all internal resources (implementation specialist, head of training) are scheduled for the project before the kickoff takes place.”
-
Save the Epic.
-
Repeat steps 3–6 for the other Epics:
- “Project Kickoff”
- “System Setup & Data Migration”
- “User Training”
- “Go-Live & Support”
Building blocks of project components
Step 3: Arrange the Epics in the correct order
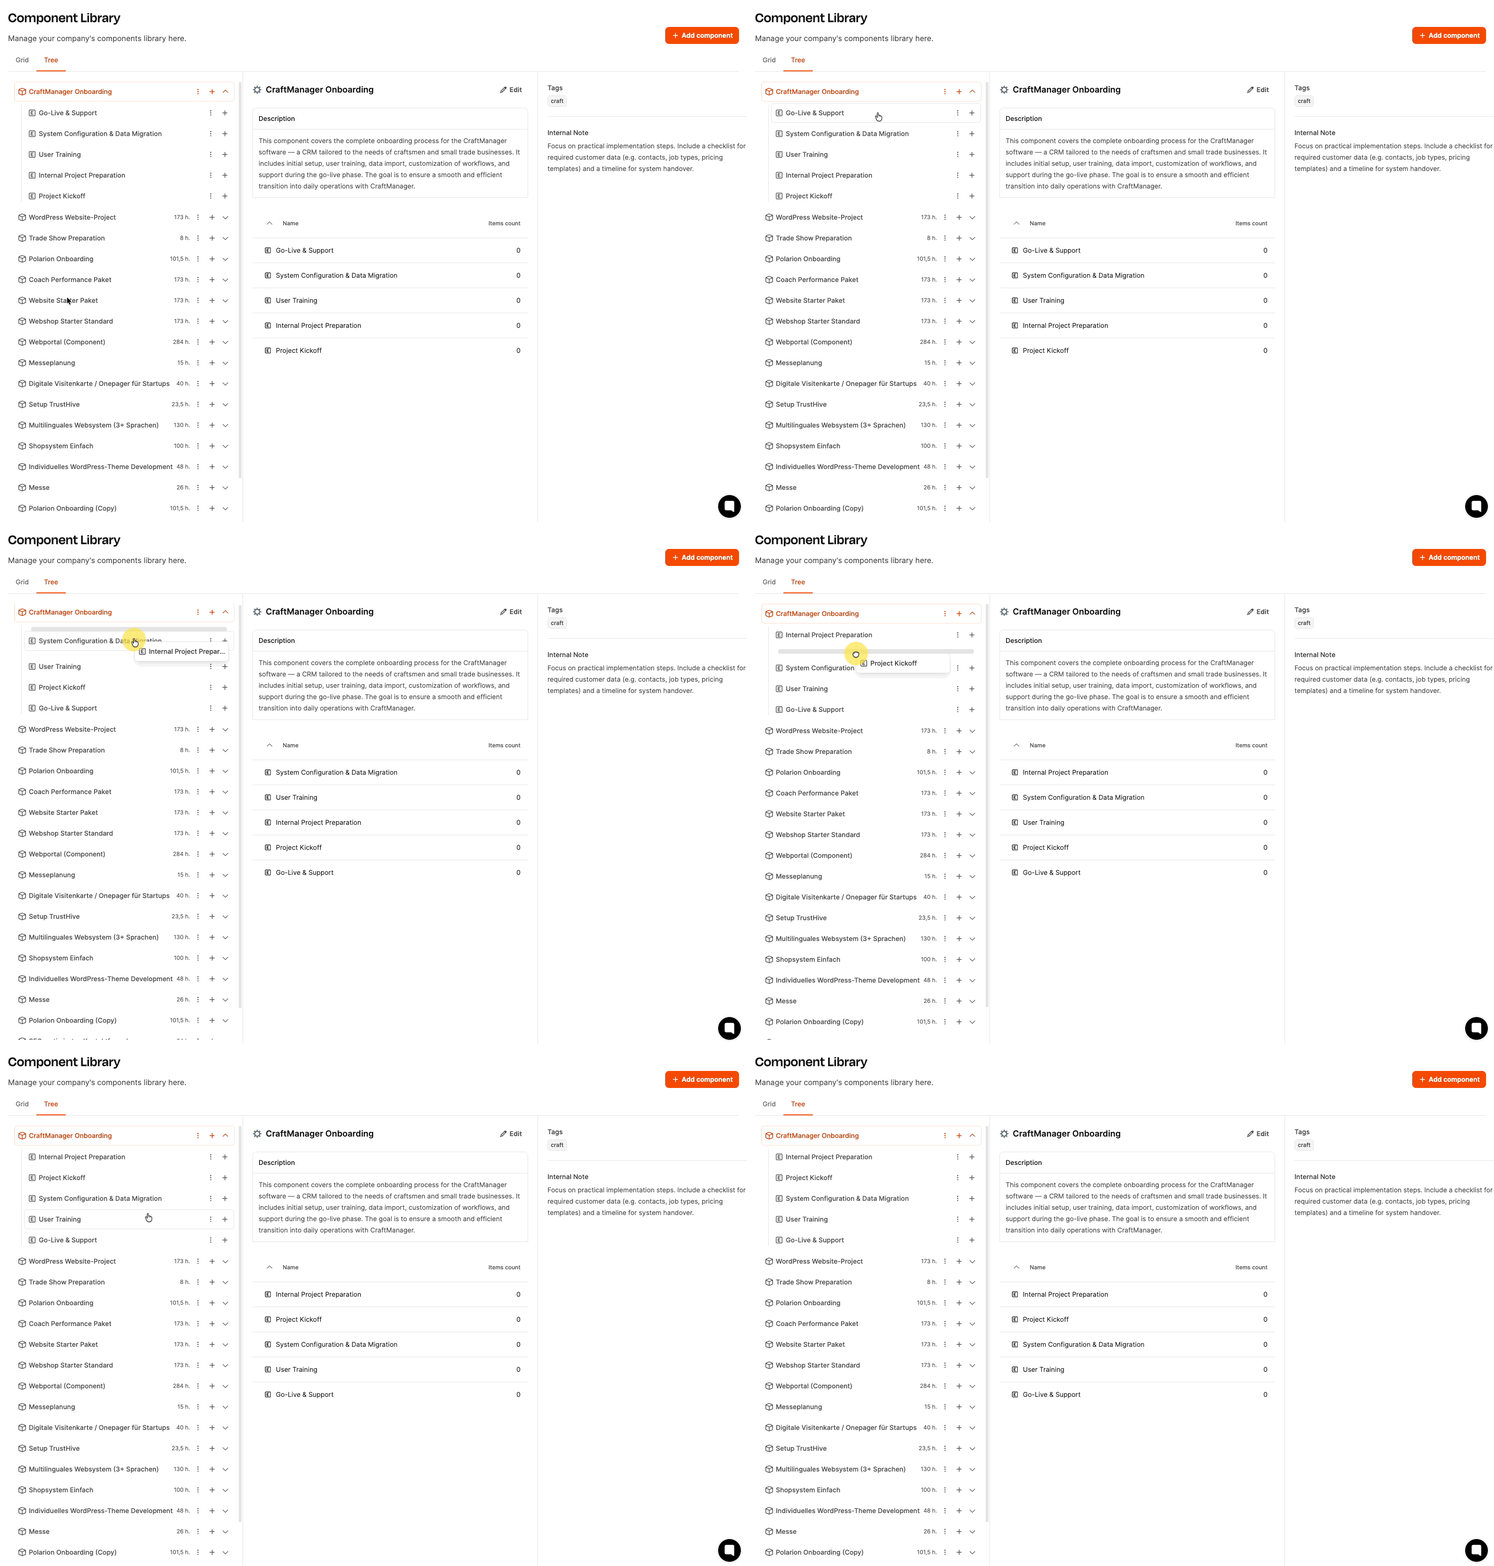
The Epics, and later other building blocks, can be rearranged in the tree view using Drag & Drop. Make sure the elements are ordered to match the actual project workflow:
- Internal Project Preparation
- Project Kickoff
- System Setup & Data Migration
- User Training
- Go-Live & Support
Step 4: Create additional components (optional)
If the meeting has already established that additional components are needed (for example, “Create Custom Quote Template”), create them right away using the same process:
- Go back to the Component Library.
- Click Add Component.
- Fill in the fields in the same way and save the component.
This completes the first phase—the component structure is in place, and the first Epics have been created. The next phase covers the specific work packages, checklists, and tests.
Workshop Phase 2: Work packages—defining the specific tasks
Team Discussion
[!WARNING] Excerpt from the workshop minutes
The team continues. The next step is to develop the specific work packages for the “Internal Project Preparation” Epic. The atmosphere is productive and everyone is focused. Michael projects the Leadtime work package input screen onto the wall.
Sarah: “Now we’ll go through the individual work packages. We discussed some initial ideas last time—today, the goal is to create the packages in concrete terms. And this time, we’re placing particular emphasis on completing all the fields properly. We need the information not only for execution, but also for planning and budgeting.”
Michael: “I’ll explain it again briefly so we’re all on the same page. For every work package, you need to complete these fields:
- Description: This is where you enter WHAT should be done in this package—the task itself.
- Tags: The Epic’s tags are inherited automatically. I gave the whole component the ‘onboarding’ tag and the first Epic the ‘onboarding_preparation’ tag. These tags are inherited by every element within the Epic. Later, when we turn these work packages into tickets, they will give us a better overview. You don’t necessarily need to add another tag at the work-package level, but it can make sense in special cases.
- Internal note: This is often what gets forgotten. Here, please explain the HOW—the work instructions for the person who will work on the package later. When someone receives the package, they should immediately know how to approach the task without needing to ask questions.
- Minimum effort: And this is really important now…”
Sarah: “Exactly, the minimum effort! I want you to estimate how many hours each work package will take to complete. We need these estimates for two things:
So that I can budget the project better in advance—that is, how much effort we will face in total.
So that we can later see in controlling whether we stayed on plan or whether something is getting stuck.”
Tim: “So we now give a rough estimate of the hours for every work package?”
Sarah: “Yes, it doesn’t have to be a science. It’s better to be too generous than too tight. If you think ‘Create project in Leadtime’ will take one hour, enter one hour. If it ends up taking only 30 minutes—that’s fine too. But we need a baseline.”
Lisa: “And what if we can’t estimate a package well?”
Sarah: “Then allow more time rather than too little. And if in doubt, ask someone who has done something like it before.”
Michael: “So, to summarize:
- Description = WHAT needs to be done
- Tags are for structure
- Internal note = HOW the topic should be approached
- Minimum effort = How many hours will this step take
Can we do that?”
Team (nods in agreement): “Yes!”
Sarah: “Good, let’s get started. We’ll now go through each work package one by one.”
Tim: “So this means we create the new customer project in Leadtime, load the onboarding component, and add the team members involved. I’d say that takes about an hour with all the settings.”
Michael: “Okay, I’ll enter this:
- Description: Create the new customer project in Leadtime, load the onboarding component, and add the responsible team members.
- The tags are already there.
- Internal note: Please ensure that the ‘CRM Onboarding’ component is loaded. All team members (Customer Success, Implementation, Training, Support) must be added as project members.
- Minimum effort: 1 hour.”
Sarah: “Perfect, next.”
Lisa: “Review customer data in advance. Before we start the kickoff, I should look at the data the customer has sent us—Excel lists, CSV files, or whatever else. I need to check whether the data is clean, which fields are present, and whether there are duplicates. The time varies depending on the amount of data, but I’d say three hours on average.”
Michael: “Okay, I’ll write:
- Description: Review the existing data provided by the customer (Excel, CSV, etc.) for completeness, data quality, and structure.
- The tags are there.
- Internal note: Please check for duplicates, missing required fields, and inconsistent formatting. If there are problems, consult the customer before the kickoff.
- Minimum effort: 3 hours.”
Sarah: “Great, next.”
Tim: “Prepare the kickoff meeting. I need to create the agenda, invite all participants, and assemble the materials—presentation, checklist, questionnaire. I’d say two hours.”
Michael: “So:
Description: Prepare the kickoff meeting with the customer—create the agenda, invite participants, and assemble the presentation and materials.
- The tags are there.
Internal note: The agenda should cover the following points: project goals, timeline, responsibilities, data migration, and training needs. Use the presentation and questionnaire from the templates folder.
- Minimum effort: 2 hours.”
Sarah: “Good, that covers the key preparation topics. But I’ve noticed something else: We should also have a checklist for internal coordination—to make sure everyone on the team is on the same page before we kick off with the customer.”
Julia: “That’s true. Sometimes we only realized during the kickoff that we hadn’t even clarified internally who was doing what.”
Sarah: “That’s why I suggest creating a checklist with the most important points that need to be clarified internally. Michael, can you set that up?”
Michael: “Sure, there’s a special ‘Checklist’ work package for that. It’s similar to a ticket, except it contains many individual small tasks that need to be completed. I’ll create it now:
- Description: Internal coordination before customer contact.
- The tags are there.
- Internal note: A list of the most important points to clarify before the kickoff—please go through it completely and check off every item.
- Minimum effort: 1 hour.”
Sarah: “Perfect. I’d move the checklist all the way to the top now, because we want to complete it before all the other packages. Like this.”
(Michael moves the checklist to the first position using Drag & Drop.)
Sarah: “That completes our first Epic. Well done!”
Implementation in Leadtime
After creating the component’s basic structure in the first phase, the next step is to create the specific work packages and checklists within the first Epic, “Internal Project Preparation”.
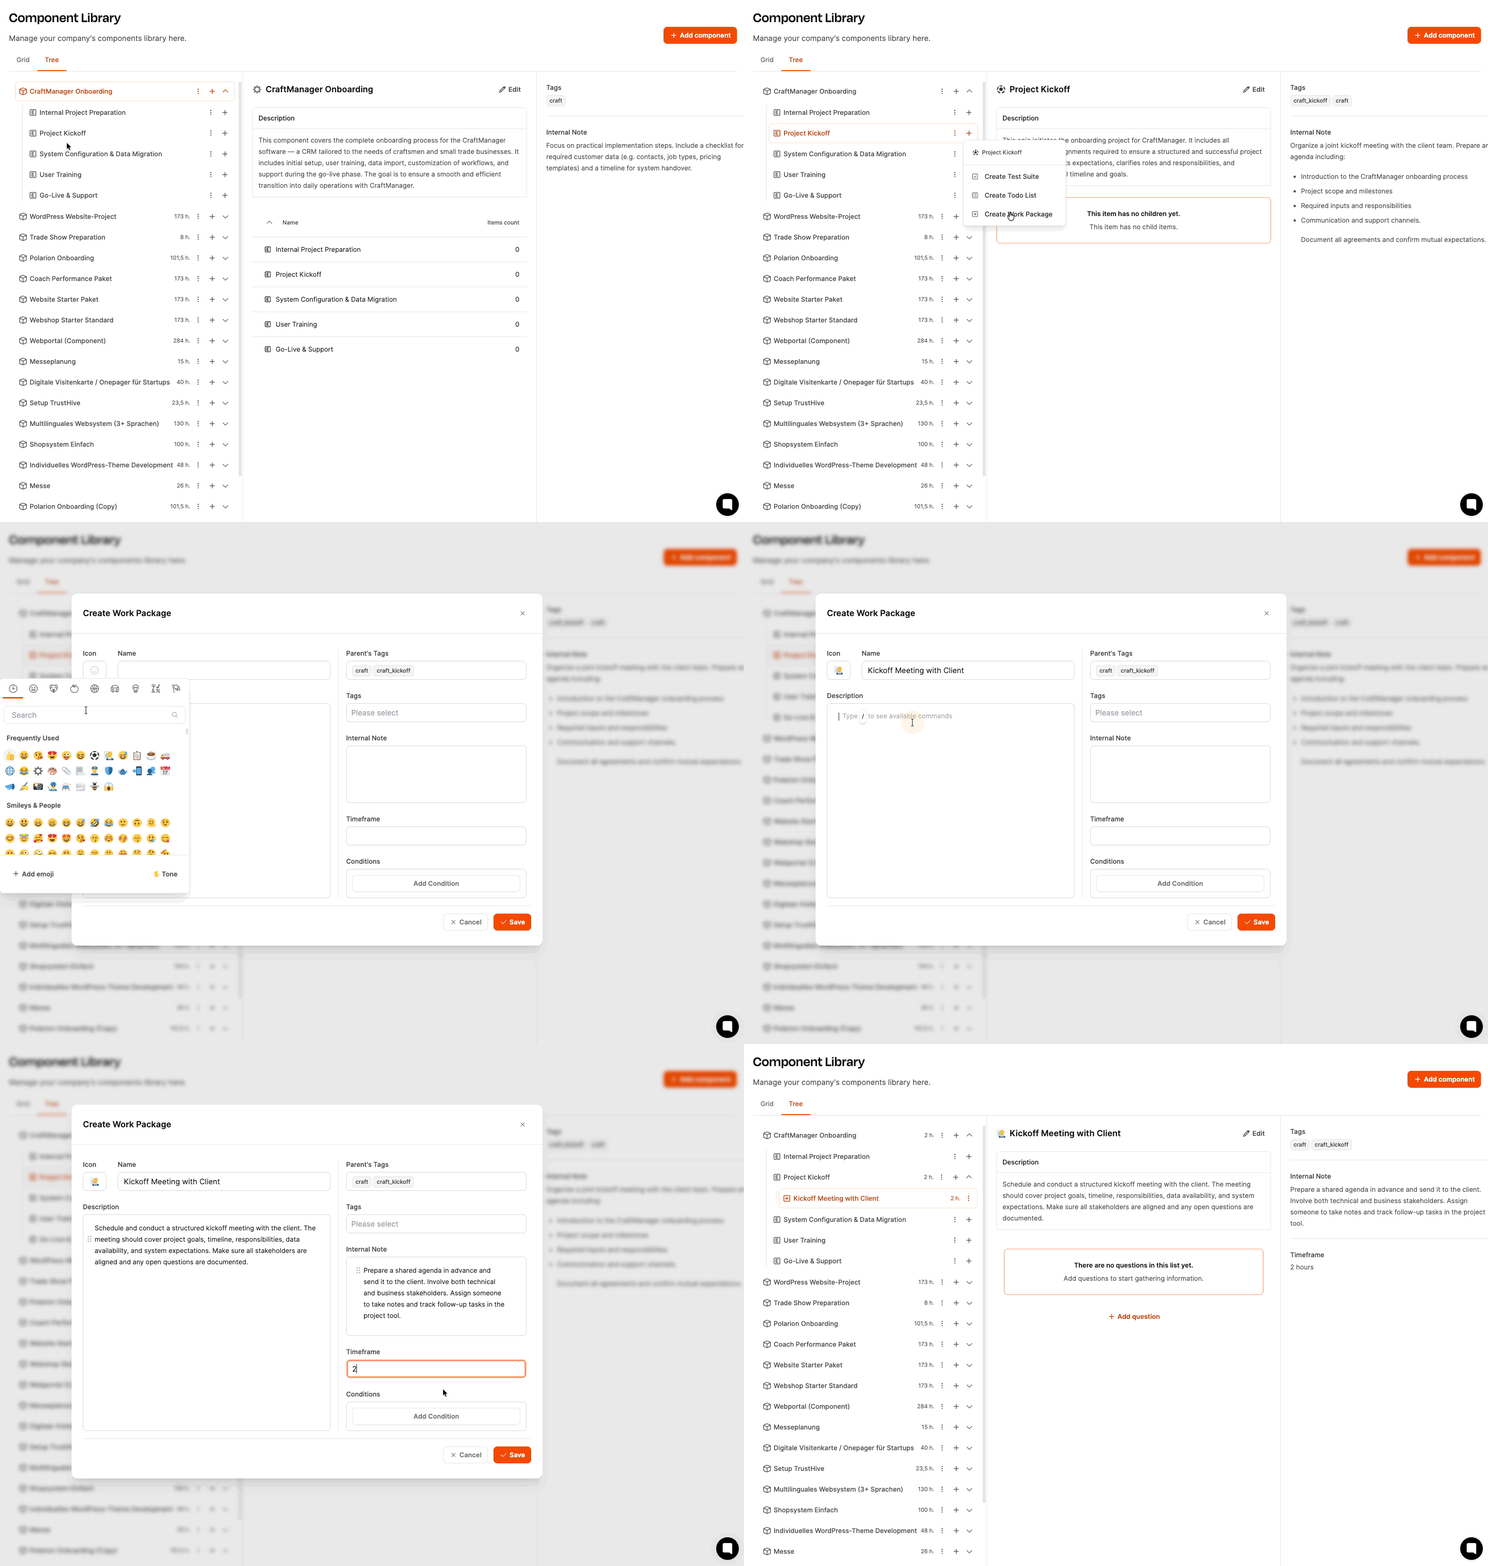
Step 1: Create a work package
-
In the component’s tree view, click the plus icon in the “Internal Project Preparation” row.
-
A context menu opens with three options:
- Create acceptance test
- Create checklist
- Create work package
-
Select “Create work package”.
-
A dialog opens with the following fields:
- Icon:
- Name: Title of the work package, such as “Create project in Leadtime”.
- Description: Explanation of the task, such as “Create the new customer project in Leadtime, load the onboarding component, and add the responsible team members.”
- Tags: Optional, but inherited automatically from the Epic and component.
- Internal note: Implementation guidance, such as “Please ensure that the ‘CRM Onboarding’ component is loaded. All team members (Customer Success, Implementation, Training, Support) must be added as project members.”
- Minimum effort: Estimated minimum effort in hours, such as “1”.
-
Click “Save”.
Building blocks of project components
Step 2: Create additional work packages
Create the additional work packages in the same way as the first task:
- “Review customer data in advance” (enter the description and minimum effort as needed)
- “Prepare kickoff meeting”
Repeat steps 1–5 for each work package.
Step 3: Create a checklist
-
In the same context menu (the plus icon by the Epic), select “Create checklist”.
-
Define the checklist’s title and description, for example:
- Name: “Internal coordination before kickoff”
- Description: “Internal coordination before customer contact.”
- Internal note: “A list of the most important points to clarify before the kickoff—please go through it completely and check off every item.”
- Minimum effort: “1 hour”
-
Save.
Step 4: Rearrange work packages and checklists
The newly created work packages and checklist can be rearranged in the component tree using Drag & Drop. In this example, the “Internal coordination before kickoff” checklist was moved to the top because it should be completed first.
Workshop Phase 3: Adding forms and questions—making the work packages flexible
Team Discussion
[!WARNING] Excerpt from the workshop minutes
Sarah: “Now we’re going into even more detail. We’ve defined our Epics and created the work packages—now it’s time to specify the tasks within the packages precisely. We’ll start with ‘Internal coordination before kickoff’. Tim, what do we need there?”
Tim: “Well, we need to make sure in advance that all relevant points for the kickoff meeting have been clarified internally. To make sure we don’t forget anything, we should create a checklist with the most important to-dos.”
Michael: “Exactly. I’ll briefly show you how that works. We can create what are called To-Dos for the checklist. They’re intended for small, clear tasks that can simply be checked off so the preparation runs smoothly.”
(Michael opens the “Internal coordination before kickoff” checklist in Leadtime and shows the To-Do input screen.)
Michael: “As you can see, we can simply enter the tasks here as a list.”
(The team workshops a series of To-Dos for the checklist.)
To-Dos for “Internal coordination before kickoff”:
- Assign Customer Success Manager: Clarify who will serve as the customer’s main point of contact during onboarding. Record the name in the project.
- Assign Implementation Specialist: Ensure that a technical specialist is scheduled for system configuration and data migration. Check their availability over the next 4 weeks.
- Inform Head of Training: Inform the head of training about the new project and coordinate a rough timeline for training.
- Ensure support availability: Check whether sufficient support capacity is available during the go-live phase. Adjust vacation planning if necessary.
- Clarify access to customer documentation: Ensure that all relevant customer documents (data exports, requirements list, existing process descriptions) are stored in the project folder.
- Outline a rough onboarding schedule: Based on the project start and desired go-live date, create an initial rough timeline.
(Michael types in the items.)
Sarah: “Perfect. The items can then be completed one after another. And what about the work packages themselves?”
Michael: “Those have already been created. Let’s look at ‘Project Kickoff’. Every work package in Leadtime can have a form attached to it. I’ll briefly explain why that’s important.”
(Michael opens the “Project Kickoff” Epic and selects the “Conduct kickoff meeting” work package.)
Michael: “The description of the work package states the ‘What’—what needs to be done. The ‘Internal note’, on the other hand, provides instructions for the person carrying it out—the ‘How’. But for that person to complete the work package properly, the requirements must be clear. That’s exactly what the form is for.”
Sarah: “The point is that every time we do an onboarding, the situation is a little different: The customer has different requirements, different amounts of data, and different training needs. The form questions let us customize the work package for the specific situation.”
Michael: “Exactly. And the questions for this first work package could help us address the right topics in the kickoff meeting. During the meeting, you work through the points and enter the answers directly into the form. The answers also affect the other work packages.”
Sarah: “Great. Let’s gather the questions for the kickoff meeting.”
(The team develops the questions together.)
Questions for the “Conduct kickoff meeting” work package:
1. Who is the main point of contact at the customer?
- Question type: Person (on the customer side)
- Description: Name and role of the person at the customer who will serve as the main point of contact during onboarding.
Michael: “‘Person’ is a special question type. It lets you select a person directly from the customer’s team or enter someone manually. That’s really useful because the person can then also be entered as the contact in later tasks.”
2. How many employees at the customer will use the CRM?
- Question type: Number
- Description: Number of end users who will actively use the CRM after onboarding.
Tim: “That’s important for planning the training. If there are only 3 people, one training session is enough. With 15 people, we need several sessions.”
3. Which data sources should be migrated?
-
Question type: Checkboxes (multiple selection)
-
Options:
- Excel file with customer contacts
- CSV export from existing CRM
- Quote and invoice data from accounting software
- Other (please explain in the comments field)
-
Description: From which systems or files should data be transferred into the new CRM?
Lisa: “That gives me an immediate overview of which data sources I need to examine. It also helps me estimate how much effort the migration will require.”
4. Does the customer need custom quote templates?
- Question type: Radio button (Yes/No)
- Description: Should a completely custom quote template be created with the customer’s own logo, layout, and text blocks?
Michael: “We can later use this question for a condition.”
Daniel: “What’s a condition?”
Michael: “Work packages can be shown or hidden depending on specific answers. Take the question ‘Does the customer need custom quote templates?’ as an example. If the answer is ‘Yes’, we can use a condition to make the ‘Create Custom Quote Template’ work package appear automatically. If the answer is ‘No’, it remains hidden.”
Daniel: “Cool, so the project structure automatically adapts to our answers?”
Michael: “Yeah baby, you’ve got it. Let’s keep going.”
5. Which training formats does the customer prefer?
-
Question type: Checkboxes (multiple selection)
-
Options:
- Live training on site
- Online training via video conference
- Recorded training videos
- Written instructions / manual
-
Description: How should the user training be conducted?
Daniel: “That helps me structure the training plan right away. Depending on what the customer chooses, I need to prepare different materials.”
6. What is the desired go-live date?
- Question type: Date
- Description: By what date should the CRM system be in production?
Sarah: “That’s the most important question for the timeline. It determines how much time we have for all the other steps.”
7. How many people will attend the kickoff meeting?
- Question type: Multiplier
- Description: Number of participants in the kickoff meeting. Duration per person: 2 hours.
Michael: “The multiplier is particularly useful when a task’s duration depends on the number of participants. For example: The kickoff meeting takes 2 hours per person. If we enter 4 participants in the form, Leadtime automatically calculates 4 times 2 hours, or 8 hours, as the effort. That’s enormously helpful for later scheduling and budgeting.”
8. Does the customer have any special requirements or requests?
- Question type: Long text
- Description: Special functions, customizations, or processes that the customer needs.
Tim: “Here we can enter anything that doesn’t fit the standard questions—for example, a special integration with other software or special invoice fields.”
9. Does the customer already have experience with CRM systems?
-
Question type: Radio button
-
Options:
- Yes, already works with another CRM
- No, first CRM system
-
Description: The customer’s prior experience with CRM systems.
Daniel: “That affects the depth of the training. If the customer already knows another CRM, we can get started faster. If not, we need to explain more of the basics.”
Sarah: “Perfect. That’s exactly the structure we need to collect all the important information during the kickoff and make sure nothing is forgotten.”
Michael: “And don’t forget: This form principle applies to every work package. For each package, think about which questions need to be answered for execution so that no follow-up questions are necessary.”
Sarah: “All right, let’s continue with the other packages. Or do you need a short break?”
(The team nods, and Sarah announces a 15-minute break.)
Implementation in Leadtime
The next step is to supplement the work packages and checklists that have already been created with forms. These forms help adapt the work packages flexibly to the specific project situation.
In our example project, the starting point varies from customer to customer—for example, the data sources, training needs, or desired customizations change. The form questions help adapt the work packages to the specific current situation.
Step 1: Add To-Dos to a checklist
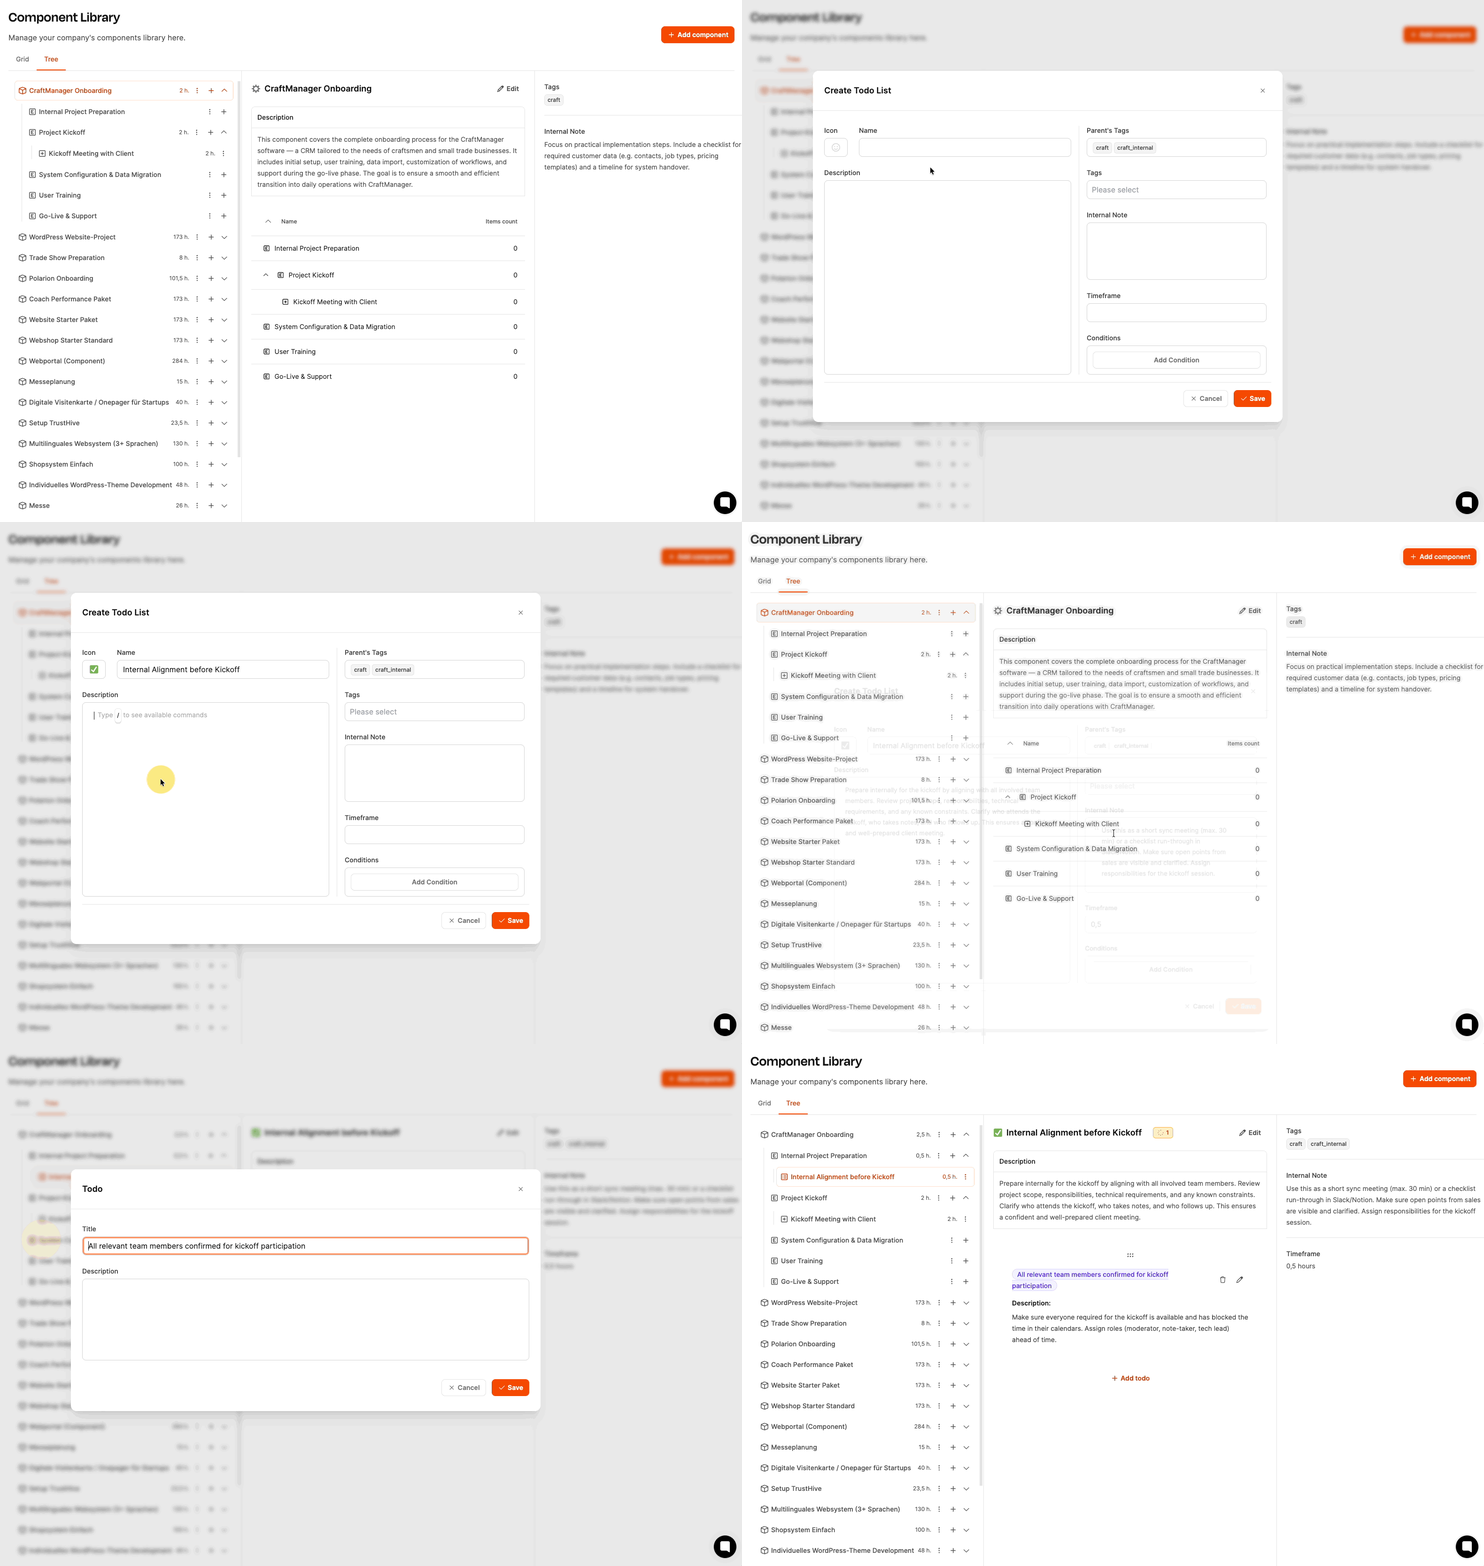
Checklists consist of individual tasks (To-Dos) that must be completed one after another.
Here’s how:
-
Select the checklist in the component tree (for example, “Internal coordination before kickoff”).
-
In the center, click the “Add To-Do” button.
-
A dialog opens:
- Enter the title of the To-Do (for example, “Assign Customer Success Manager”).
- Optional: Add a description.
-
Save.
-
The To-Do now appears in the checklist and can be checked off when the project is carried out.
Repeat this process for every To-Do in the checklist.
Step 2: Add questions to a work package
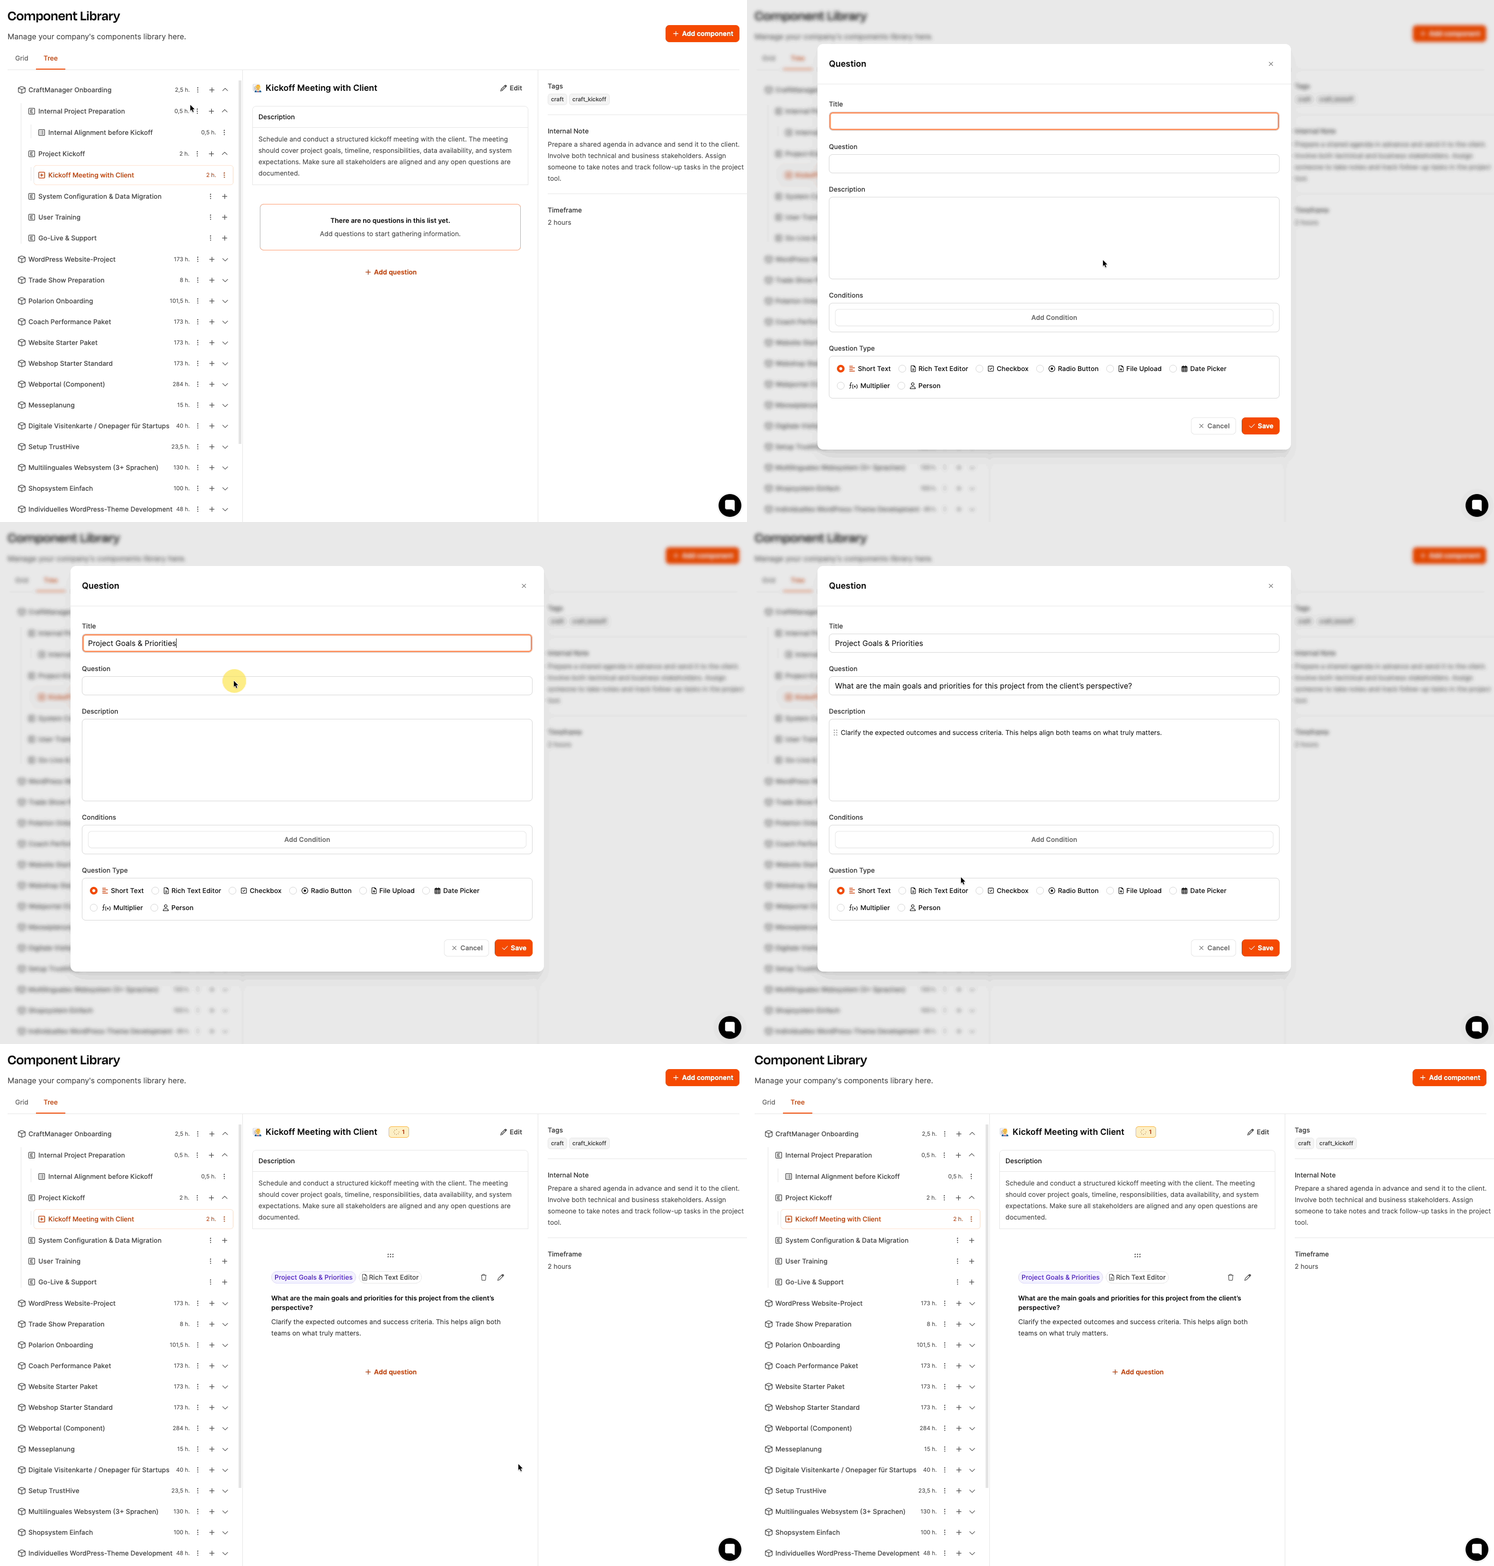
Questions make it possible to adapt a work package flexibly to the specific project situation.
Here’s how:
-
Select the work package in the component tree (for example, “Conduct kickoff meeting”).
-
Click “Add question”.
-
A dialog opens:
- Title: Short name for the question (for example, “Customer’s main point of contact”).
- Question: The fully worded question (for example, “Who is the main point of contact at the customer?”).
- Description: Explanation of the question (for example, “Name and role of the person at the customer who will serve as the main point of contact during onboarding.”).
- Question type: Select the appropriate question type (for example, “Person”, “Number”, “Radio button”, “Checkboxes”, “Date”, “Long text”).
- For checkboxes or radio buttons: Define options (for example, “Live training on site”, “Online training via video conference”).
-
Save.
-
The question is added to the work package and completed when the project starts later.
Repeat this process for every question in the work package.
Step 3: Use multiplier questions
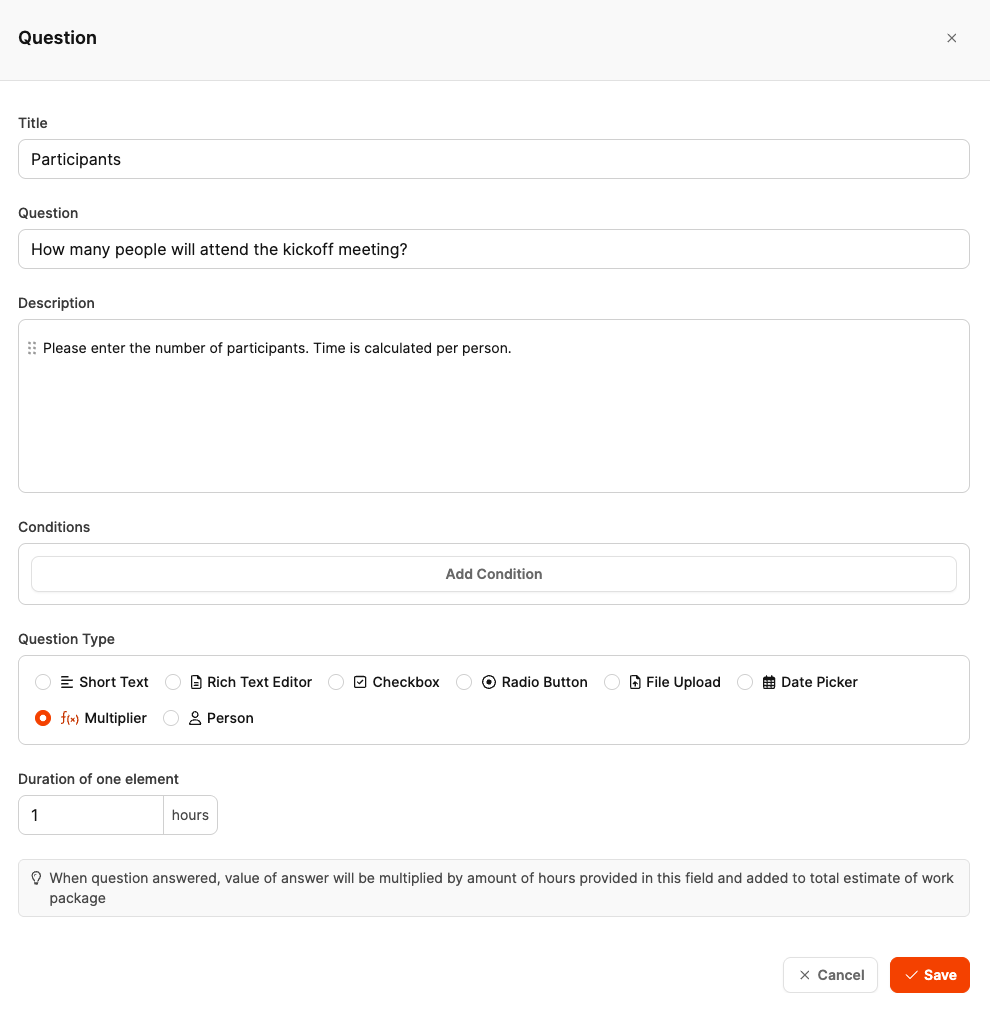
The Multiplier question type affects the work package’s effort estimate:
- Example: Question “How many people will attend the kickoff meeting?”
- The question specifies that 2 hours per person should be planned.
- If the user later enters “4 people”, the effort is automatically set to 8 hours.
How to create a multiplier:
- Add a question (see step 2).
- Select the “Multiplier” question type.
- Enter the hours in the “Duration per unit” field (for example, “2”).
- Save.
Step 4: Adjust the order of questions
The order of questions can be changed using Drag & Drop. For example, it often makes sense to ask about the number of participants near the beginning.
Workshop Phase 4: Conditions and acceptance tests—making the component smarter
Team Discussion
[!WARNING] Excerpt from the workshop minutes
After several intense hours, interrupted by breaks and lively discussions, the team has now created the work packages for all Epics and equipped them with forms. As they worked through the details, new ideas kept emerging, so Michael adjusted and expanded the component tree several times. Additional Epics and work packages were created, while others were merged. Michael points out that every element in the component tree can be moved using Drag & Drop. It is even possible to drag a question from one work package to another.
Now, late in the afternoon, everyone is a little exhausted but satisfied. It is the rewarding feeling of having created a sustainable solution for a complex, recurring project.
Michael: “Okay, final stretch! Now that the structure is more or less in place, we’ll finish with conditions. I’ve put this off all day because it’s simply better to do it once you can see the project as a whole.”
Michael explains again what conditions are: “Conditions let us make sure that certain questions or work packages only appear when a previous answer meets a specific condition. This keeps the component clear and ensures that it only ever shows the relevant tasks.”
Practical example 1: Custom quote template only when needed
For the first practical example, the team opens the “Conduct kickoff meeting” work package. It contains the question:
“Does the customer need custom quote templates?”
- Answer options: Yes / No
In the “System Setup & Data Migration” Epic, a “Create Custom Quote Template” work package should now appear only if this question was answered with “Yes”.
Michael: “I’ll show you how this works. We go to the ‘Create Custom Quote Template’ work package and add a condition there.”
Steps:
-
In the “System Setup & Data Migration” Epic, create a new work package: “Create Custom Quote Template”.
-
Add condition:
- Component: CRM Onboarding
- Element: Conduct kickoff meeting
- Target: Question “Does the customer need custom quote templates?”
- Condition type: Answer is “Yes”
-
Save.
Michael: “Now this work package will only be visible in the project if ‘Yes’ was selected in the kickoff meeting. If ‘No’, it remains completely hidden.”
Lisa: “That’s brilliant! Then I only see the tasks that are actually relevant in each project.”
Practical example 2: Multiple training sessions only for larger teams
Daniel: “I’ve thought of another condition. If the customer has more than 8 employees who need training, we need several training sessions. Could we automate that too?”
Michael: “Sure! In the kickoff, we have the question ‘How many employees at the customer will use the CRM?’—which is a ‘Number’ type. We can now create a ‘Plan Additional Training Sessions’ work package and set a condition: Only visible if the number is greater than 8.”
Steps:
-
In the “User Training” Epic, create a new work package: “Plan Additional Training Sessions”.
-
Add condition:
- Component: CRM Onboarding
- Element: Conduct kickoff meeting
- Target: Question “How many employees at the customer will use the CRM?”
- Condition type: Number greater than 8
-
Save.
Daniel: “Perfect! Then I don’t waste time planning unnecessary additional sessions for smaller customers.”
Practical example 3: Data migration work packages based on the data source
Lisa: “I have another idea. For the question ‘Which data sources should be migrated?’, the customer can select multiple options—Excel, CSV, accounting software. Could we create a separate work package for each data source that only appears when the corresponding option was selected?”
Michael: “Absolutely! That’s actually a very good idea, because every data source requires different preparation.”
Steps:
-
In the “System Setup & Data Migration” Epic, create three new work packages:
- “Import Excel Data”
- “Migrate CSV Export from CRM”
- “Transfer Accounting Data”
-
Add a condition to each work package:
- Component: CRM Onboarding
- Element: Conduct kickoff meeting
- Target: Question “Which data sources should be migrated?”
- Condition type: Answer contains “Excel file with customer contacts” (or the corresponding option for the other packages)
-
Save.
Lisa: “That’s incredibly practical! Then every project shows me only the migration packages that are actually needed.”
Creating acceptance tests
Julia: “I have another idea too. Every go-live has a few standard checks that we should always go through—for example, whether the email integration works, whether the invoice templates are correct, and whether the access rights are configured properly. Couldn’t we standardize that as well?”
Michael: “Good idea! Better still: We could create an acceptance test instead. It’s more precise than a simple checklist. Acceptance tests originally come from software development. They’re a little more flexible.”
Michael explains:
Acceptance tests consist of:
- Title
- Description
- Steps
- Expected result
During acceptance, the tester can select “Passes” or “Does not pass” and leave a comment in the second case. If “Does not pass” is selected, a ticket can be created immediately to fix the problem.
Lisa: “Cool, we can also use that really well for our own software tests!”
The team develops the first test cases for the go-live together. As an example, Michael demonstrates the “Email Integration” test case:
Title: Test email integration
Description: “Please check whether the email integration with the CRM works correctly.”
Steps:
- Add the customer’s email account to the CRM
- Send a test email to the customer
- Check whether the email appears in the CRM outbox
- Check whether the customer’s reply appears in the CRM inbox
Expected result: “Emails are displayed correctly in both the outbox and inbox. No error messages.”
The team creates additional acceptance tests:
- “Check Invoice Templates”
- “Test Access Rights”
- “Check Mobile App Functionality”
- “Verify Customer Data Import”
Scheduling lessons learned
Sarah: “Let’s create one final work package, ‘Lessons Learned Meeting’. After the go-live, we’ll take the time to write down together what went well and what didn’t. Then we’ll revise the project component—both the effort estimates and the content, if necessary.”
Everyone agrees and thinks it is a very good idea.
Sarah closes the meeting: “When the project starts for real, please enrich the work packages in the Component Library with additional information as needed if that makes them easier to carry out. Thank you, everyone—that was a very productive day!”
Implementation in Leadtime
The final phase of creating the component focuses on refining the project structure in a targeted way. This refinement uses conditions, which make certain work packages, questions, or acceptance tests visible only when a previously defined condition is met.
The goal of this phase is to reduce complexity when the project is completed later. Unnecessary work packages and questions are dynamically hidden so that only the elements relevant to the particular project are displayed.
When does this phase make sense?
Refinement should take place once the component’s basic structure is in place and most Epics and work packages have already been defined. Conditions can then be integrated to activate or deactivate individual branches of the component tree as needed.
Add a condition to a work package
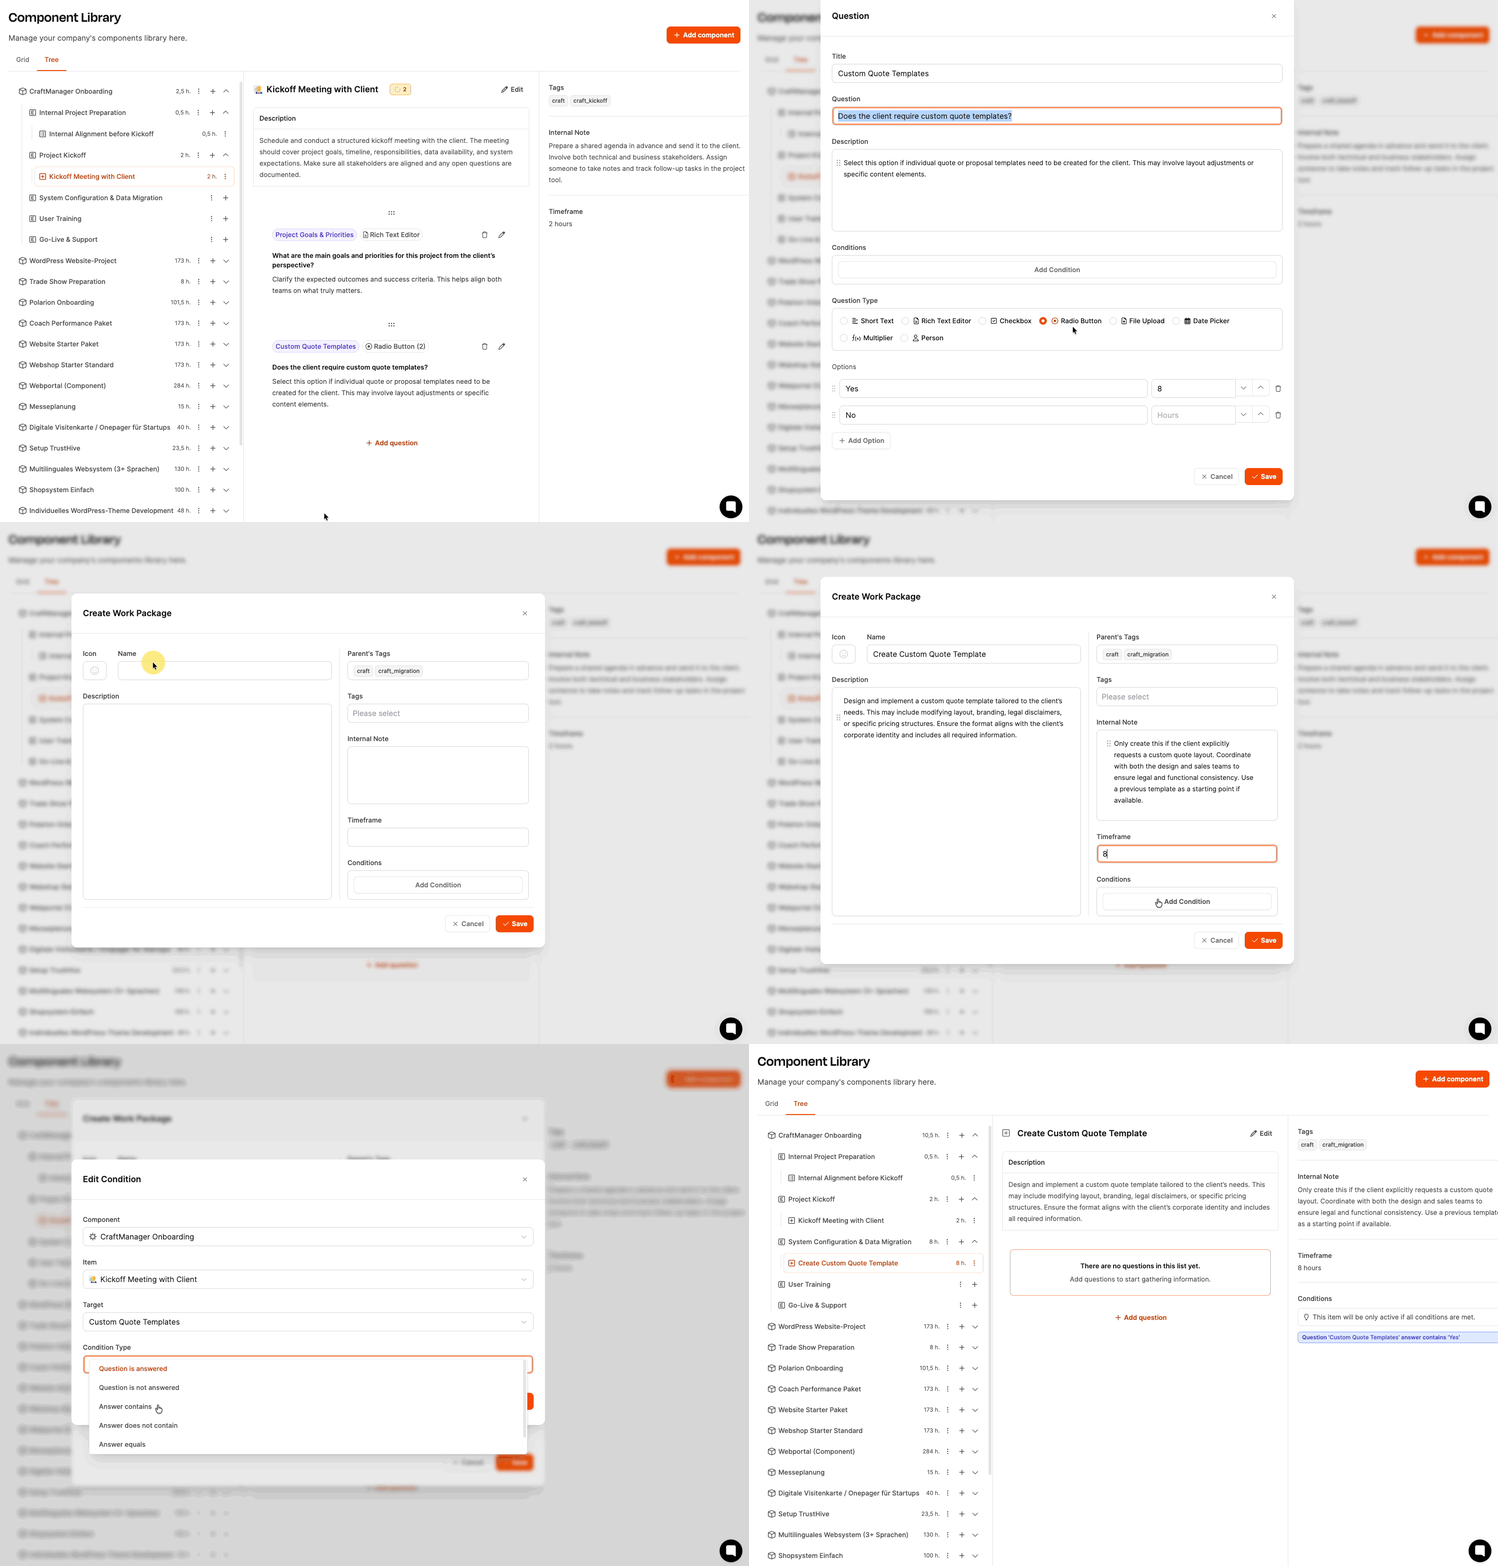
Example: The “Create Custom Quote Template” work package should only be visible if the question “Does the customer need custom quote templates?” was answered with “Yes” in the kickoff meeting.
Here’s how:
-
In the “System Setup & Data Migration” Epic, create a new work package: “Create Custom Quote Template”.
-
Add condition:
- Click “Add condition”.
- Component: CRM Onboarding
- Element: Conduct kickoff meeting
- Target: Question “Does the customer need custom quote templates?”
- Condition type: Answer is “Yes”
-
Save.
The work package is now displayed in the project only when the condition is met.
Condition based on numerical values
Example: The “Plan Additional Training Sessions” work package should only be visible when more than 8 employees need to be trained.
Here’s how:
-
In the “User Training” Epic, create a new work package: “Plan Additional Training Sessions”.
-
Add condition:
- Component: CRM Onboarding
- Element: Conduct kickoff meeting
- Target: Question “How many employees at the customer will use the CRM?”
- Condition type: Number greater than 8
-
Save.
Condition based on multiple selection (checkboxes)
Example: The “Import Excel Data” work package should only be visible if the “Excel file with customer contacts” option was selected for the question “Which data sources should be migrated?”.
Here’s how:
-
In the “System Setup & Data Migration” Epic, create a new work package: “Import Excel Data”.
-
Add condition:
- Component: CRM Onboarding
- Element: Conduct kickoff meeting
- Target: Question “Which data sources should be migrated?”
- Condition type: Answer contains “Excel file with customer contacts”
-
Save.
Repeat this process for all other data sources (CSV, accounting software).
Create acceptance tests
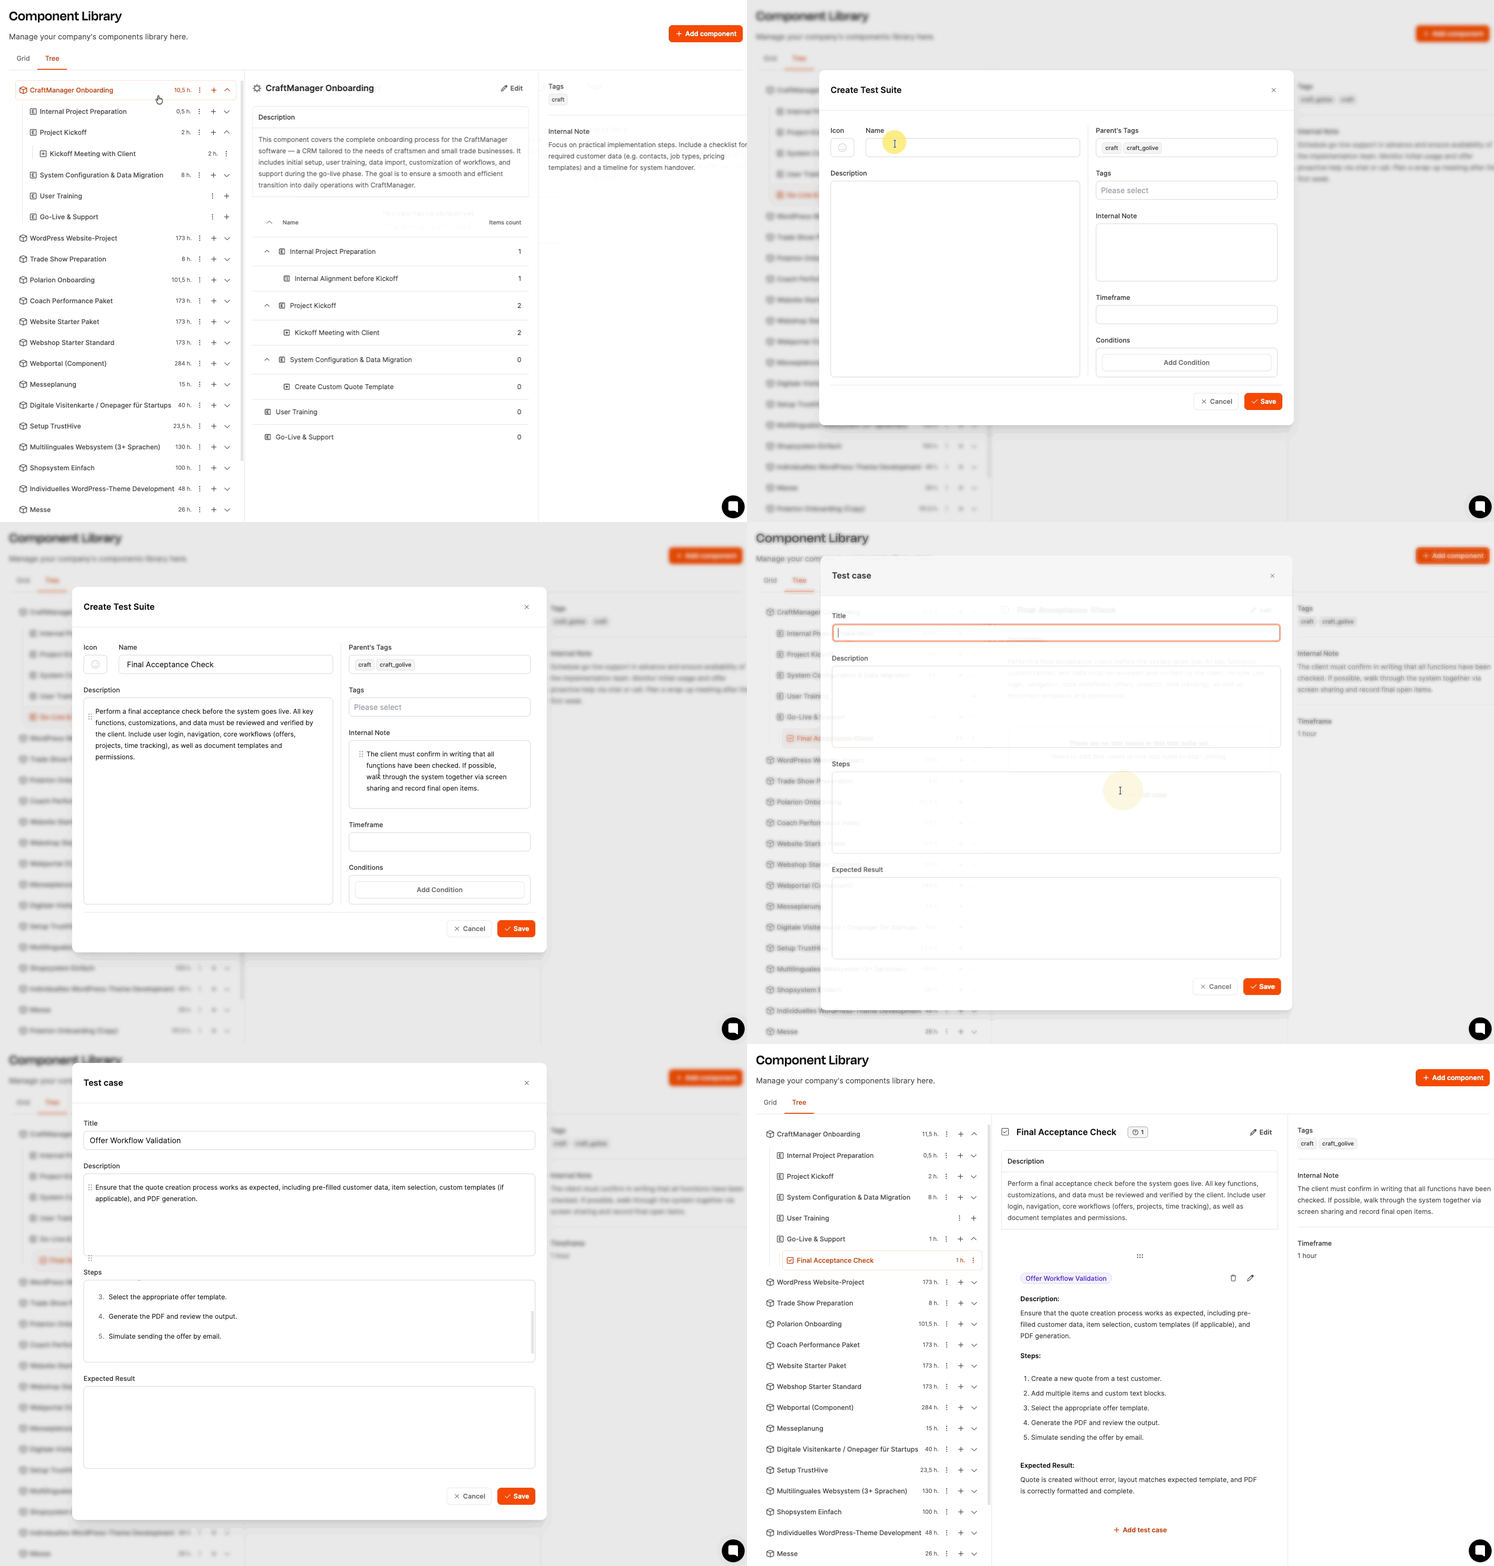
Acceptance tests are a special type of work package. They work similarly to checklists, but include detailed test steps and expected results.
An acceptance test defines:
- Test title
- Description of the test scope
- Specific execution steps
- Expected result
Here’s how:
-
In the “Go-Live & Support” Epic, click the plus icon.
-
Select “Create acceptance test”.
-
Fill in the fields:
-
Title: for example, “Test email integration”
-
Description: for example, “Please check whether the email integration with the CRM works correctly.”
-
Steps:
- Add the customer’s email account to the CRM
- Send a test email to the customer
- Check whether the email appears in the CRM outbox
- Check whether the customer’s reply appears in the CRM inbox
-
Expected result: “Emails are displayed correctly in both the outbox and inbox. No error messages.”
-
-
Save.
A tester checks the requirements and documents the result. If a test fails, a new ticket can be created directly from it to fix the problem.
Conclusion
In this workshop, the HandwerkerPro team developed a comprehensive, flexible, and intelligent project component for CRM onboarding. The component:
- Clearly structures the entire onboarding process into Epics and work packages
- Uses forms to respond flexibly to different customer situations
- Uses conditions to display only relevant tasks
- Enables realistic budgeting through minimum effort estimates
- Integrates acceptance tests for a quality-assured go-live phase
- Schedules lessons learned to enable continuous improvement
This component now serves as a reusable template for all future onboarding projects and ensures that every new customer is introduced to the CRM system professionally, systematically, and efficiently.