
Project Tree
The project tree controls the structure, requirements and effort of a project and creates production-ready tasks from them.
Find this under Projects → [Select individual project] → Project planning → Project tree.
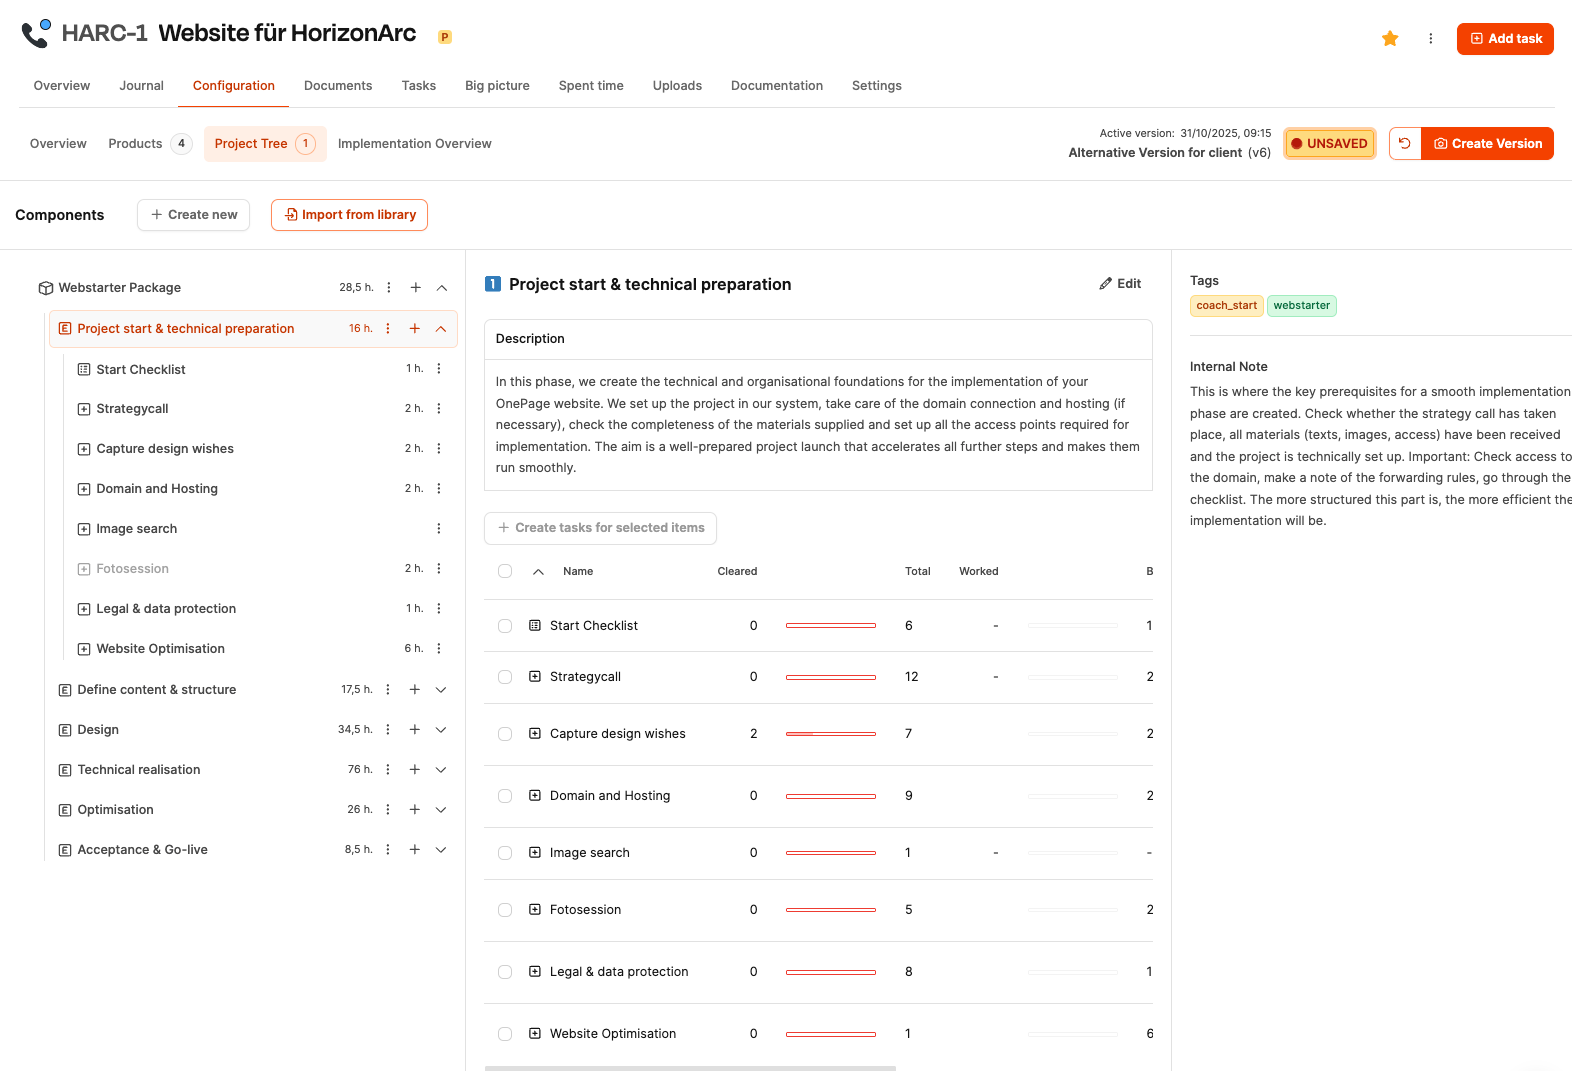
The project tree is the central tool for preparing the content of an individual project in Leadtime. It combines structured requirements collection, configurable project logic and operational execution into a coherent overall process. In this area, predefined project components are imported, adapted to the customer’s individual requirements and converted into editable tasks. The information recorded influences the project scope, the effort and all downstream documents - in particular the specifications and later also the offer. This creates a resilient, comprehensible and audit-proof basis for the entire project implementation.
Advantages
The project tree enables a systematic, methodical approach to project preparation. By reusing standardized components, the error rate decreases significantly. Customers are actively involved in the requirements definition without having access to internal tools. At the same time, the dynamic project structure increases the scalability of the organization, as different customer situations can be mapped without individual redefinition. The integration with operational tickets ensures that the project configuration goes seamlessly into implementation.
Overview
Interaction with the component library
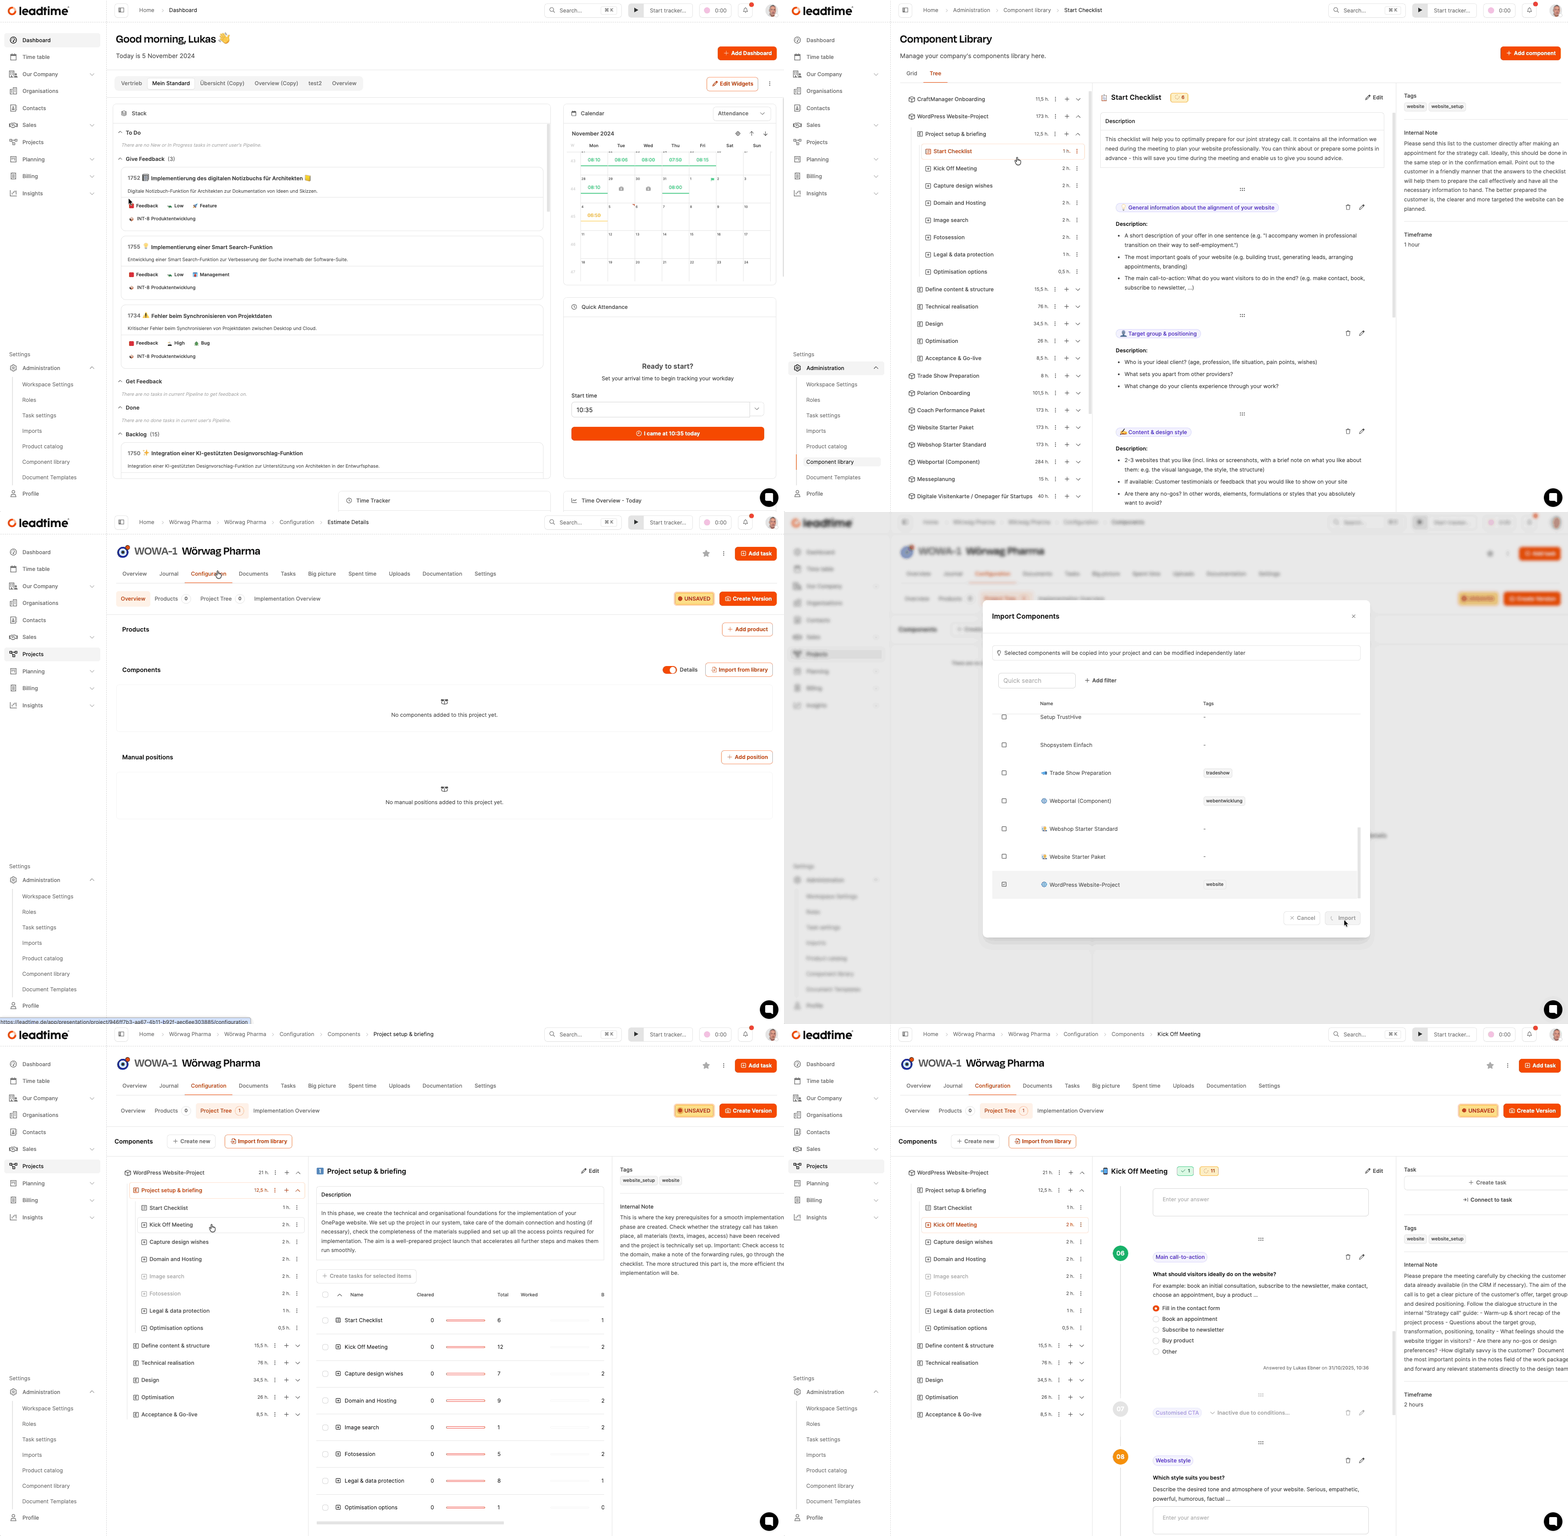
Under Administration → Project components, the organization maintains a collection of reusable project templates. These templates are pre-structured, generic templates of projects that the organization needs to carry out on a regular basis. The templates already contain structured work packages, descriptions, questionnaires, test procedures and effort estimates. When you start a new project, one or more of these components are imported into the project using the “Import from library” button. Each imported component is copied completely and can be changed independently within the project without affecting the original in the library.
How to create project templates in the component library: Project templates
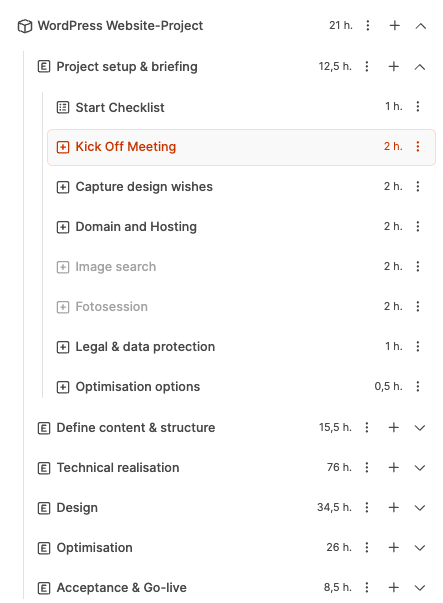
After importing, the component appears in a hierarchical tree structure in the left column of the interface. All elements can be opened and closed to keep a quick overview. The project tree is typically divided into larger thematic areas (epics), which in turn consist of specific work packages. In addition, there are checklists for preparatory customer work and test suites for structured acceptance processes. This hierarchy ensures that projects of different sizes can be structured consistently and comprehensibly.
The building blocks of project components
Detailed view in the project tree
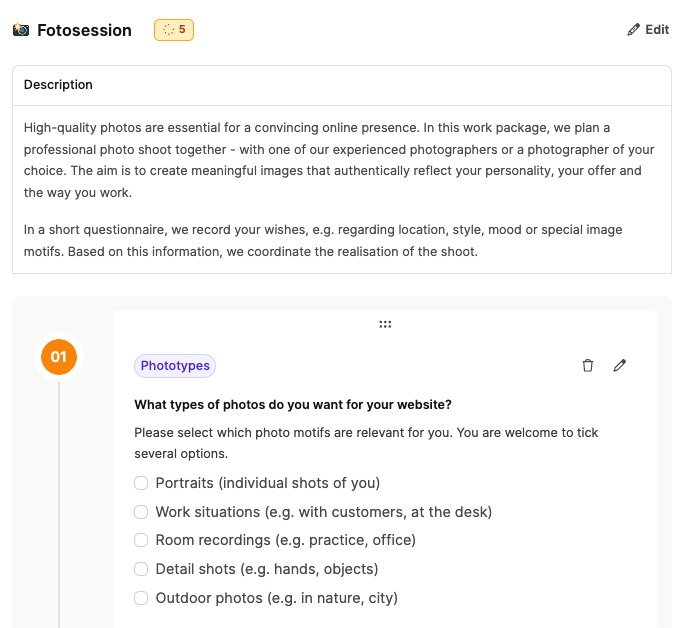
If an element is selected in the tree, a detailed view appears in the central column. There you will find detailed descriptions, contingency logic, input fields and, if necessary, questionnaire structures. In addition, a task can be created at this point, which is then processed in the team’s ticket system. In this way, defined requirements are immediately transformed into operationally implementable work steps.
Additional information and internal communication
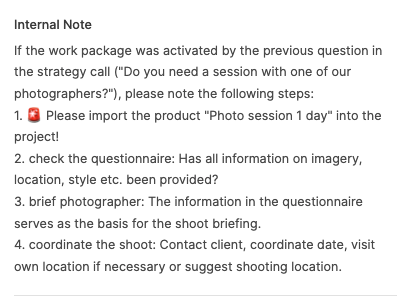
The right column contains additional information that is not visible to the customer. This includes internal notes, tags for structuring, effort estimates and linked tasks. Based on this data, the team can set priorities, assign responsibilities and track progress. Since internal information is only visible internally, more sensitive information can be recorded securely there.
Work packages and content configuration
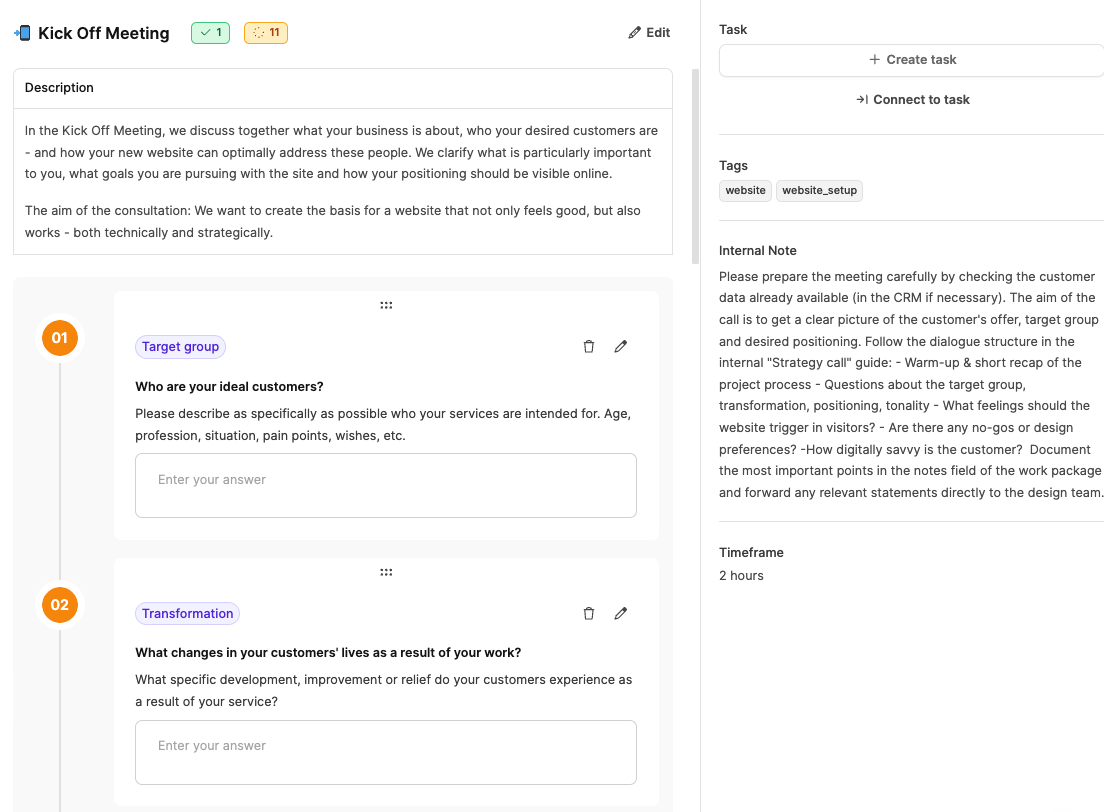
Work packages form the operational core of the project tree. They contain descriptions, cost estimates and often questions that are answered in direct customer discussions. The answers have a direct impact on the structure of the project. This means that additional tasks can become visible, optional content can be activated or the effort can increase automatically. This dynamic logic ensures that different customer requirements can be reliably mapped based on the same template.
The building blocks of project components
Use of checklists and test suites
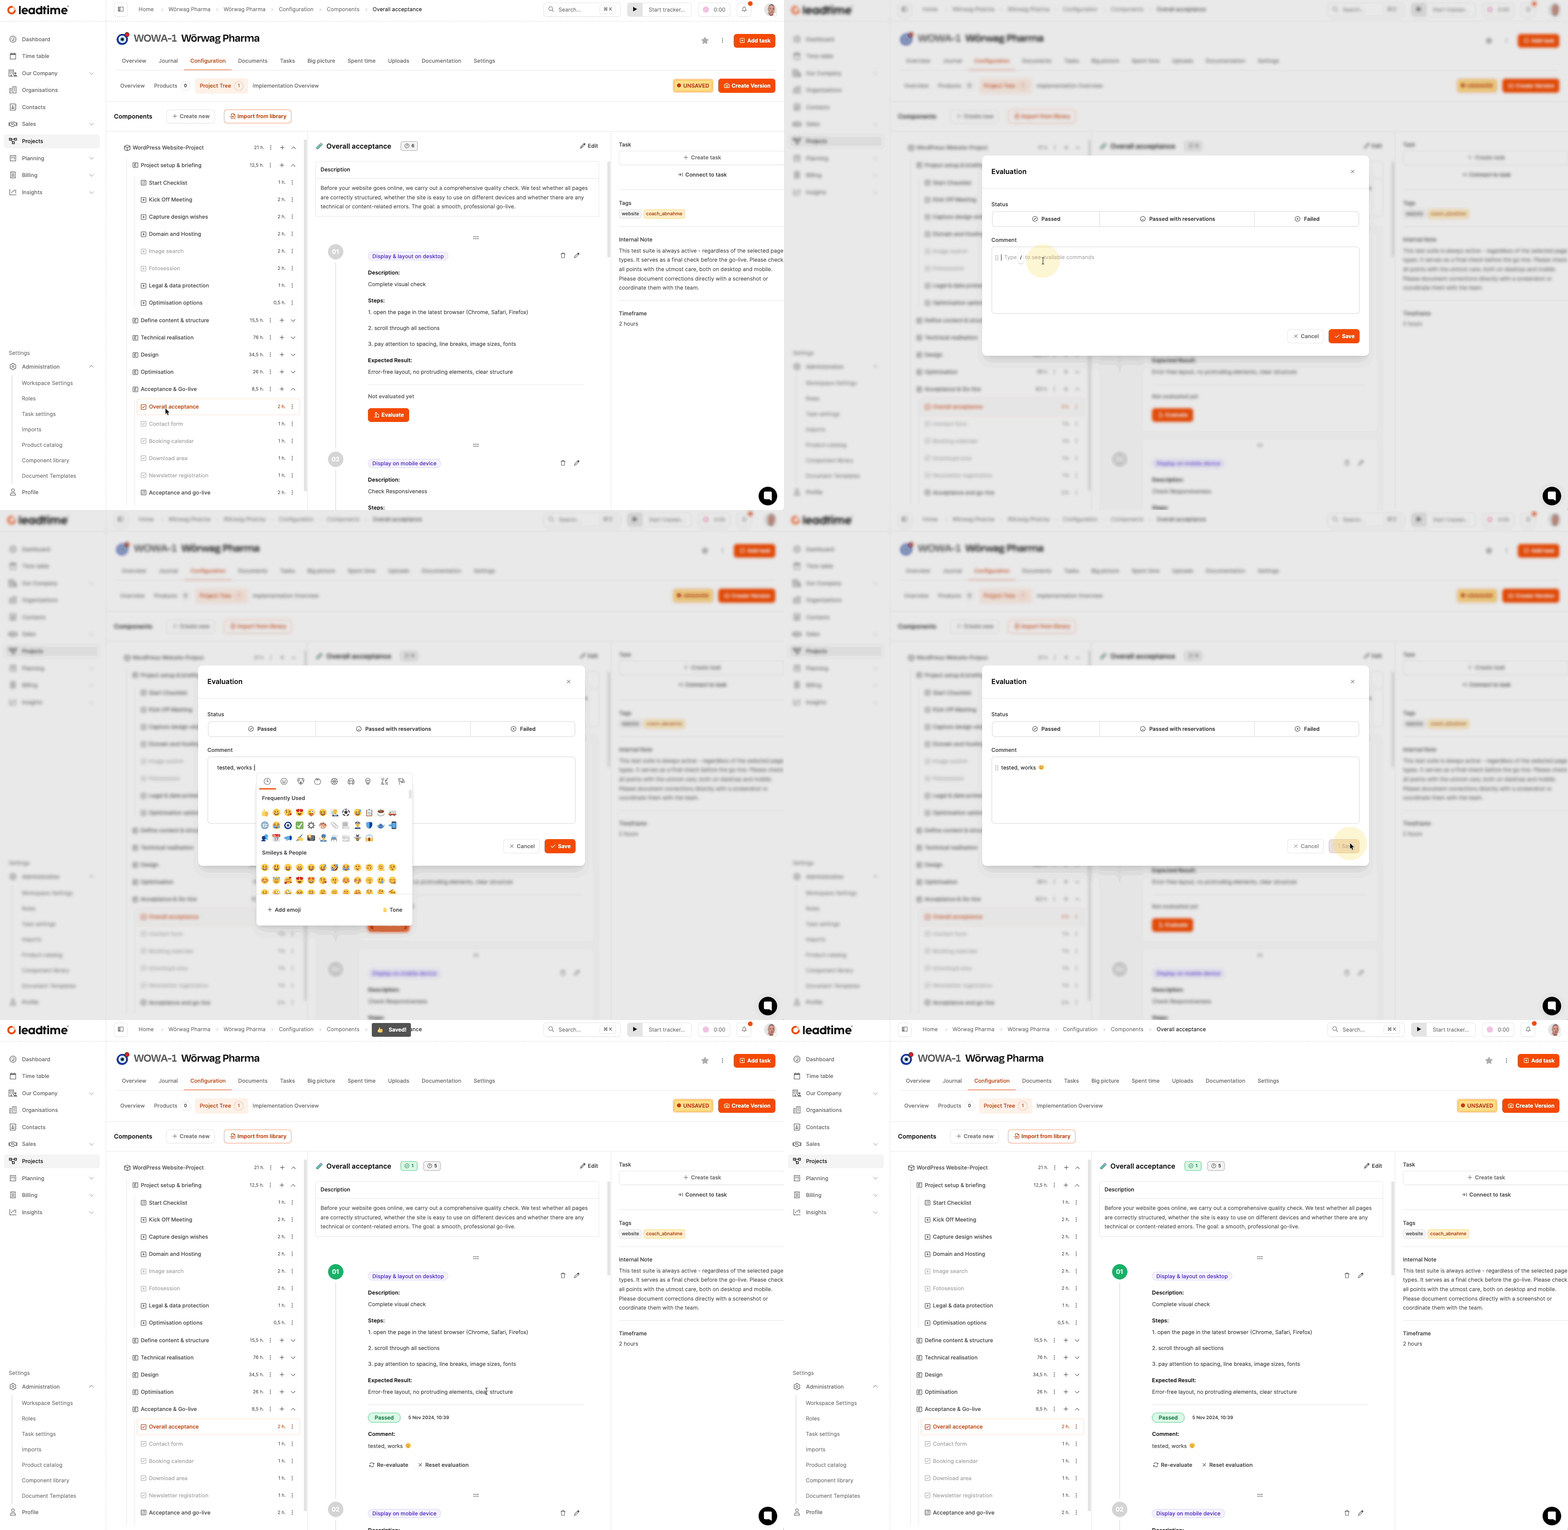
Checklists are particularly suitable for tasks that the customer can prepare themselves. Instead of static documents, the customer receives structured entries in the ticket system that they can process step by step. Test suites, in turn, are used to systematically check at the end of the project whether all functionalities were delivered as agreed. This ensures clear acceptance and reduces queries and correction loops.
Dynamic activation and conditional logic
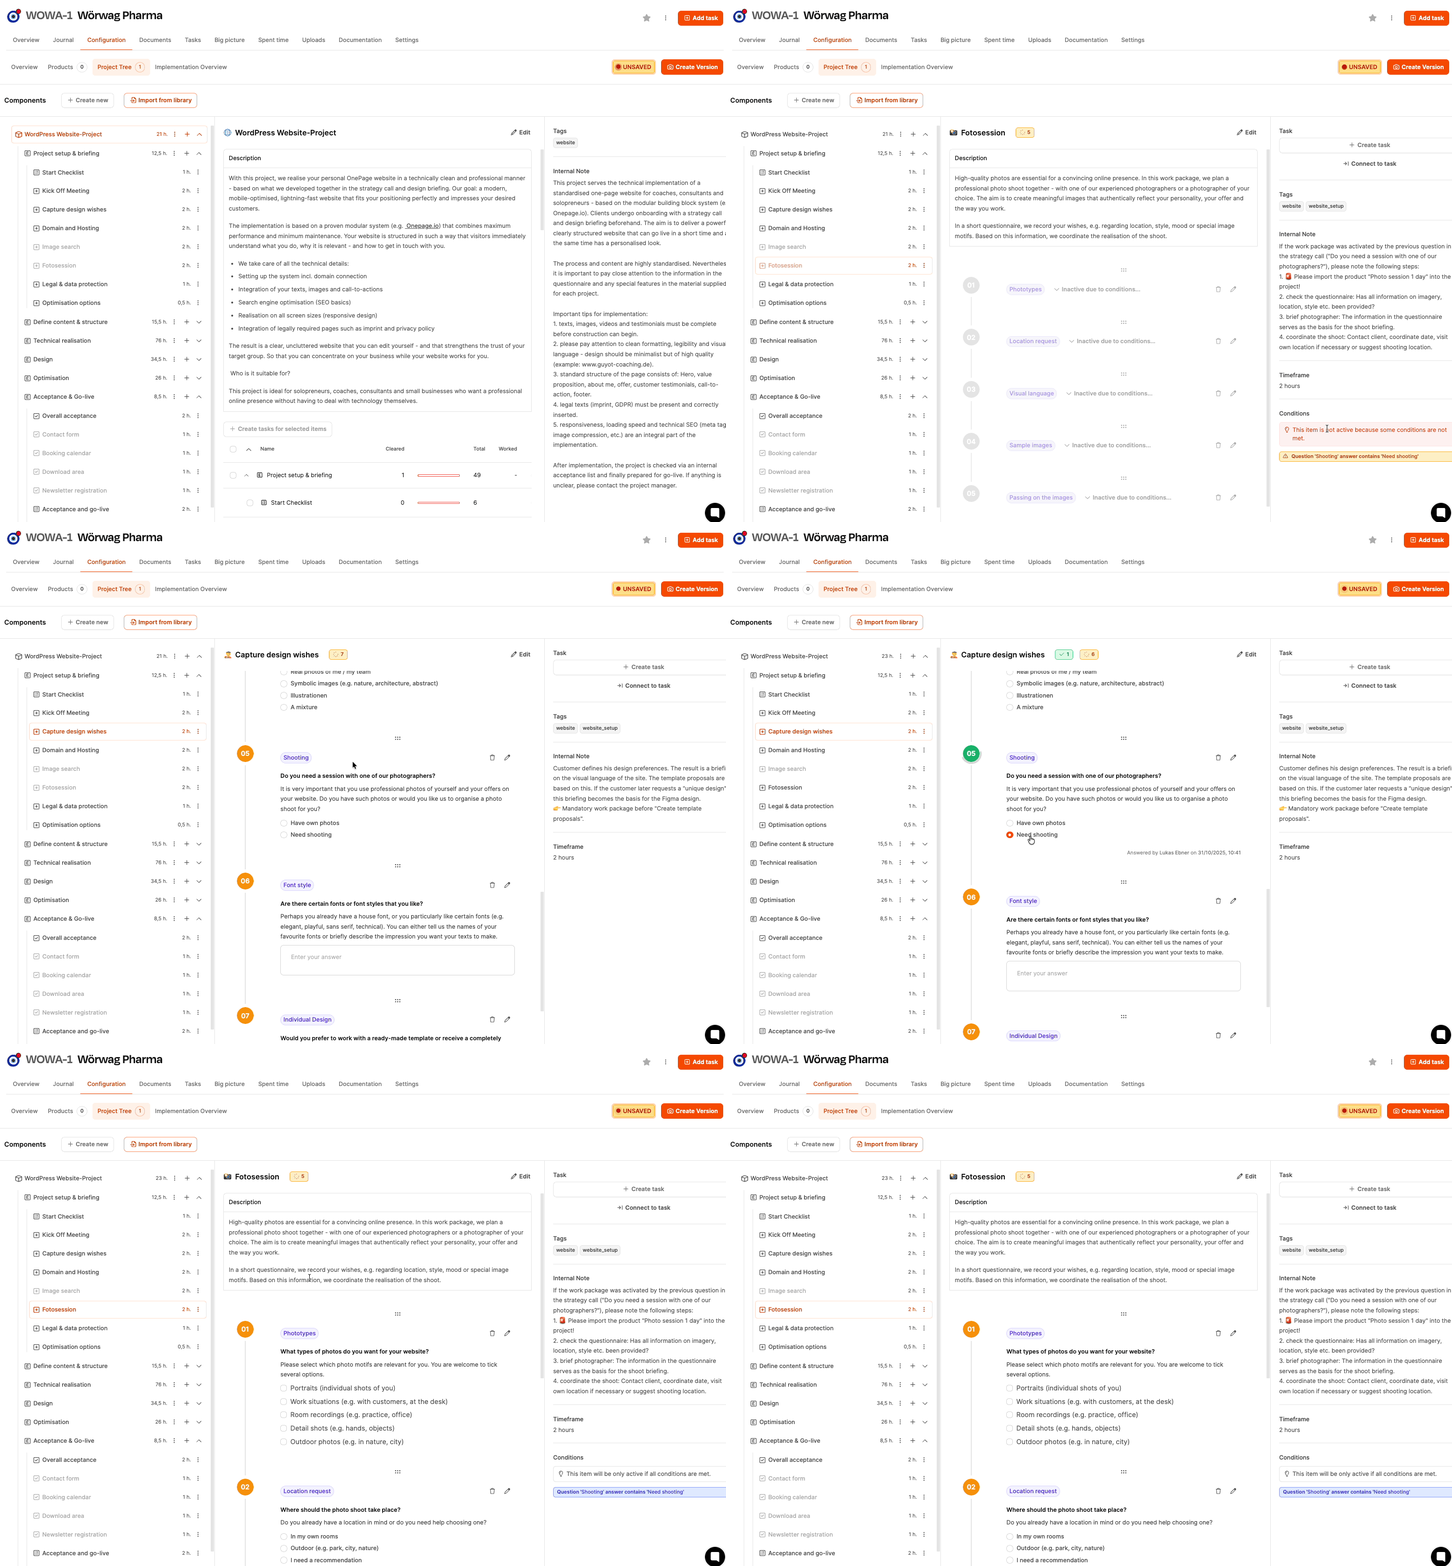
Many project components contain hidden elements that only become visible through certain answers. This means that the project tree automatically adapts to the customer’s needs without the project team having to intervene manually. For example, selecting “Need photo shoot” can lead to an additional work package, which in turn requires a billable product. This automatic structuring enables a scalable and efficient approach, especially for recurring project types.
See Conditions in work packages
Collaboration with customers in the ticket system
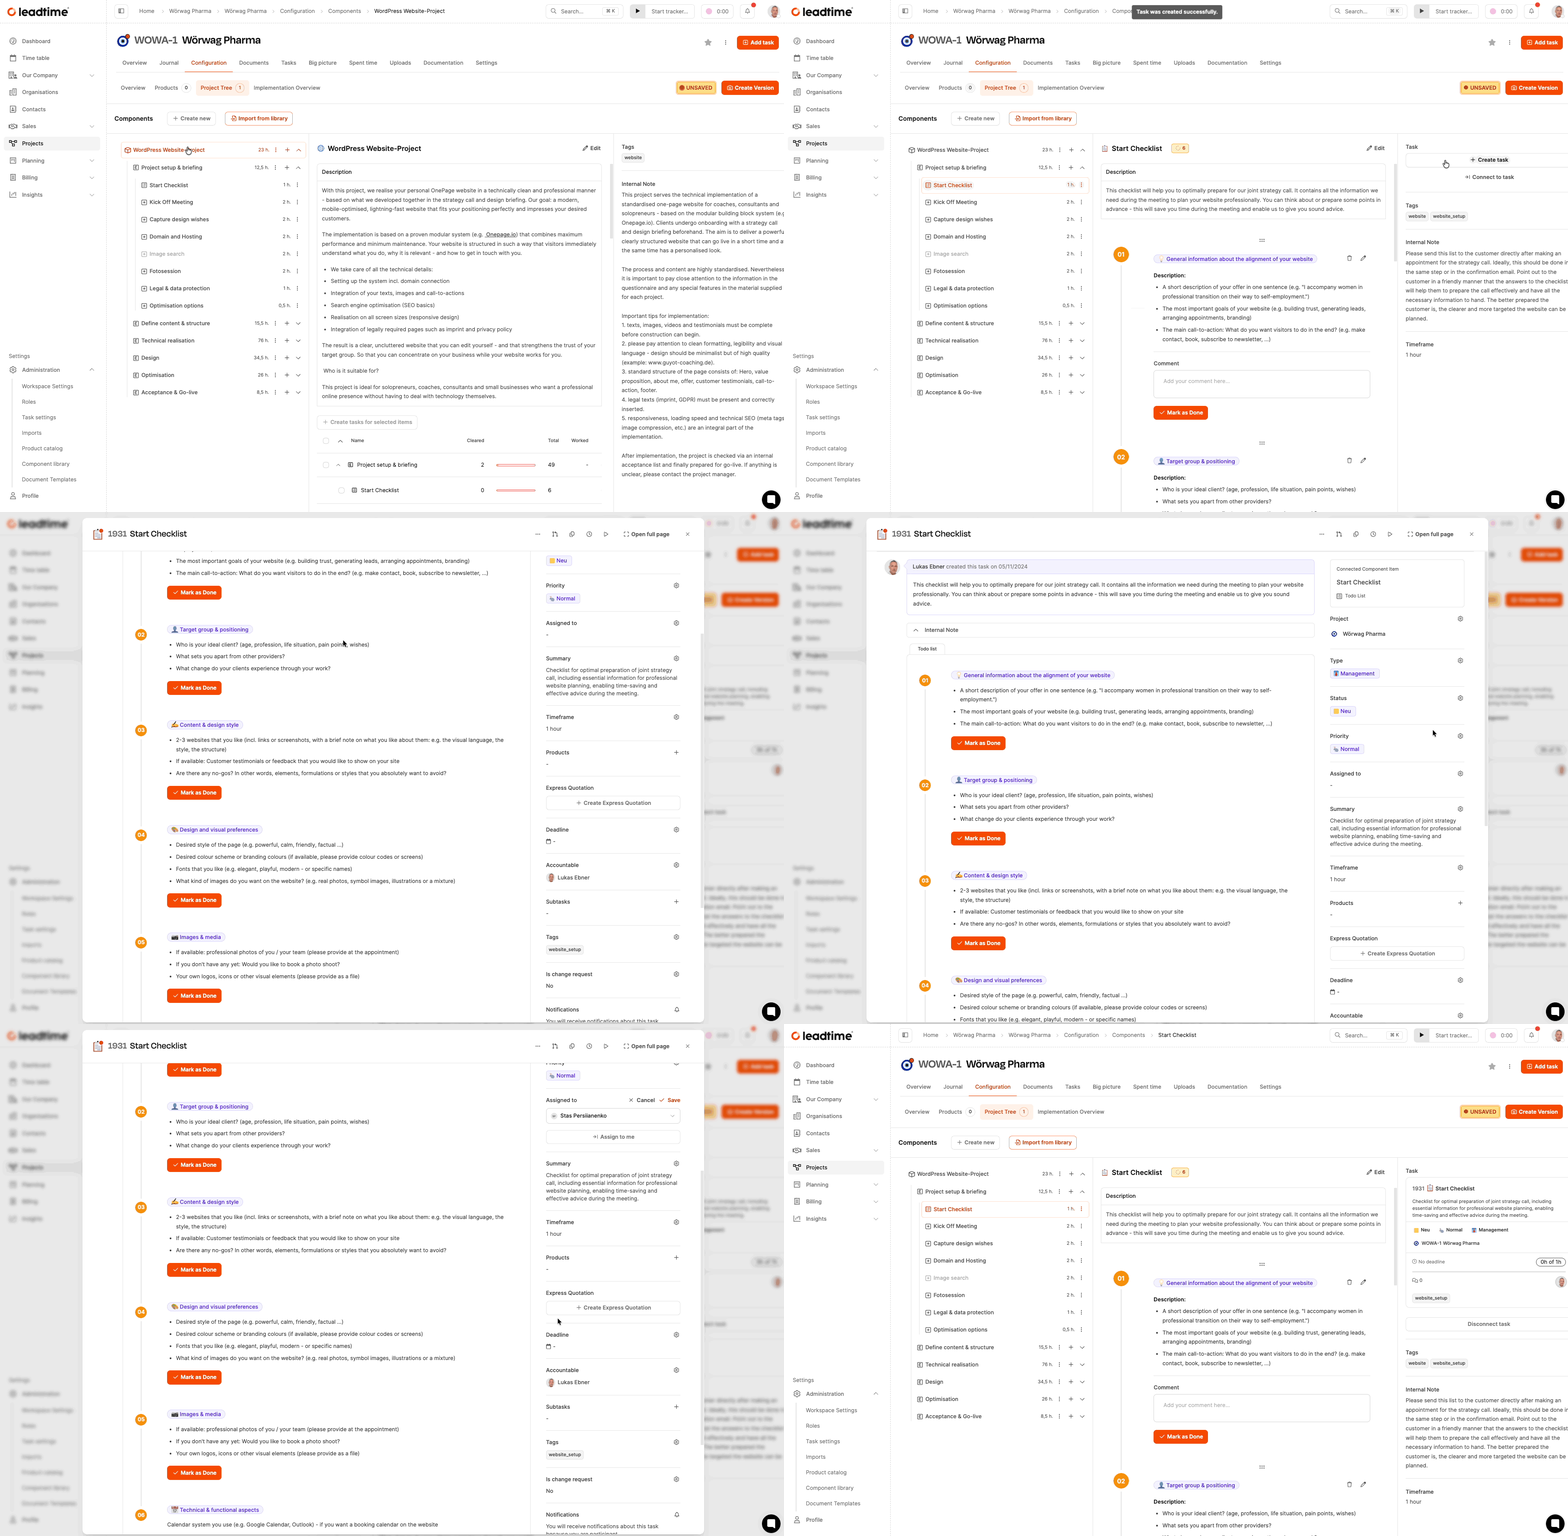
While the project tree is only available to the internal team, tasks are created from it that can be assigned to the customer in the ticket system. In this way, part of the requirements recording can be delegated directly to the customer. The customer answers questions, uploads materials or confirms content. This reduces coordination loops and enables more efficient project management.
Task and ticket generation
Work packages can be converted into tickets at the push of a button. These contain automatically generated descriptions based on the customer’s answers. This gives the team an immediate, actionable brief. Tickets can be assigned, commented on, prioritized and booked within the team. Progress is visible in both the ticket and the project tree, eliminating the need for double maintenance.
Connection to the specifications
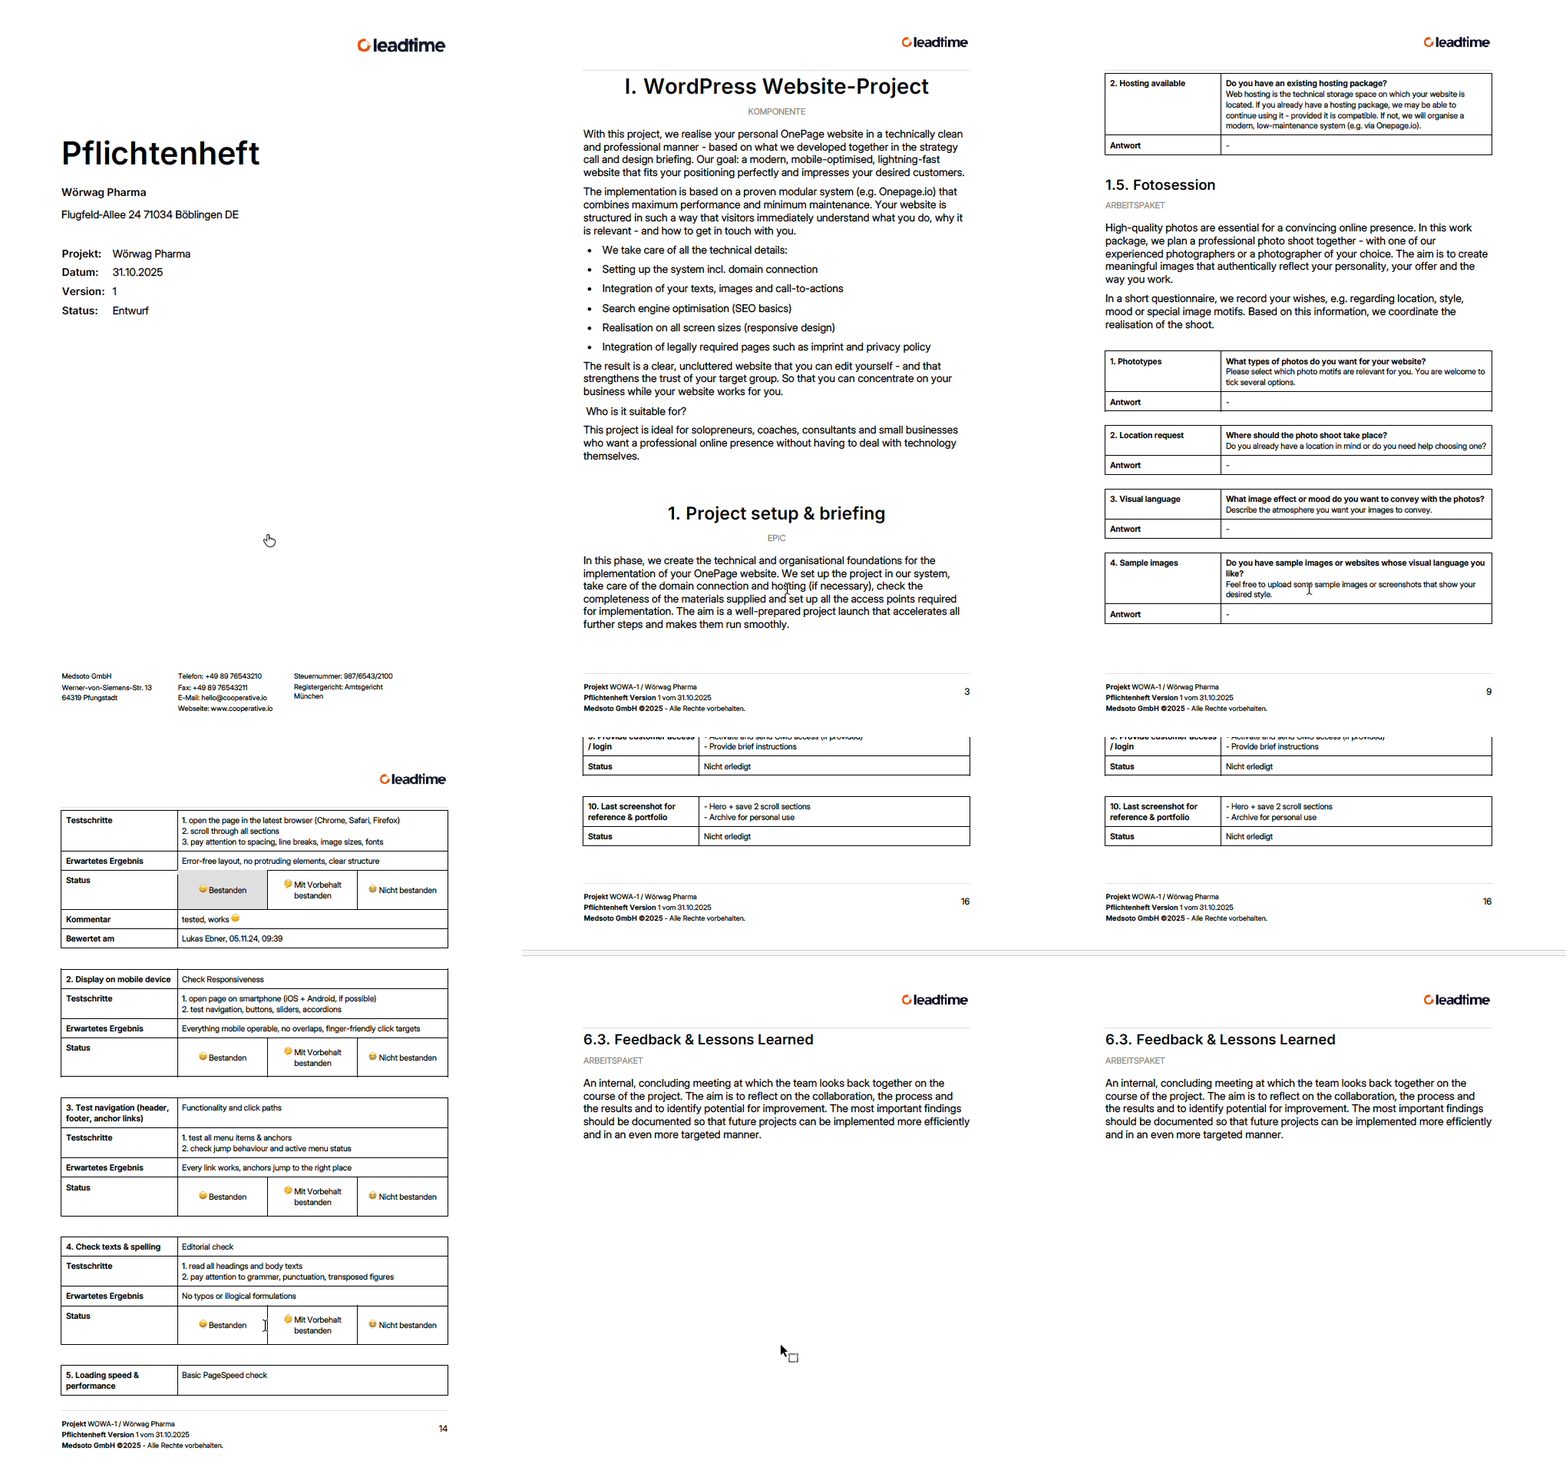
All content configured in the project tree is automatically included in the specifications. This is a textual condensation of all planned services. It later forms a contractually relevant basis. Options, decisions, exclusions and additional expenses are documented transparently. Since the requirements specification is generated from structured data, it is consistent, reproducible and free of transmission errors.
How to create requirements specifications: Projects – Documents tab (individual projects only)
How it works
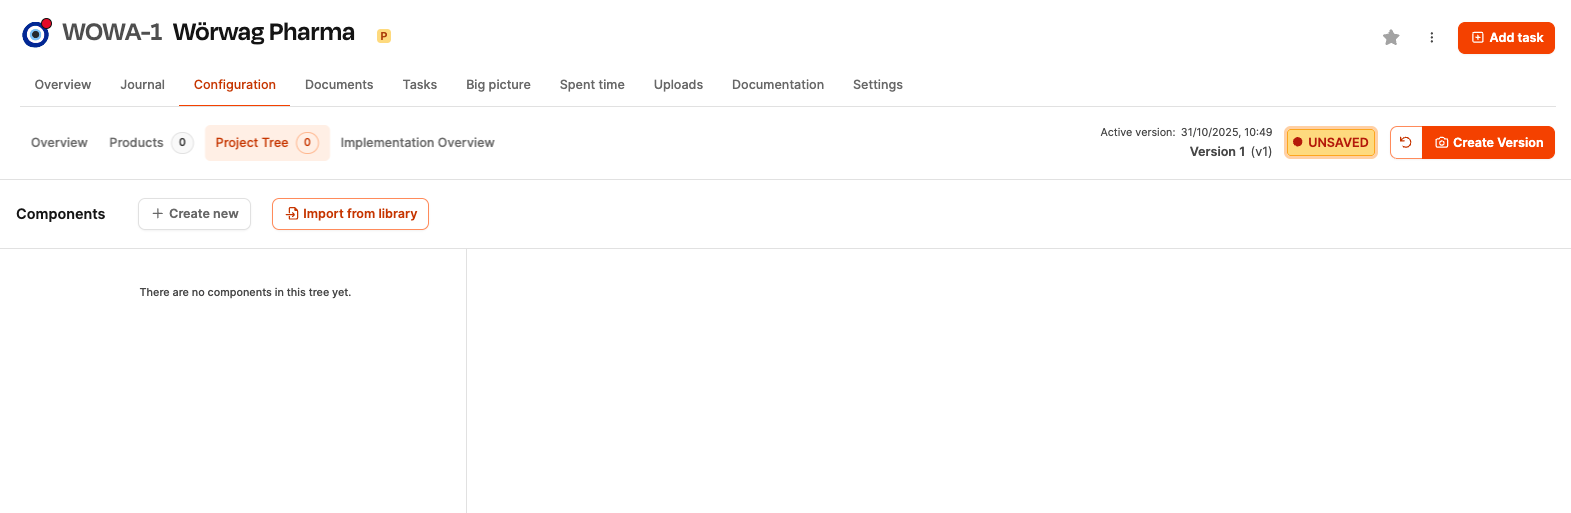
When the project tree is called up for the first time, it is empty. The user has two options:
-
Import component from the library
This route is recommended if it is a project that can be standardized. Organizations can use the library to provide ready-made project templates that are reusable, tested and quality assured.
-
Create component ad hoc
About the button Create new A component can be built directly just for this project. This component lands not automatically in the global component library and is therefore not reusable. This approach is suitable for individual or special projects. However, a component created ad hoc in a project can be included in the component library using the context menu function “Export to Library”.
After import or creation, the structure is immediately displayed in the left tree; all further processing takes place directly there.
How to create project templates in the component library: Project templates
Working method in practice
A typical process:
- Open project tree
- Import project component(s).
- Discuss work packages with customers
- Capture answers
- Check dynamic packages
- add internal information
- Validate effort
- Save version
- Generate tickets
- Start implementation
This creates a clean, reproducible business process.
Element types in the project tree
There are four basic building blocks in the project tree that make up the structural process of a project:
The building blocks of project components
Epics
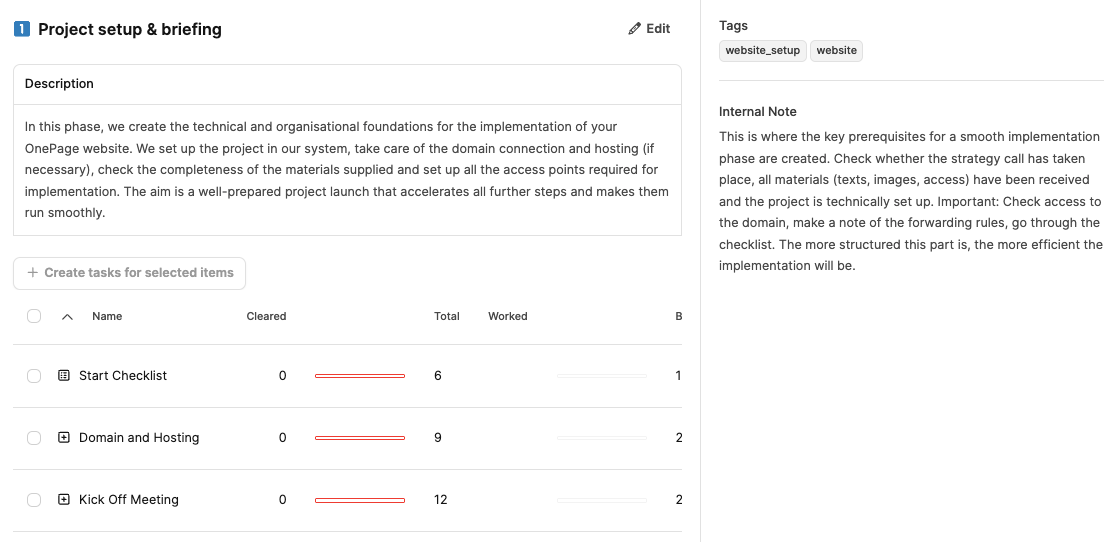
Epics represent large thematic sections of the project (e.g. “Design”, “Technical Realization”). They structure the scope logically and help to group work packages sensibly.
Work packages
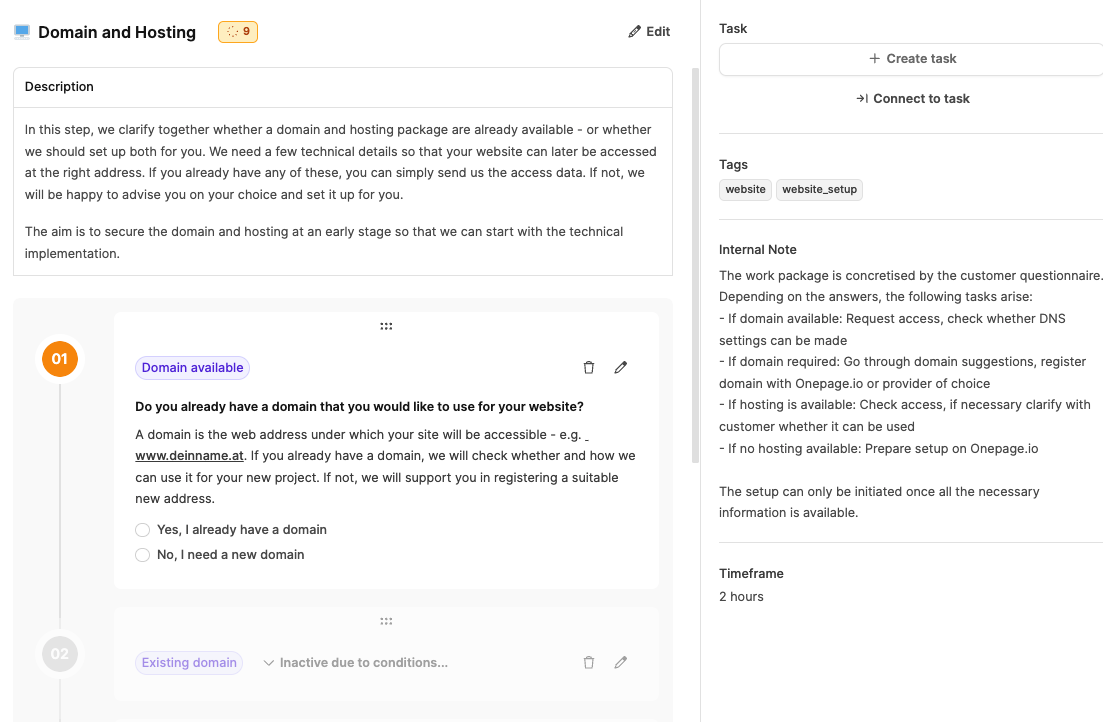
These are the operational work units. They contain:
- Descriptions and contexts
- Questionnaires to clarify requirements
- dynamic logic (activating conditions)
- Effort (in hours)
- the ticket creation button
Work packages are the basis for later tickets and therefore the actual production unit of the project.
Checklists
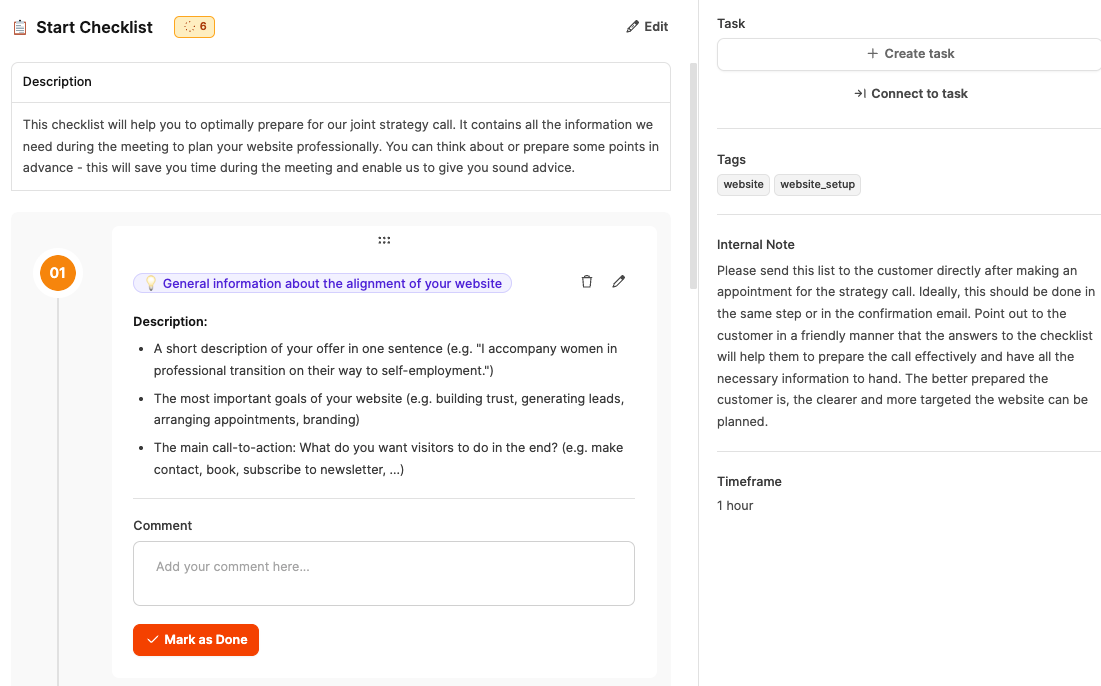
Checklists are used when individual steps need to be checked off by the customer or team. Examples: “Delivery of material”, “Collect SEO data”.
Test suites
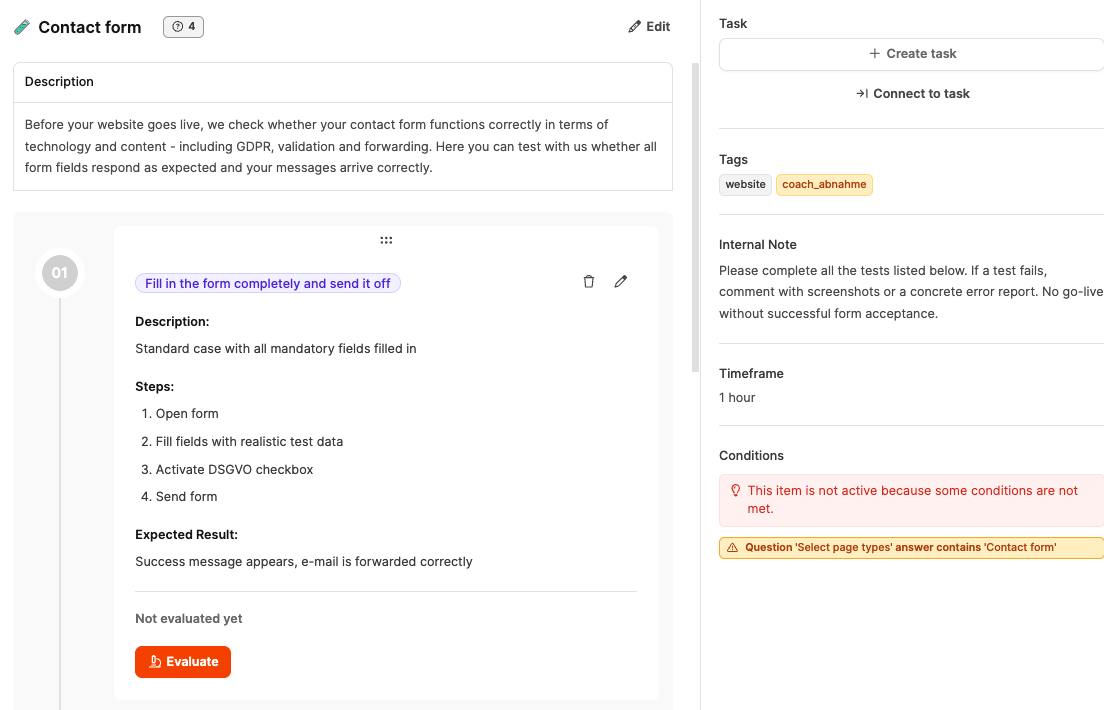
Test suites consist of predefined test cases that are typically used for acceptance and quality assurance (e.g. “Website Responsive Test”).
Navigation and control in the tree
Fold in and out
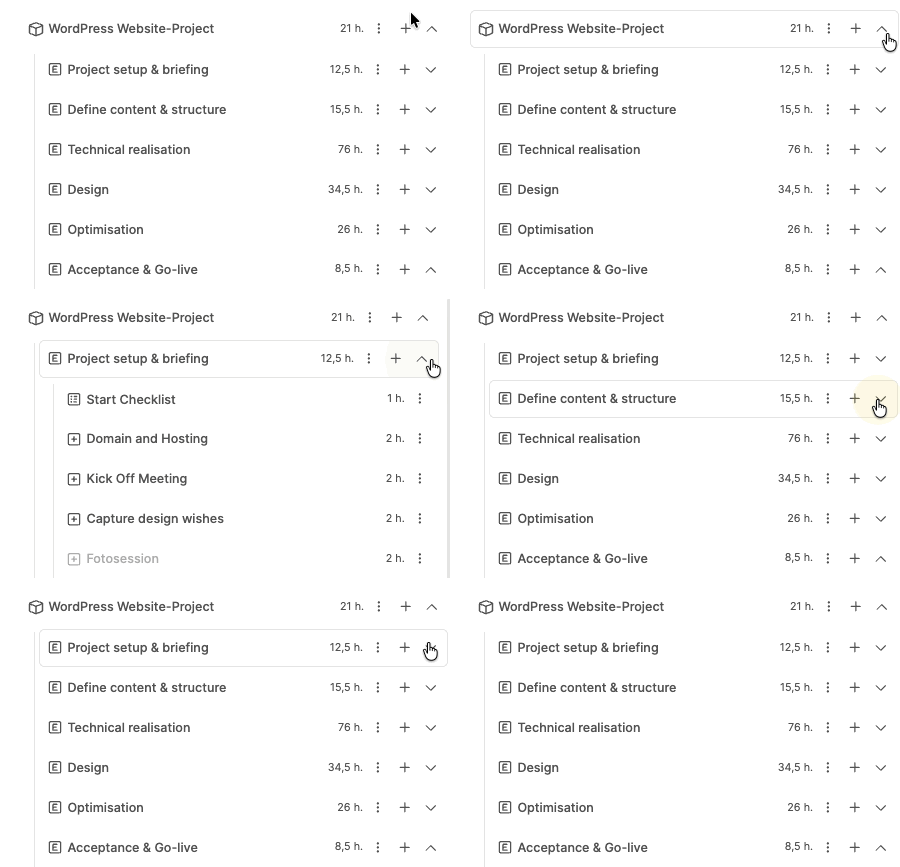
Epics and their content can be structurally shown and hidden using arrows. This helps to maintain an overview in large projects.
Drag and drop
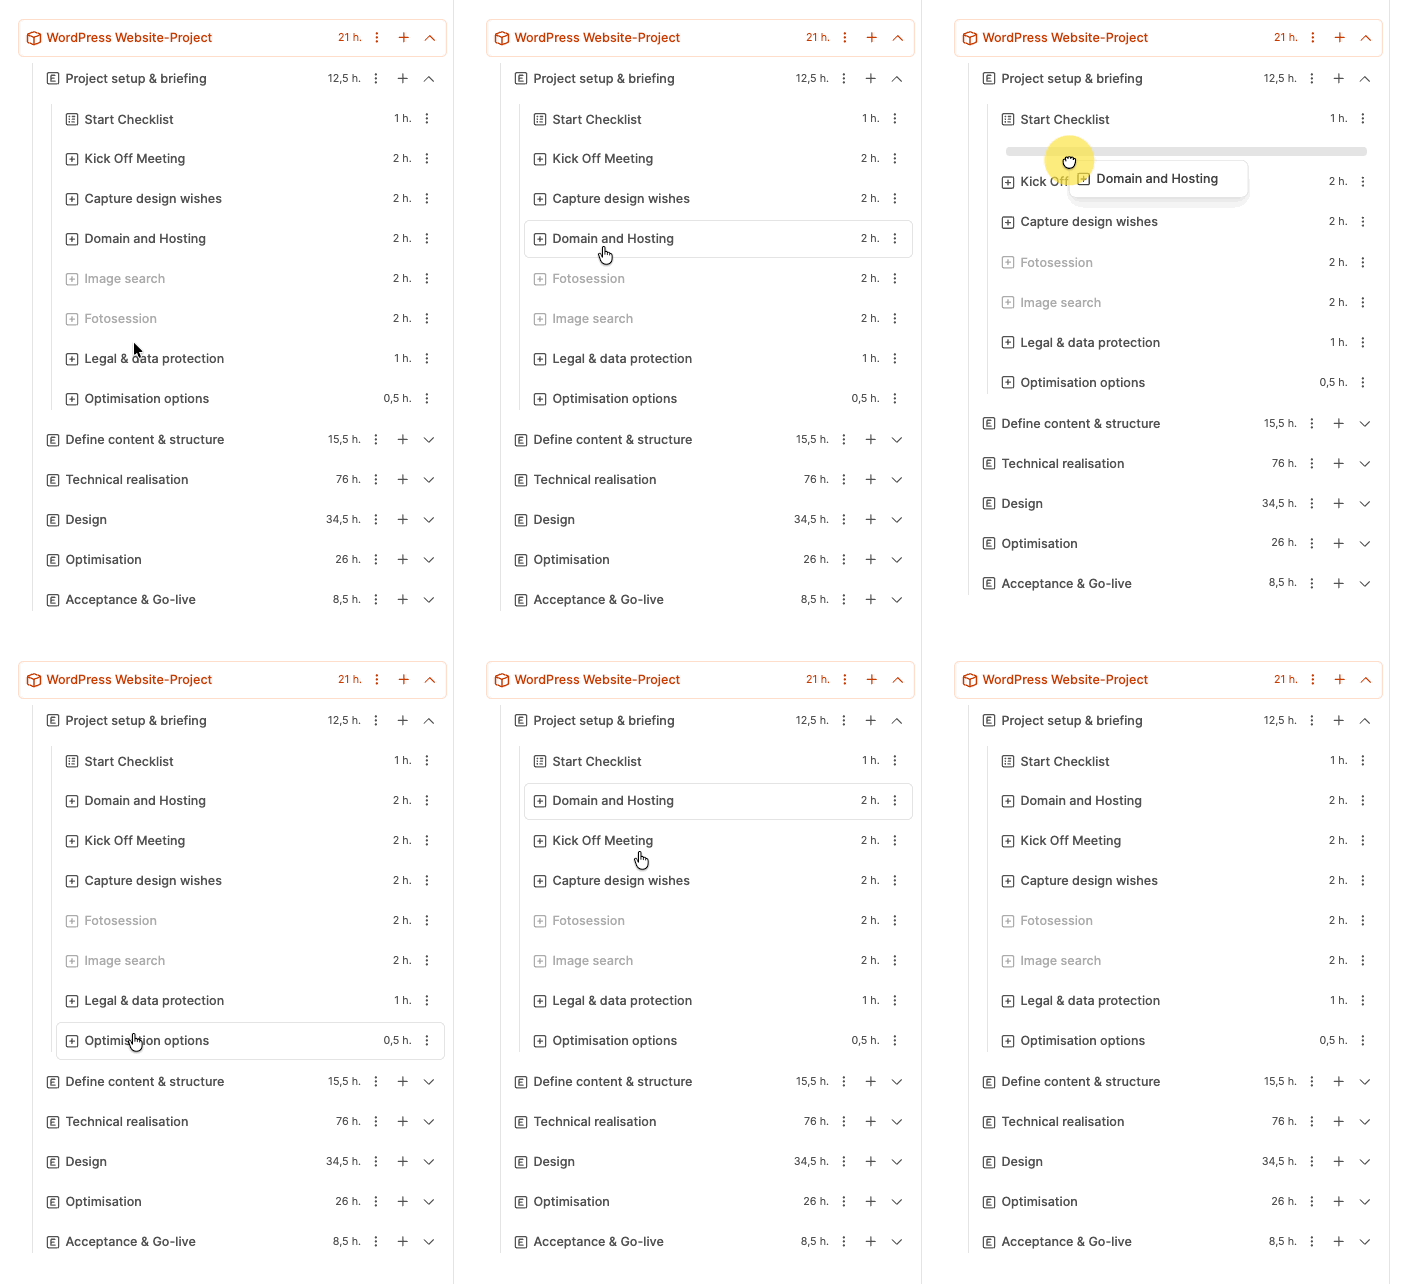
Elements can be moved in the tree:
- Change order
- Move work packages between epics
- define new logical order
This means that even more useful structures can be created later.
Context menus and control functions
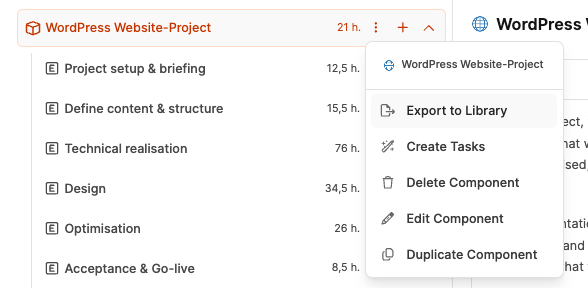
Each element has a menu (three-dot symbol). Options vary by item type, but typically include:
-
Create Tasks
Generates tickets for all subordinate work packages. Important: Only run when configuration is complete.
-
Delete
Removes the item from the project (not from the global library).
-
Edit
Opens the editing mask for basic data such as description, internal information, tags, time spent.
-
Duplicates
Duplicates elements (e.g. multiple product variants, recurring task blocks).
The following are also available at the component level:
Export to Library
Allows you to restore a custom component to the global library. This allows individual adaptation to be standardized in the long term.
Add elements
A plus button below the component allows you to create new structural elements within the tree. Possible are:
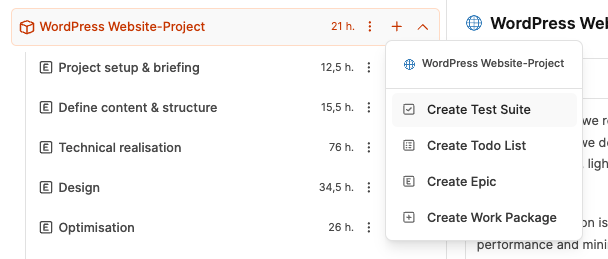
- new epics
- new work packages
- new checklists
- new test suites
This means that the standard can be expanded at any time for a specific project without changing the global component.
Detailed view of a selected element
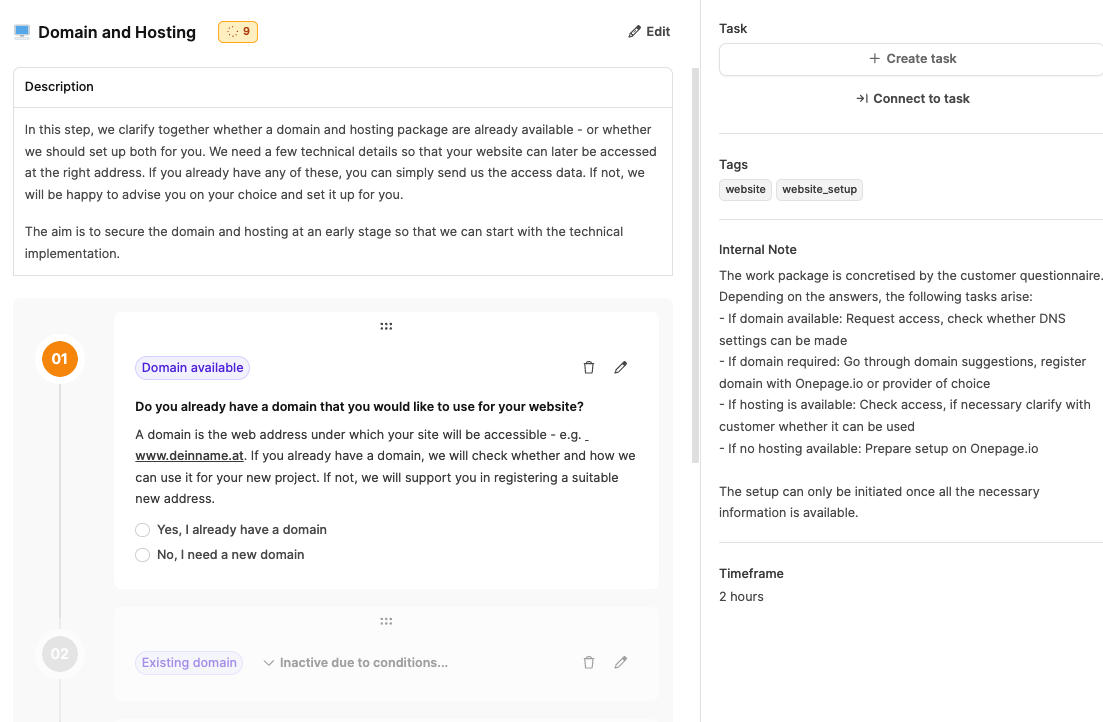
When you click on an element, the detailed view opens in the middle. It consists of:
-
Description
Explanation of the content of the work package.
-
Question areas
The customer or the team answers structured questions here. The answers influence:
- Effort
- Activation of optional packages
- Structure of the requirements specification
-
Comments
Enable queries and internal coordination.
These fields form the basis for later service descriptions.
Dynamic work packages and conditional logic
Many work packages respond to answers:
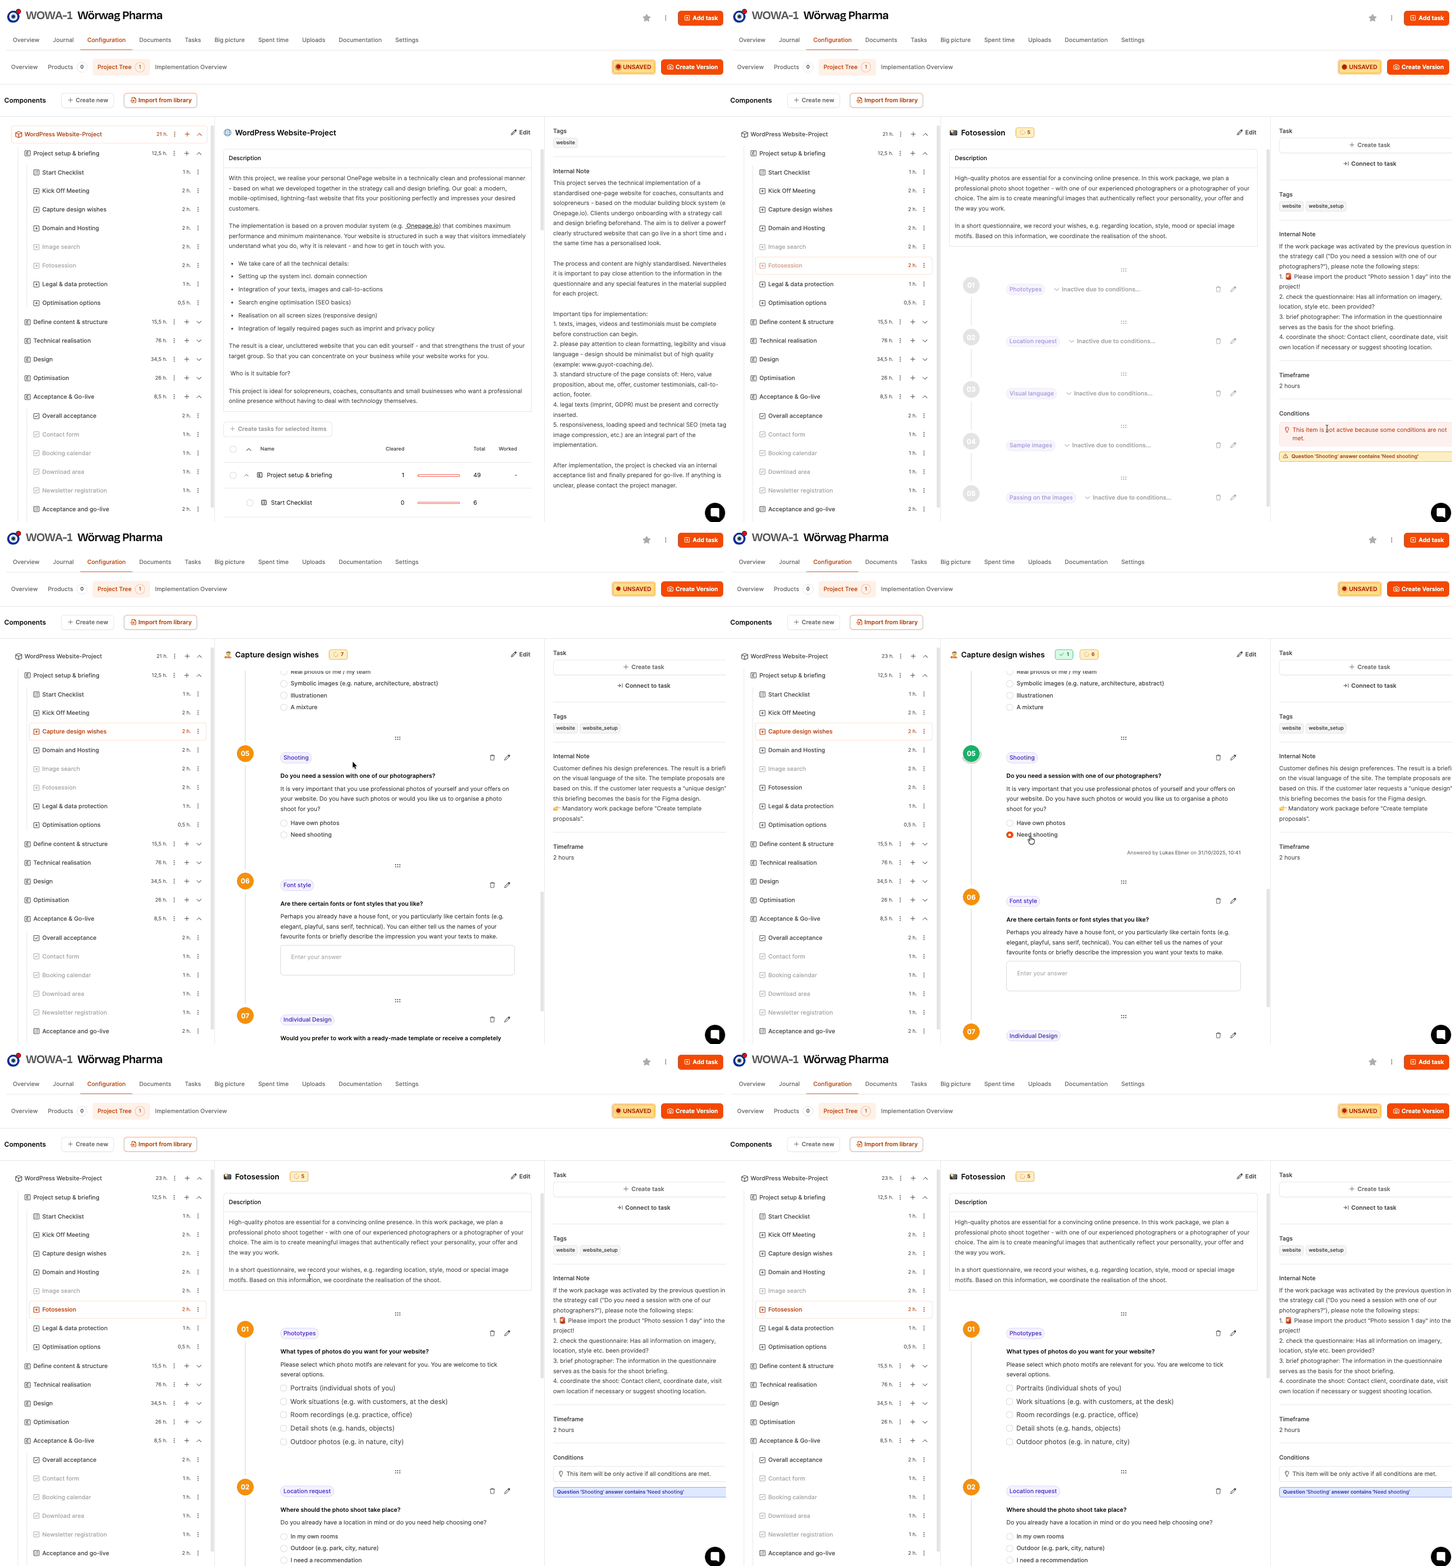
- “Yes/No” decisions activate additional packages
- “Other” displays free text fields
- Requirements automatically increase effort
Example: “Do you need a photo shoot?”
→ Activates the “Photo Session” package and requires the “Photo Shooting Day” product.
This logic makes it easier to model complex variants.
Ticket creation (right column)
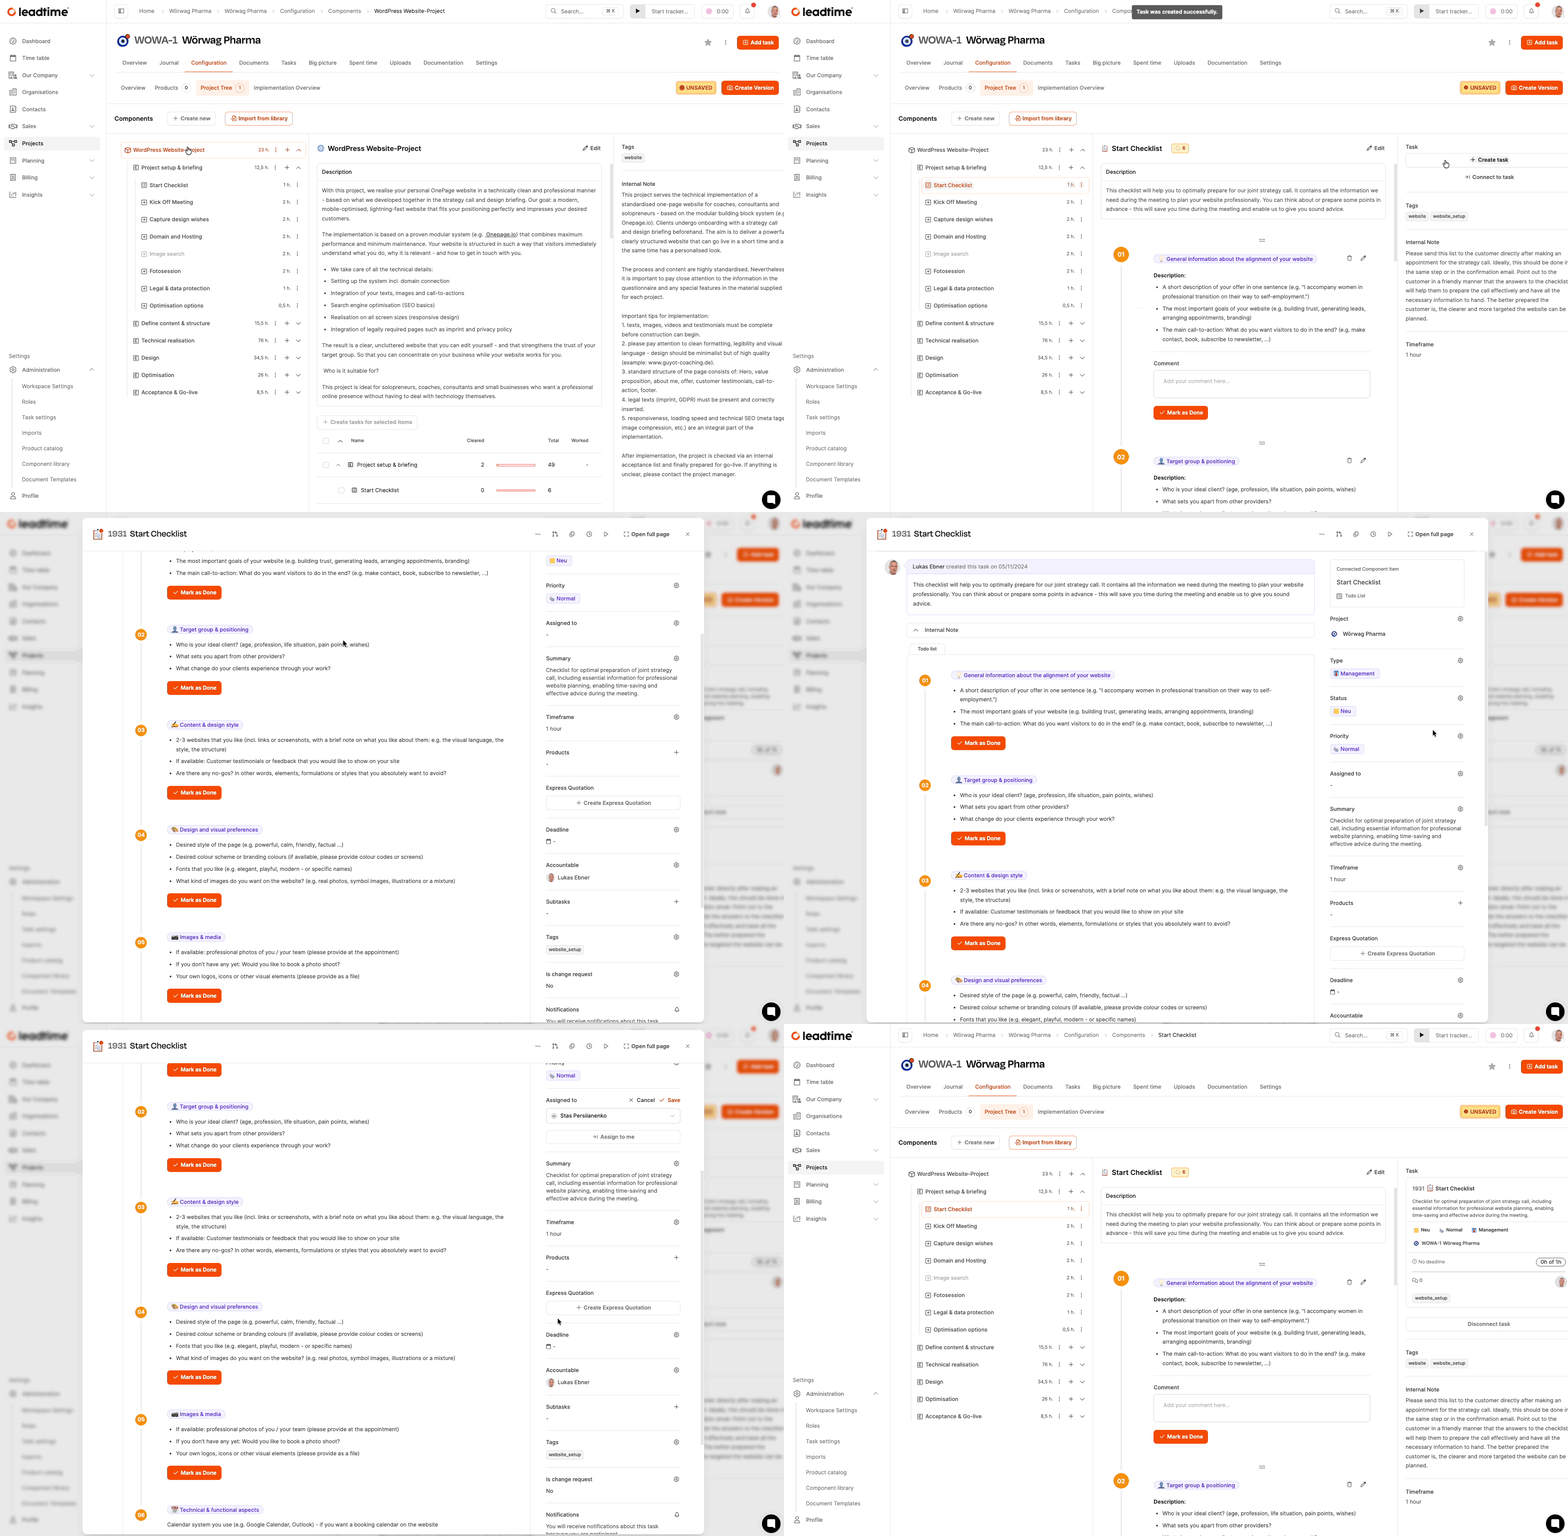
In the right column there is the button:
- Create task
If this is triggered:
- A ticket is created with the information stored in the work package
- Expenses will be covered
- the ticket can be assigned, commented on and timestamped
- Progress is reflected back in the project tree
If later Create tasks is executed at the epic or component level, all tickets that have not yet been generated are created in one operation.
Tags and visibility
Tags are inherited:
- Component tags
- Epic tags
- Work package tags
In the ticket system, tags then help with filtering and assignment.
Example: You can see at a glance which tasks belong to “Design”.
Use tags in project components
Internal notes
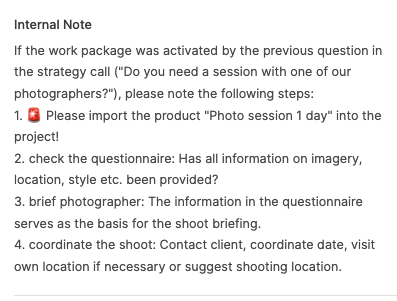
Each element can contain internal clues. These:
- do not appear in the specifications
- are invisible to customers
- contain implementation guidelines, warnings and quality standards
Example: “Pay attention to responsive image sizes”, “Be sure to check data protection for this customer”.
Internal notes act like a built-in memory of experiences.
See Internal notes
Effort and calculation
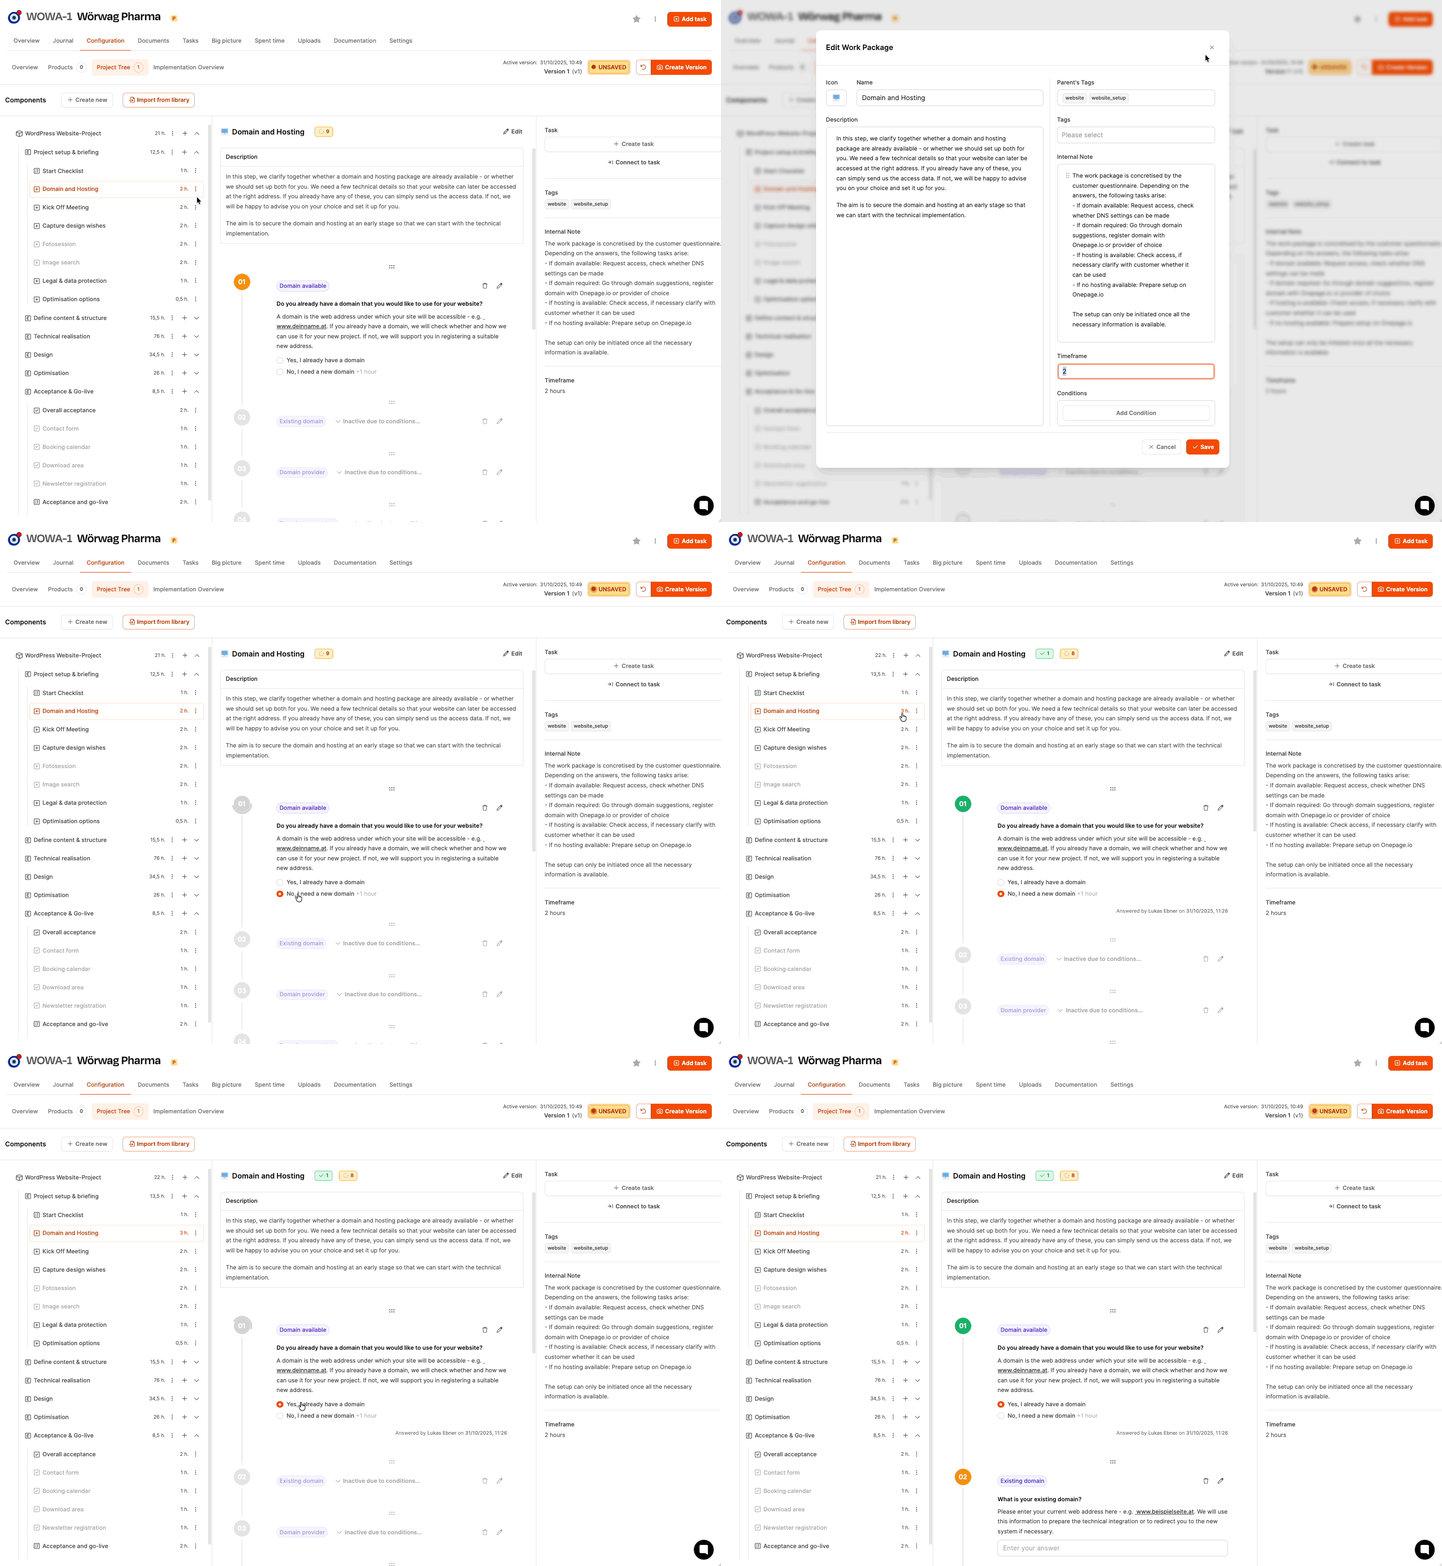
Each work package has a time value in hours. The sum of all expenses:
- forms the offer price (for time-based calculation)
- is documented in the specifications
- is dynamically changed by customer responses
This means that the scope of services automatically becomes relevant to the budget.
How project expenses are calculated
Versioning
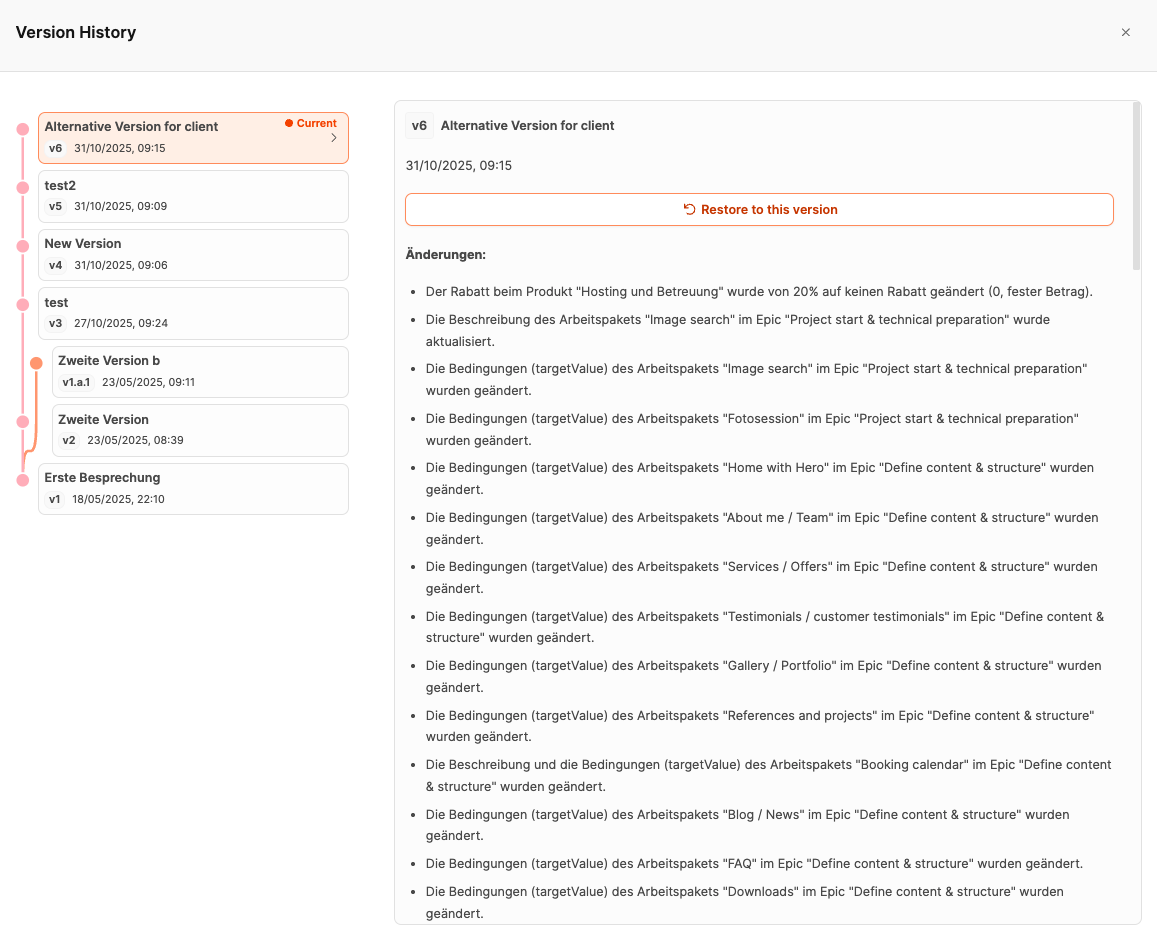
The project tree has a version mechanism. Any substantial change should be saved in a new version, such as:
- customer appointments
- answered questionnaires
- Proposals for expansion
The version documents:
- Scope of services
- Objective
- Change history
The offer approval by the customer is referenced one Project version. This version will later become legally binding.