
The building blocks of project components
How to create Epics, work packages, checklists, and acceptance tests
Project components in Leadtime are used to standardize recurring work steps and processes in projects. They divide a project into clearly defined sections and ensure that similar projects follow a consistent pattern. This improves planning reliability, efficiency, and the comparability of effort.
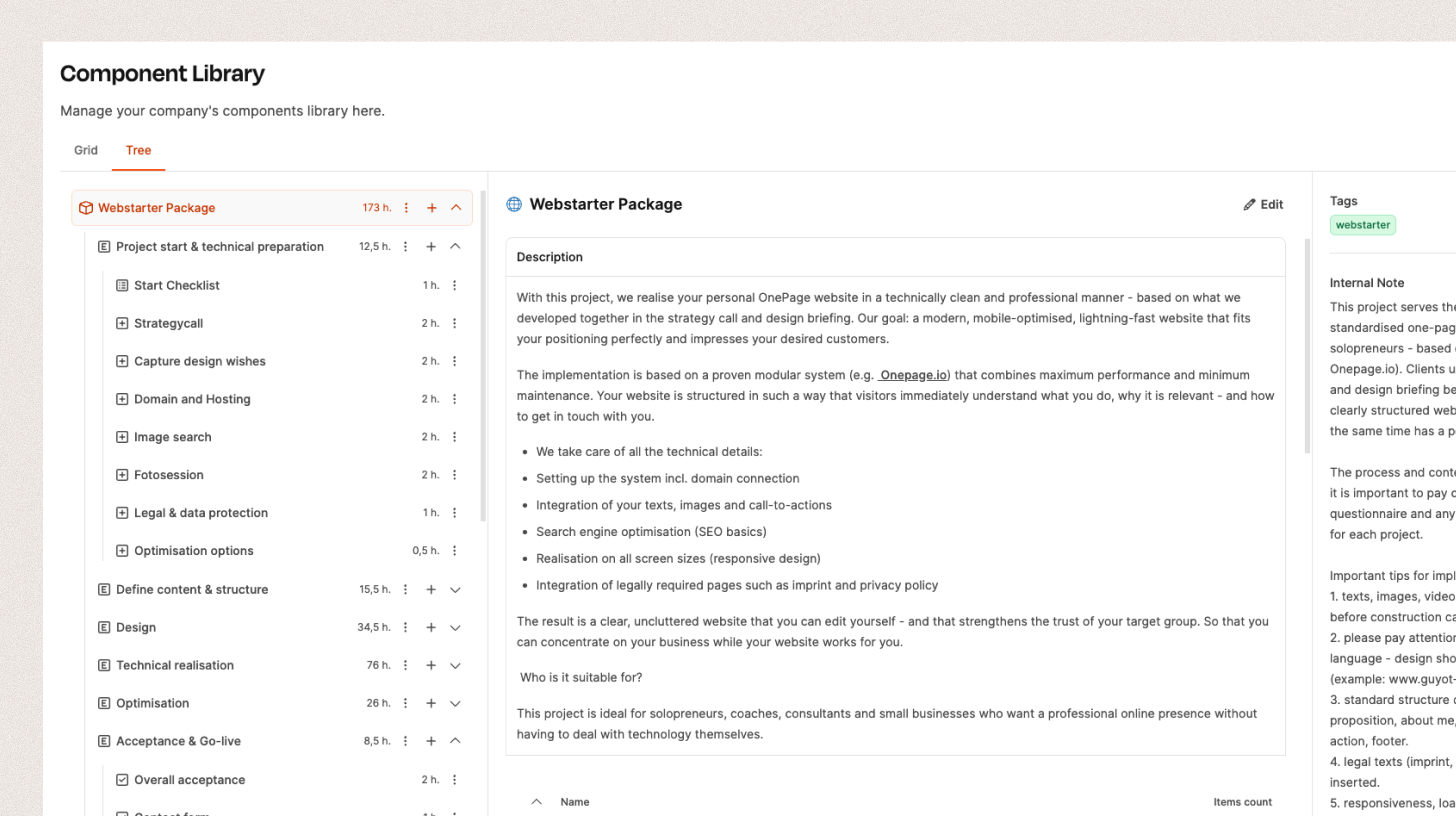
Structure of a project component
A project component has a tree structure and can consist of four types of building blocks:
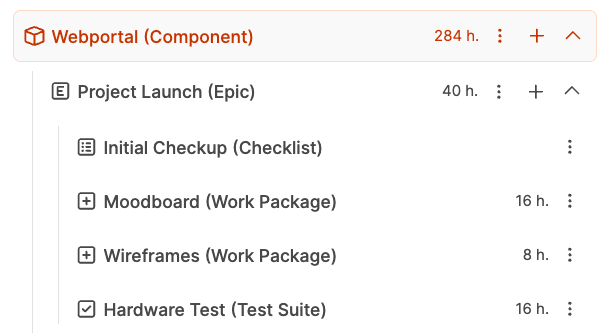
- Epics – High-level subject areas within a project
- Work packages – Specific, self-contained tasks or units of work
- Checklists – Lists of multiple individual steps or checkpoints
- Acceptance tests – Structured tests for the formal acceptance of results
These elements can be combined and nested in any way. This creates a flexible, reusable template for delivering typical project types.
Epics
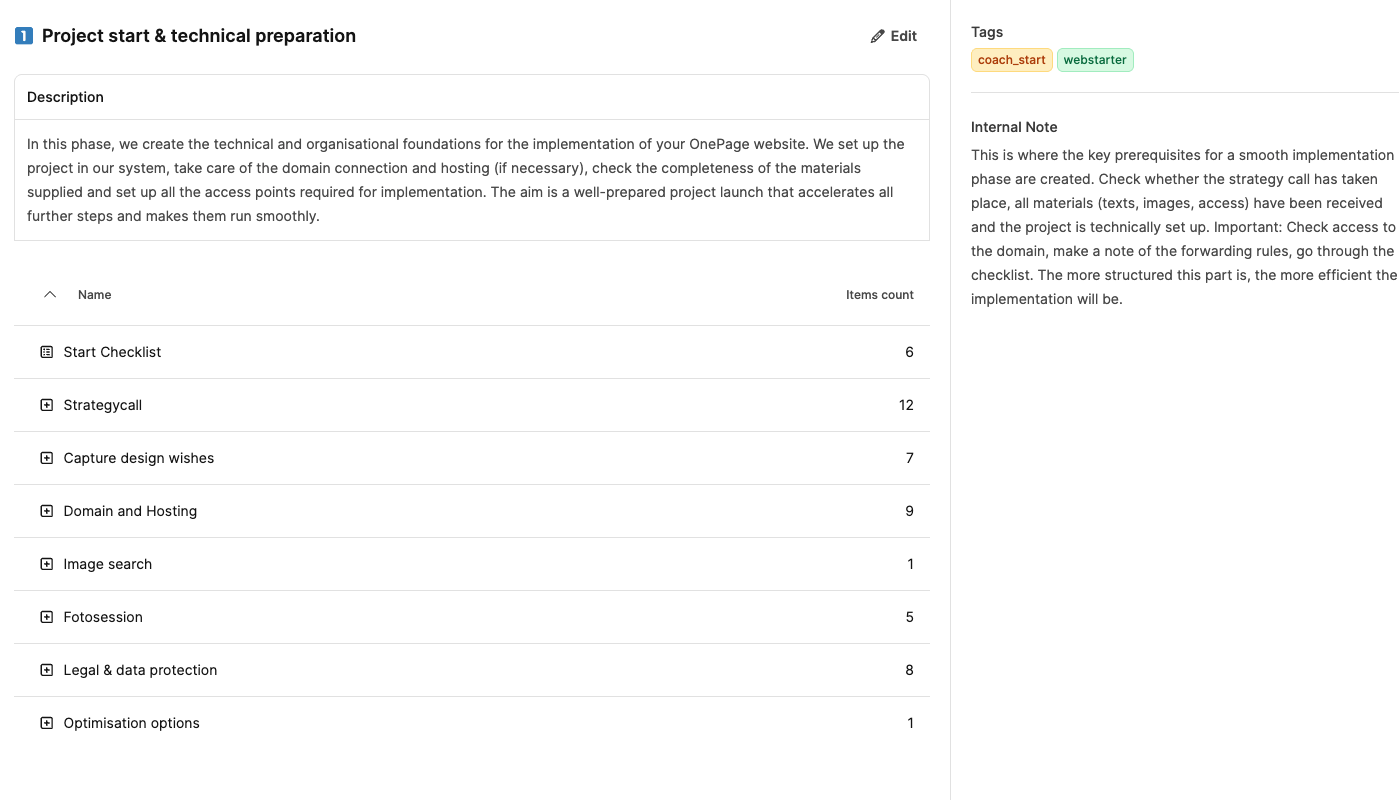
An Epic is a high-level group of tasks that brings several work packages together by topic.
It describes a larger goal or functional area within a project.
Example:
In a web project, an Epic called “Technical implementation” could contain work packages such as “Set up hosting,” “Configure CMS,” and “SEO basics.”
Epics help you track project progress at a strategic level and organize dependencies clearly.
Create an Epic
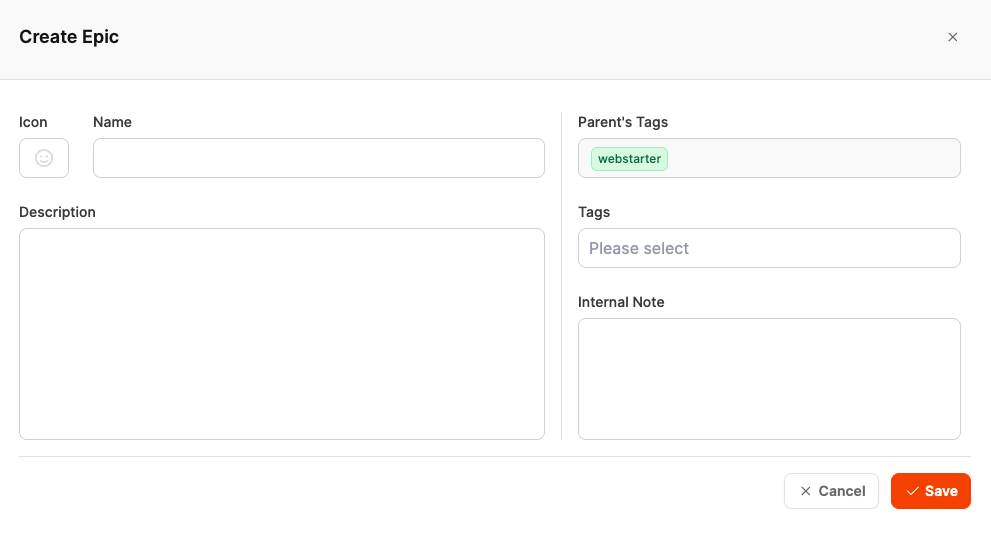
- In the tree view of your project component, open the menu using the plus icon (+) next to the required component.
- Select “Create Epic.”
- Complete the following fields in the dialog:
| Field | Description |
|---|---|
| Icon | An optional icon for visually identifying the Epic. |
| Name | The title of the Epic, such as “Technical implementation” or “Project kickoff & preparation.” |
| Description | A brief description of the content and objective of this project section. |
| Parent’s Tags | Displays the tags of the parent component (these are inherited automatically). |
| Tags | Optional additional keywords for improved organization and filtering. An Epic’s tag is passed to every work package contained in that Epic. This makes it clear in the ticket system which Epic each task belongs to. |
| Internal Note | Internal guidance, such as special considerations, standards, or additional implementation instructions. |
- Click “Save” to save the Epic.
Work package
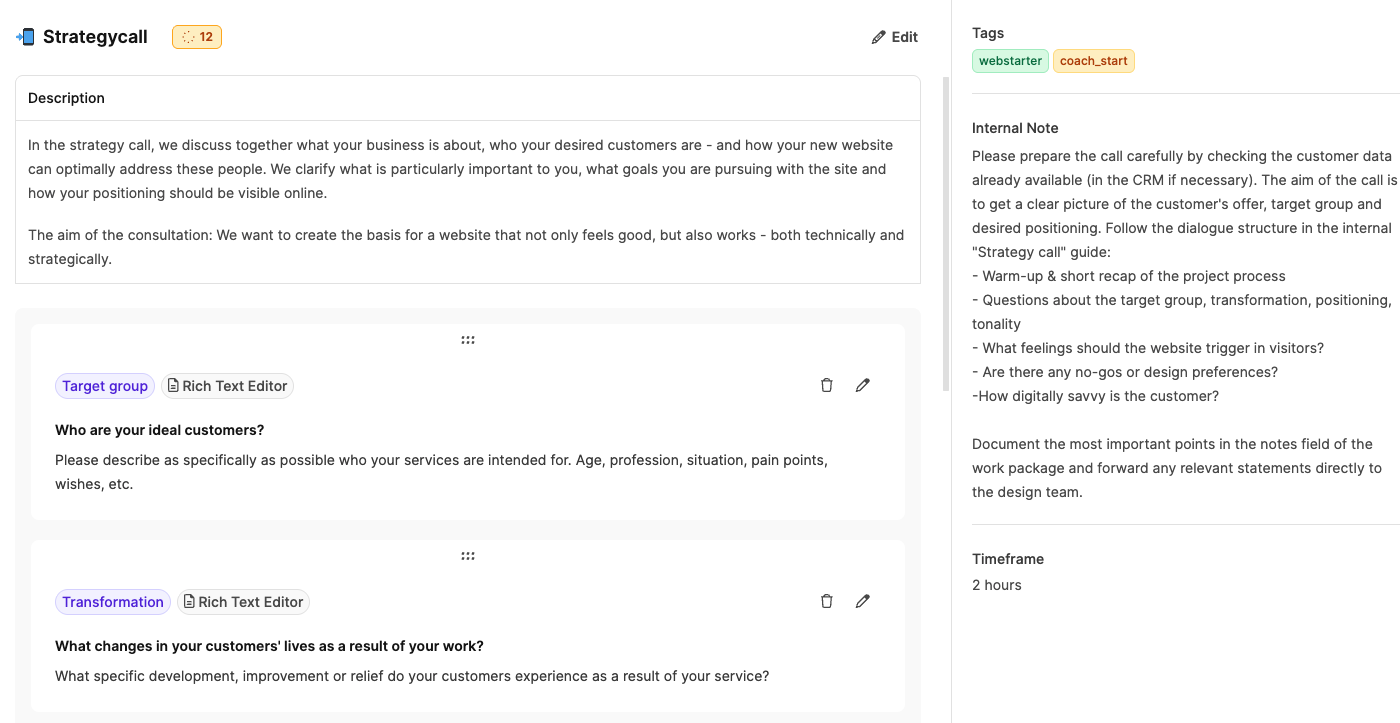
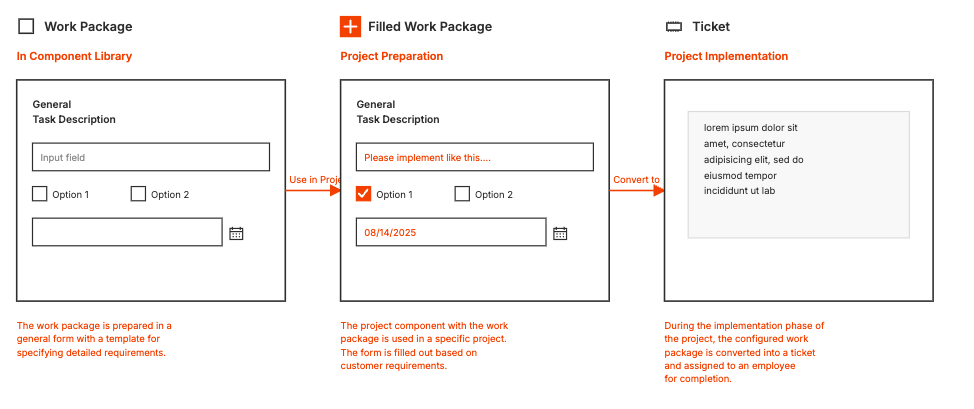
A work package is a self-contained, clearly defined task within a project. It describes a specific section of work that is completed by one or more people and produces a tangible result. Work packages are the precursor to tickets. They provide a standardized task description that can later be specified and tailored based on the customer’s requirements
Create a work package
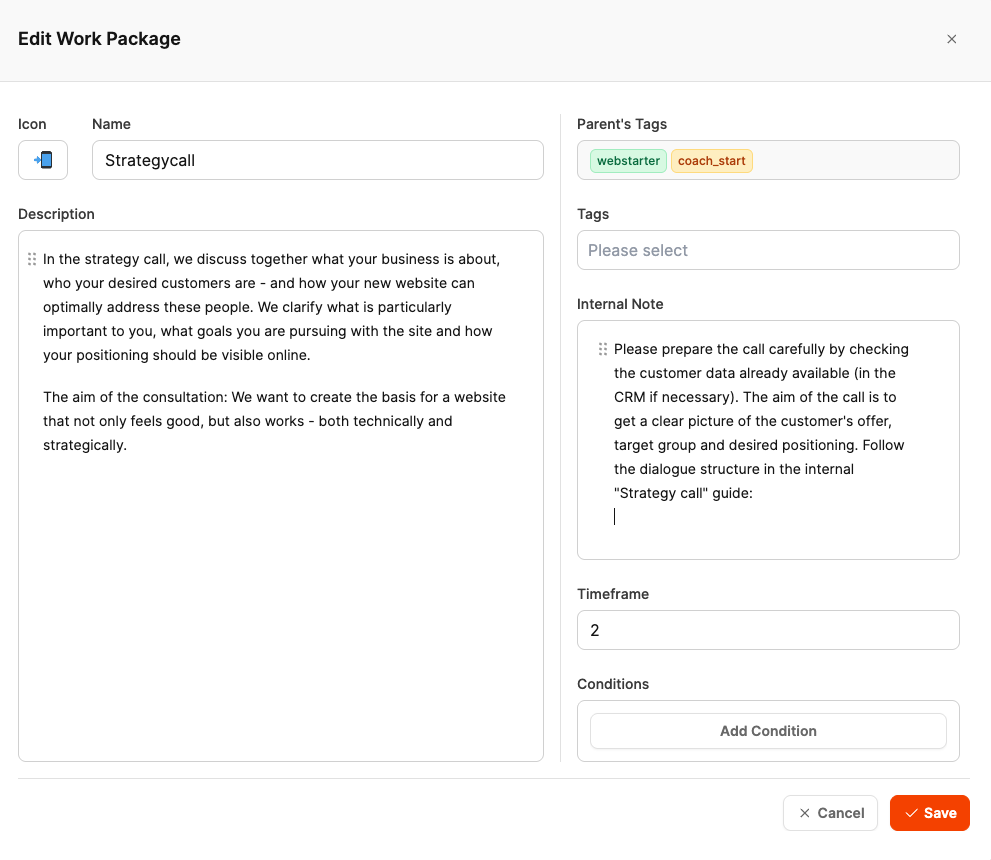
- In your project’s tree view, open the Epic under which you want to create the work package.
- Click the plus icon (+) and select “Create Work Package.”
- Complete the following fields in the dialog:
| Field | Description |
|---|---|
| Icon | An optional icon for visually identifying the work package. |
| Name | The task name, such as “Set up domain and hosting” or “Conduct design briefing.” |
| Description | A brief description of the task, its objective, and the expected results. |
| Parent’s Tags | Displays the automatically inherited tags from the parent component or Epic. |
| Tags | Optional additional keywords for improved organization. These tags are passed to the resulting ticket. |
| Internal Note | Internal guidance or work instructions that should not appear in the customer ticket. |
| Timeframe | The estimated effort or planned duration (for example, “2 hours” or “1 day”). |
| Conditions | Conditions can be added here to make the visibility or execution of the work package depend on other factors. |
- Click “Save” to save the work package.
Add questions to a work package
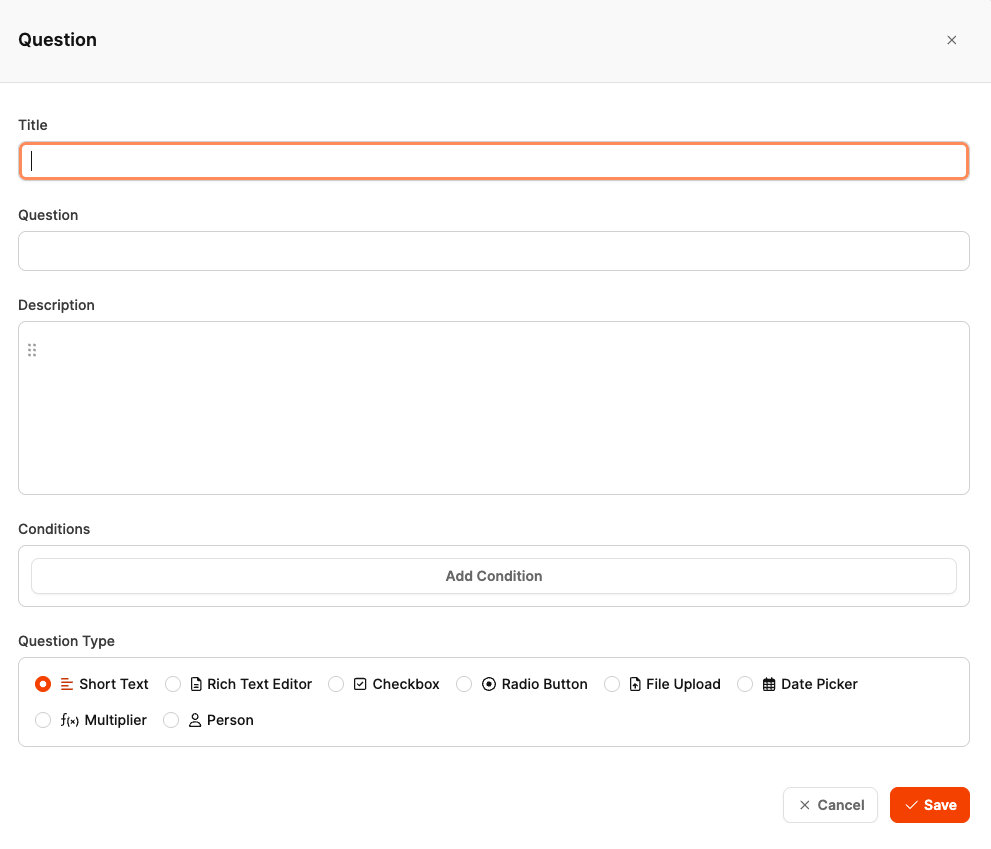
Each work package can contain a catalog of predefined questions. These questions capture customer-specific requirements or project details in a structured way. They make work packages flexible and reusable by allowing them to be tailored later in the project.
Each question can use a different answer type and can optionally affect project effort.
- Open the required work package in the tree view.
- Click “Add Question” or the plus icon (+) next to the work package.
- Complete the following fields in the dialog:
Under Question Type, select the appropriate answer type:
| Type | Description | Possible effect on effort |
|---|---|---|
| Short Text | A short text entry, such as a name, title, or keyword. | – |
| Rich Text Editor | A longer, formatted text entry (for example, a description or free-text answer). | – |
| Checkbox | A Yes/No choice for simple decisions or confirmations. | check_mark can affect effort |
| Radio Button | Selection of one option from several predefined choices. | check_mark can affect effort |
| File Upload | Allows files such as logos, documents, or graphics to be uploaded. | – |
| Date Picker | Selection of a date, for example for delivery dates or deadlines. | – |
| Multiplier (fₓ) | The Multiplier is a special question type that calculates a work package’s effort dynamically. It is used when effort is multiplied for each recurring element (for example, per page, product, user, or language). The “Duration of one element” field defines the duration per unit—the time required for one individual element (such as one page or product). Once the question is answered, Leadtime calculates automatically: Answer (quantity) × duration per element = total additional effort | check_mark can affect effort |
| Person | Selects a person from the project team or customer group—all users participating in the project are available. | – |
- Click “Save” to save the question.
- Repeat the process to add more questions.
Questions can later be moved within the work package or copied to other work packages using drag & drop.
Checklist
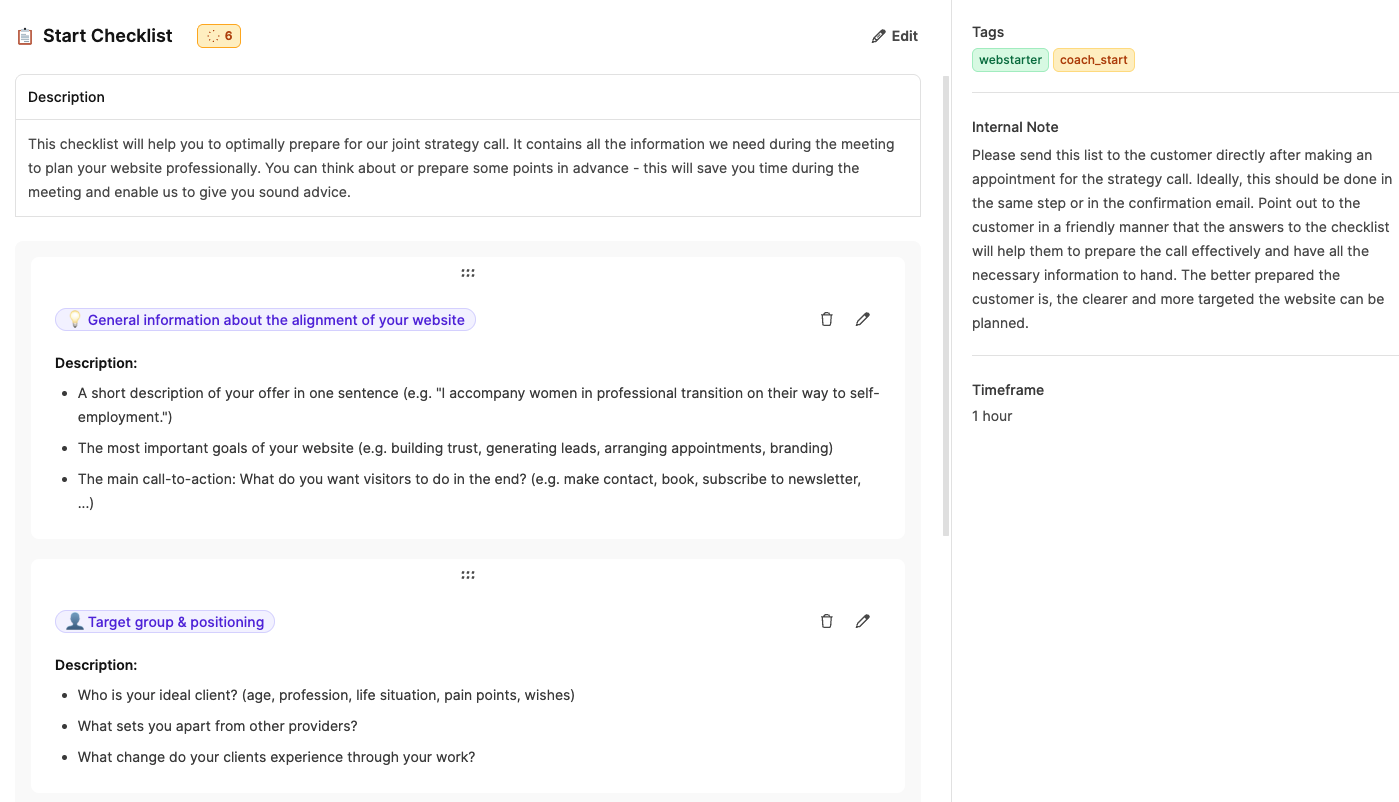
A checklist represents several small individual steps or review tasks within a work package.
It is ideal for recurring processes such as tests, approvals, installation steps, or quality checks.
Each item in the list can be checked off individually, making the ticket’s progress immediately visible.
Typical use cases
- Project preparation (for example, “Kickoff checklist”)
- Quality assurance (for example, “Testing Checklist”)
- Final review (for example, “Go-live approval”)
- Onboarding or support processes
Create a checklist
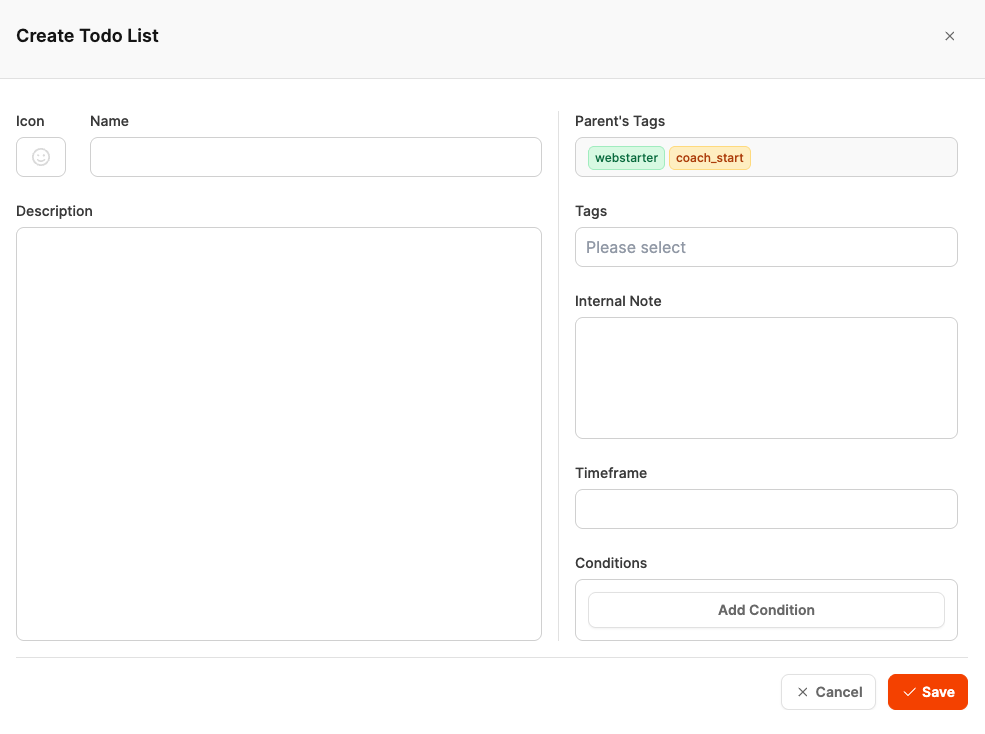
- In the tree view, open the required Epic or work package under which you want to create the checklist.
- Click the plus icon (+) and select “Create To-do List.”
- Enter the following information in the dialog:
| Field | Description |
|---|---|
| Icon | An optional icon for quick visual identification (for example, check_mark_button or wrench). |
| Name | The checklist title, such as “Project kickoff check” or “Technical review.” |
| Description | A brief description of what the checklist is intended to verify or ensure. |
| Parent’s Tags | Displays tags automatically inherited from the parent structure (such as the Epic or component). |
| Tags | Optional keywords for organization or filtering. These are passed to the resulting tickets. |
| Internal Note | Internal guidance or additional information for the project team (not visible to customers). |
| Timeframe | Optional time required to complete the entire checklist. |
| Conditions | Conditions can be defined here to determine when the checklist is visible or active. |
- Click “Save” to save the checklist.
Create a checklist item
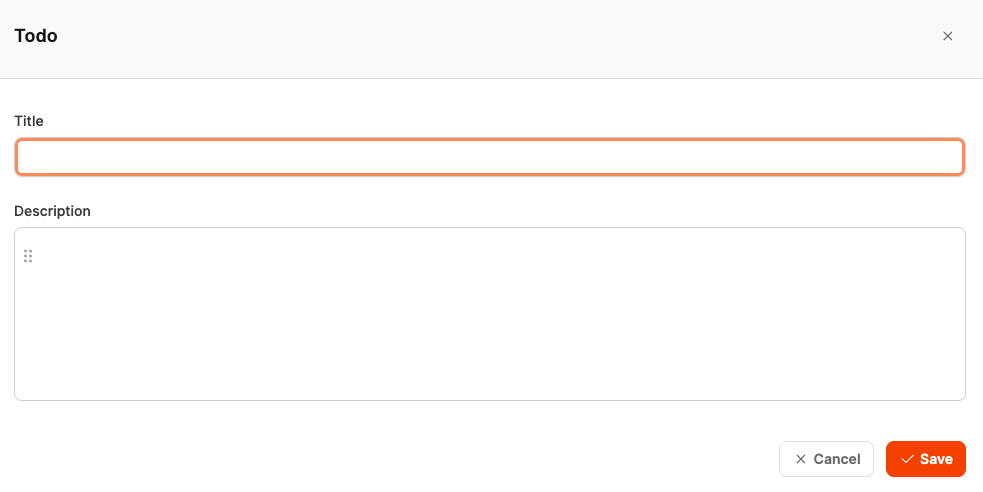
A checklist item is a work step within a To-do list.
It is used to complete recurring project tasks, reviews, or checks in a transparent and traceable way.
Each item can be checked off separately and therefore contributes to the progress shown for the checklist as a whole.
- Open the required checklist in the tree view.
- Click “Add Todo” or the plus icon (+) within the list.
- Complete the following fields in the dialog:
| Field | Description |
|---|---|
| Title | A short, concise title for the to-do, such as “Test domain connection,” “Check SSL certificate,” or “Link legal notice.” |
| Description | An optional description with additional guidance or specific execution steps. You can include checkpoints, explanations, or links to documents here as needed. |
- Click “Save” to save the checklist item.
The item is now displayed in the list and can be checked off individually during the project.
Acceptance test suites
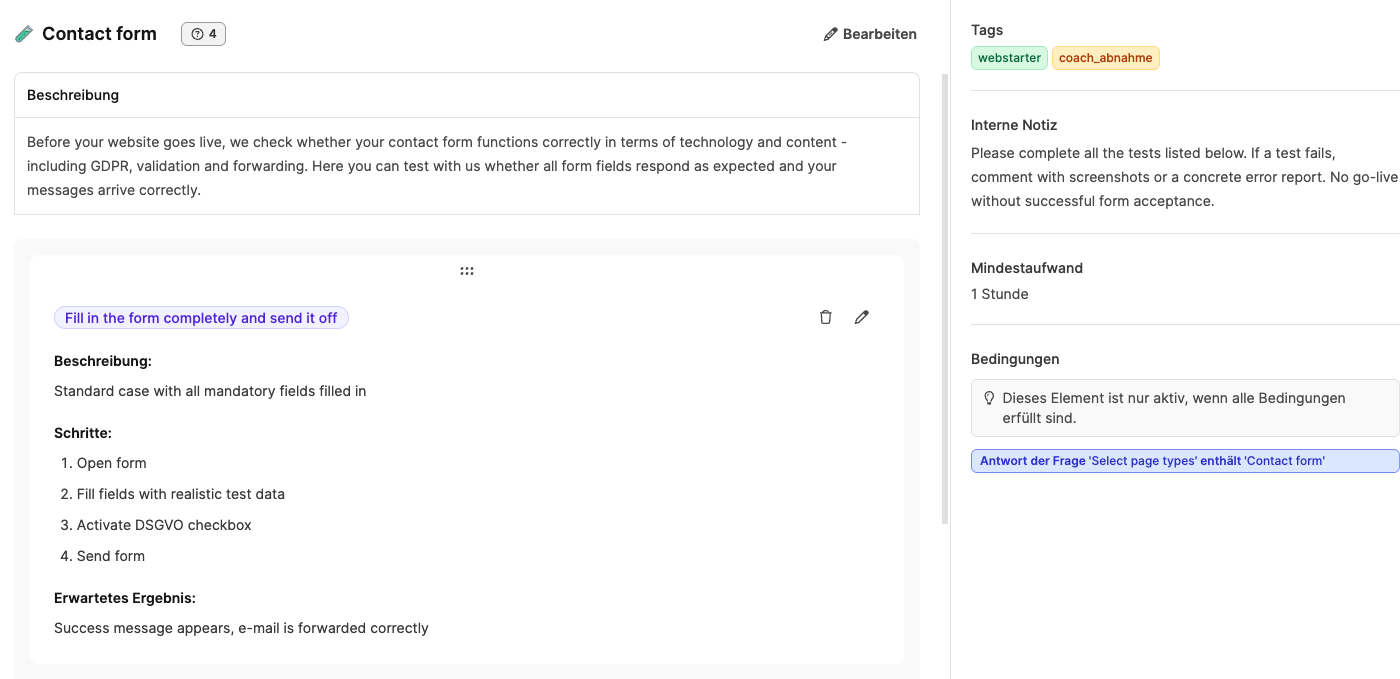
Acceptance tests document the formal testing and approval of project results.
They consist of test cases, each describing a test step and its expected results.
Each test case can be marked as passed or failed and can include comments.
The component or project is considered complete only when all tests have passed successfully.
Goal: Ensure that the delivered services meet the agreed requirements.
Create an acceptance test suite
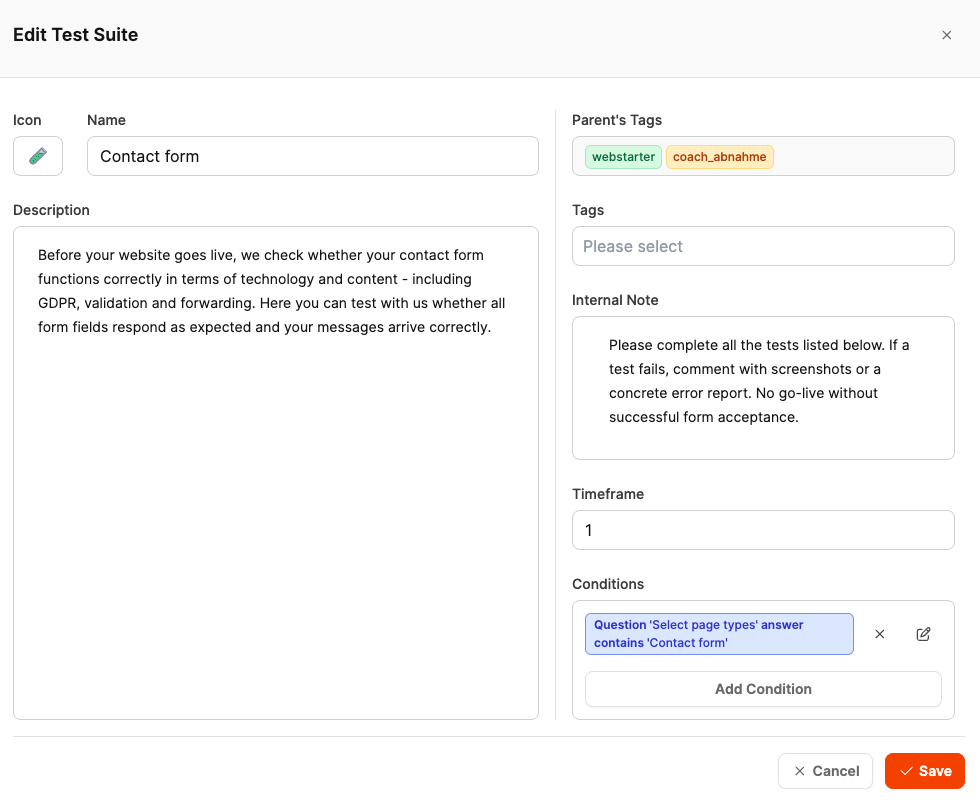
- In the tree view, open the project component that should contain the acceptance test.
- Click the plus icon (+) and select “Add Acceptance Test.”
- Enter the following information in the dialog:
| Field | Description |
|---|---|
| Icon | An optional icon for visually identifying the test (for example, test_tube or check_mark_button). |
| Name | The test name, such as “Contact Form,” “Responsive Design Check,” or “SEO Review.” |
| Description | Describes exactly what is being tested, such as functionality, presentation, or legal requirements. It can also explain how to perform the test. |
| Parent’s Tags | Automatically inherited from the parent component or Epic (for example, “webstarter” or “coach_acceptance”). |
| Tags | Optional additional keywords for improved organization and filtering. |
| Internal Note | Guidance for testers or project managers, such as which documentation must be attached or when a test is considered passed. |
| Timeframe | The time required to perform the test (for example, 1 hour). |
| Conditions | Optional: Define the conditions under which the test is displayed or activated (for example, only when particular work packages or options have been selected). |
- Click “Save” to create the acceptance test.
Add test cases
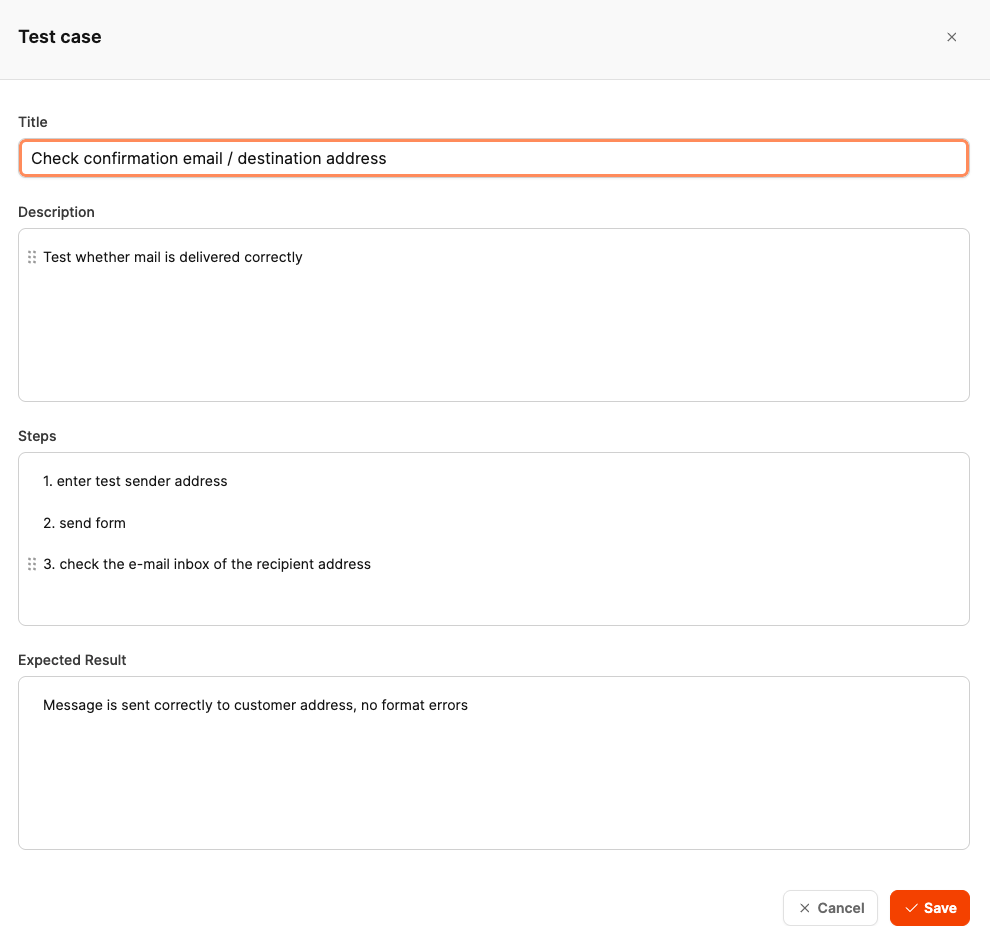
- Open the required acceptance test in the tree view.
- Click “Add Test Case” or the plus icon (+) below the test.
- Enter the following information in the dialog:
| Field | Description |
|---|---|
| Title | A short, concise title for the test case, such as “Check confirmation email / destination address” or “Validate form input fields.” |
| Description | Optional: A brief explanation of what should be tested or why the test is important. |
| Steps | Step-by-step instructions for performing the test. Each step should be clear and easy to follow, for example. Complete the form2. Send a test email3. Check the inbox. |
| Expected Result | Describes the desired or correct system behavior, such as “Message is sent correctly to the customer address, no format errors.” |
-
Click “Save” to save the test case.
The test is now displayed under the corresponding acceptance test and can later be marked individually as “Passed” or “Failed.”
Tips for meaningful test cases
- Use precise, verifiable wording (for example, “Email is delivered within 30 seconds” instead of “Email works”).
- Document every test step in full so that other team members can reproduce the test.
- Describe the expected state as specifically as possible—ideally with reference to visible results (such as an error message, display, or layout).
- Add screenshots or logs as evidence when needed.