
Standardizing website projects
A step-by-step workshop for designing a component for website development projects using the WordPress CMS
PixelCraft is a web design agency specializing in the development of custom WordPress websites. Its clients are primarily small and medium-sized businesses that want to establish a professional online presence.
Every website project follows a similar process: briefing, concept development, design, development, testing, and go-live. Yet although the basic structure remains the same, the individual projects vary greatly—some clients want elaborate animations, others need multilingual websites, and still others prioritize e-commerce integration.

This regularly leads to challenges:
- Forgotten tasks: For every project, the team has to determine from scratch which steps are necessary.
- Inefficient coordination: Responsibilities and dependencies between tasks are often unclear.
- Susceptibility to errors: Important details such as hosting setup, SEO configuration, or data protection compliance are sometimes overlooked.
- Unclear effort estimates: Without a structured template, it is difficult to calculate the actual time and resource requirements precisely.
To solve these problems, PixelCraft has decided to create a standardized project component for WordPress website development. This component is intended to:
- Clearly structure the entire project process
- Document all recurring tasks
- Remain flexible enough to adapt to different client requirements
- Make effort estimation and budgeting easier
Workshop goal:
In this workshop, we will work together to develop the structure and content of this project component. We will define:
- Which epics (main phases) website development includes
- Which work packages arise within the epics
- Which form questions must be asked to adapt the project to the client’s individual requirements
- Which conditions should be used to make the component dynamic
- How checklists and acceptance tests support quality assurance
At the end of the workshop, there will be a complete draft of the project component that will serve as a template for all future website projects.
Workshop setting
[!WARNING] Excerpt from the workshop transcript

Sarah Müller has gathered the team in the conference room. The team is seated around the large conference table. Sarah leads the discussion, while Daniel Fischer has Leadtime open on his screen, which is projected onto the large monitor. Coffee cups are on the table, and notepads are ready.
Participants:
- Sarah Müller (Managing Director): Initiator of the workshop, responsible for strategic direction and quality assurance.
- Tom Weber (Lead Designer): Responsible for the visual concept, UI/UX design, and the design of the website layouts.
- Lisa Schmidt (Frontend Developer): Develops the WordPress themes, implements animations, and ensures responsive designs.
- Max Hoffmann (Backend Developer): Handles the technical infrastructure, server setup, plugin development, and performance optimization.
- Julia Klein (Project Manager): Coordinates the projects, communicates with clients, and ensures that all deadlines are met.
- Daniel Fischer (Senior Project Manager): Leadtime specialist who supports the workshop and implements the project component in parallel.
Workshop Phase 1: Developing the major themes
Team discussion
[!WARNING] Excerpt from the workshop transcript
Sarah: “All right, let’s get started. Our first goal is to define the major thematic areas—the so-called epics. These are the main phases of our website project that everything else is organized around. Each epic represents a clearly defined area of the project.”
Julia: “So, essentially the major milestones, so we don’t get lost in a hundred individual tasks?”
Sarah: “Exactly. If we define these epics well today, we’ll have a clear structure for all future projects. Daniel, you have Leadtime open, right?”
Daniel: “Yes, I’m ready. I’ll create the epics live as we go.”
Sarah: “Great. Then let’s gather the major themes. What are the main phases of our website projects?”
Tom: “Definitely Design & Concept Development. That’s the phase in which we develop the visual concept, create wireframes, and work out the design.”
Sarah: “Absolutely. Daniel, please create ‘Design & Concept Development’.”
(Daniel types and creates “Design & Concept Development” as an epic.)
Lisa: “Then comes Frontend Development. That’s where the design is implemented in WordPress—theme development, responsive adjustments, animations.”
Sarah: “Yes, that’s a separate epic. Daniel?”
(Daniel creates “Frontend Development” as an epic.)
Max: “And of course Backend Development & Integration. That covers the technical infrastructure, plugin configuration, database setup, and API integrations.”
Sarah: “Right. That’s also its own epic. Daniel, please add it.”
(Daniel creates “Backend Development & Integration” as an epic.)
Julia: “We also need an epic for Testing & Quality Assurance. Before the website goes live, everything has to be thoroughly tested—functionality, performance, browser compatibility.”
Sarah: “Absolutely. That’s a critical point. Daniel, please add it.”
(Daniel creates “Testing & Quality Assurance” as an epic.)
Max: “And at the end comes Go-Live & Deployment. That includes preparing the production environment, domain transfer, SSL certificates, and final deployment.”
Sarah: “Yes, that’s the final step. Daniel, please add it as the last epic.”
(Daniel creates “Go-Live & Deployment” as an epic.)
Sarah: “Okay, that gives us five major areas so far:
- Design & Concept Development
- Frontend Development
- Backend Development & Integration
- Testing & Quality Assurance
- Go-Live & Deployment
Is anything missing?“
Julia: “Yes, I think we should have an epic right at the beginning for Project Setup & Briefing. That’s where we clarify all requirements with the client, create the project in Leadtime, and define goals and deadlines.”
Sarah: “Good idea. That definitely belongs there. Daniel, please put it first, before the others.”
(Daniel creates “Project Setup & Briefing” as an epic and moves it to the first position using drag & drop.)
Sarah: “Perfect. Now we have the complete structure:
- Project Setup & Briefing
- Design & Concept Development
- Frontend Development
- Backend Development & Integration
- Testing & Quality Assurance
- Go-Live & Deployment
Any other comments?“
(The team thinks for a moment, but no one has any further suggestions.)
Sarah: “Good. Then we can move on to the next phase—the work packages within the epics.”
Implementation in Leadtime
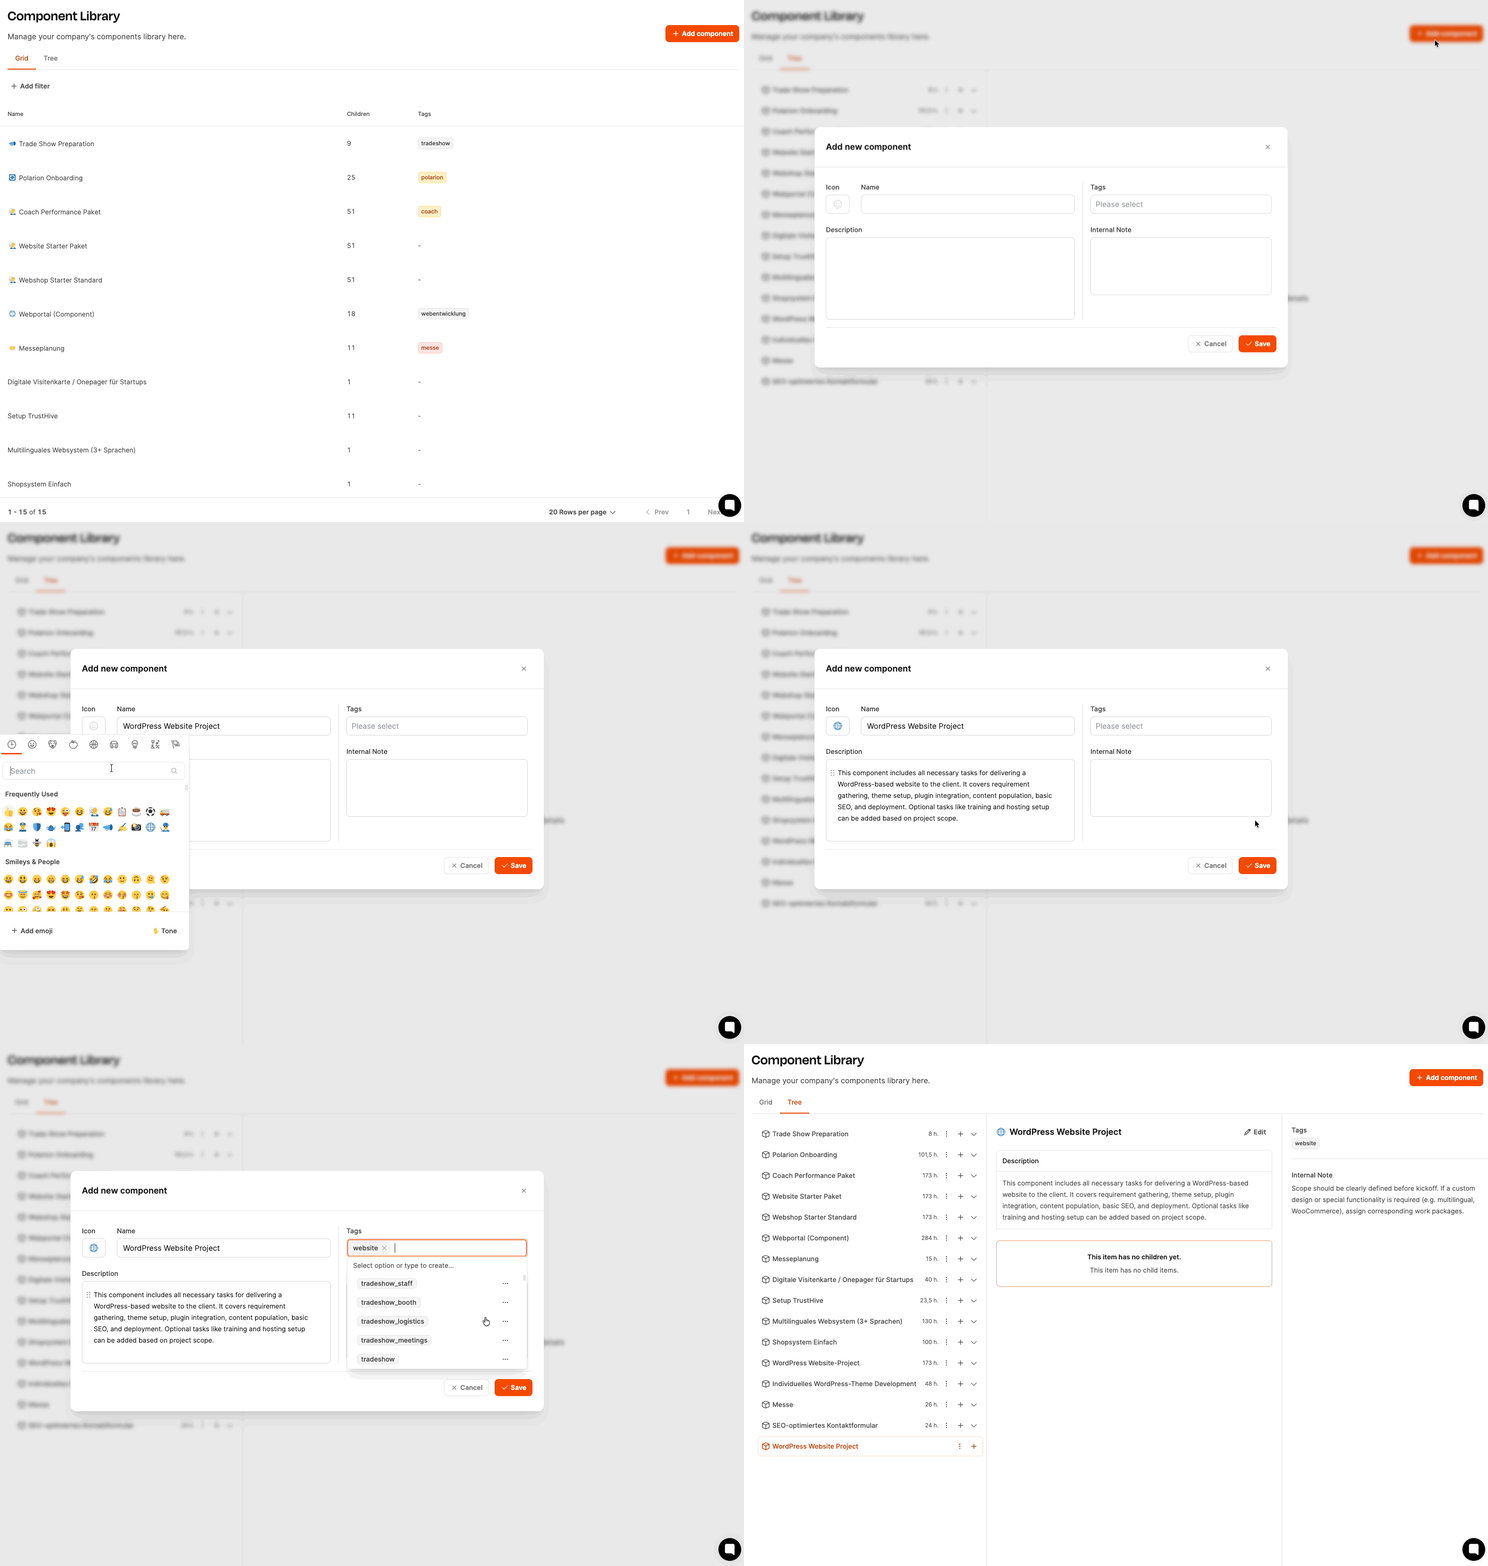
1. Create a new component
-
In the left-hand menu, navigate to Your Company → Component Library.
-
Click Add Component in the top right.
-
A dialog window opens. Complete the following fields:
- Icon: Select a suitable icon (e.g., globe_with_meridians for website)
- Name: “WordPress Website Development”
- Description: “This project component structures the entire process of developing a WordPress website—from concept development and design to development and go-live.”
- Tags: Use a consistent tag such as “website” or “wordpress”
- Internal Note: “Procedure: This component is loaded at the start of the project and adapted to the specific client requirements by answering the form questions. Please use it for every website project and document lessons learned after completion.”
-
Click Save.
2. Add building blocks to the component
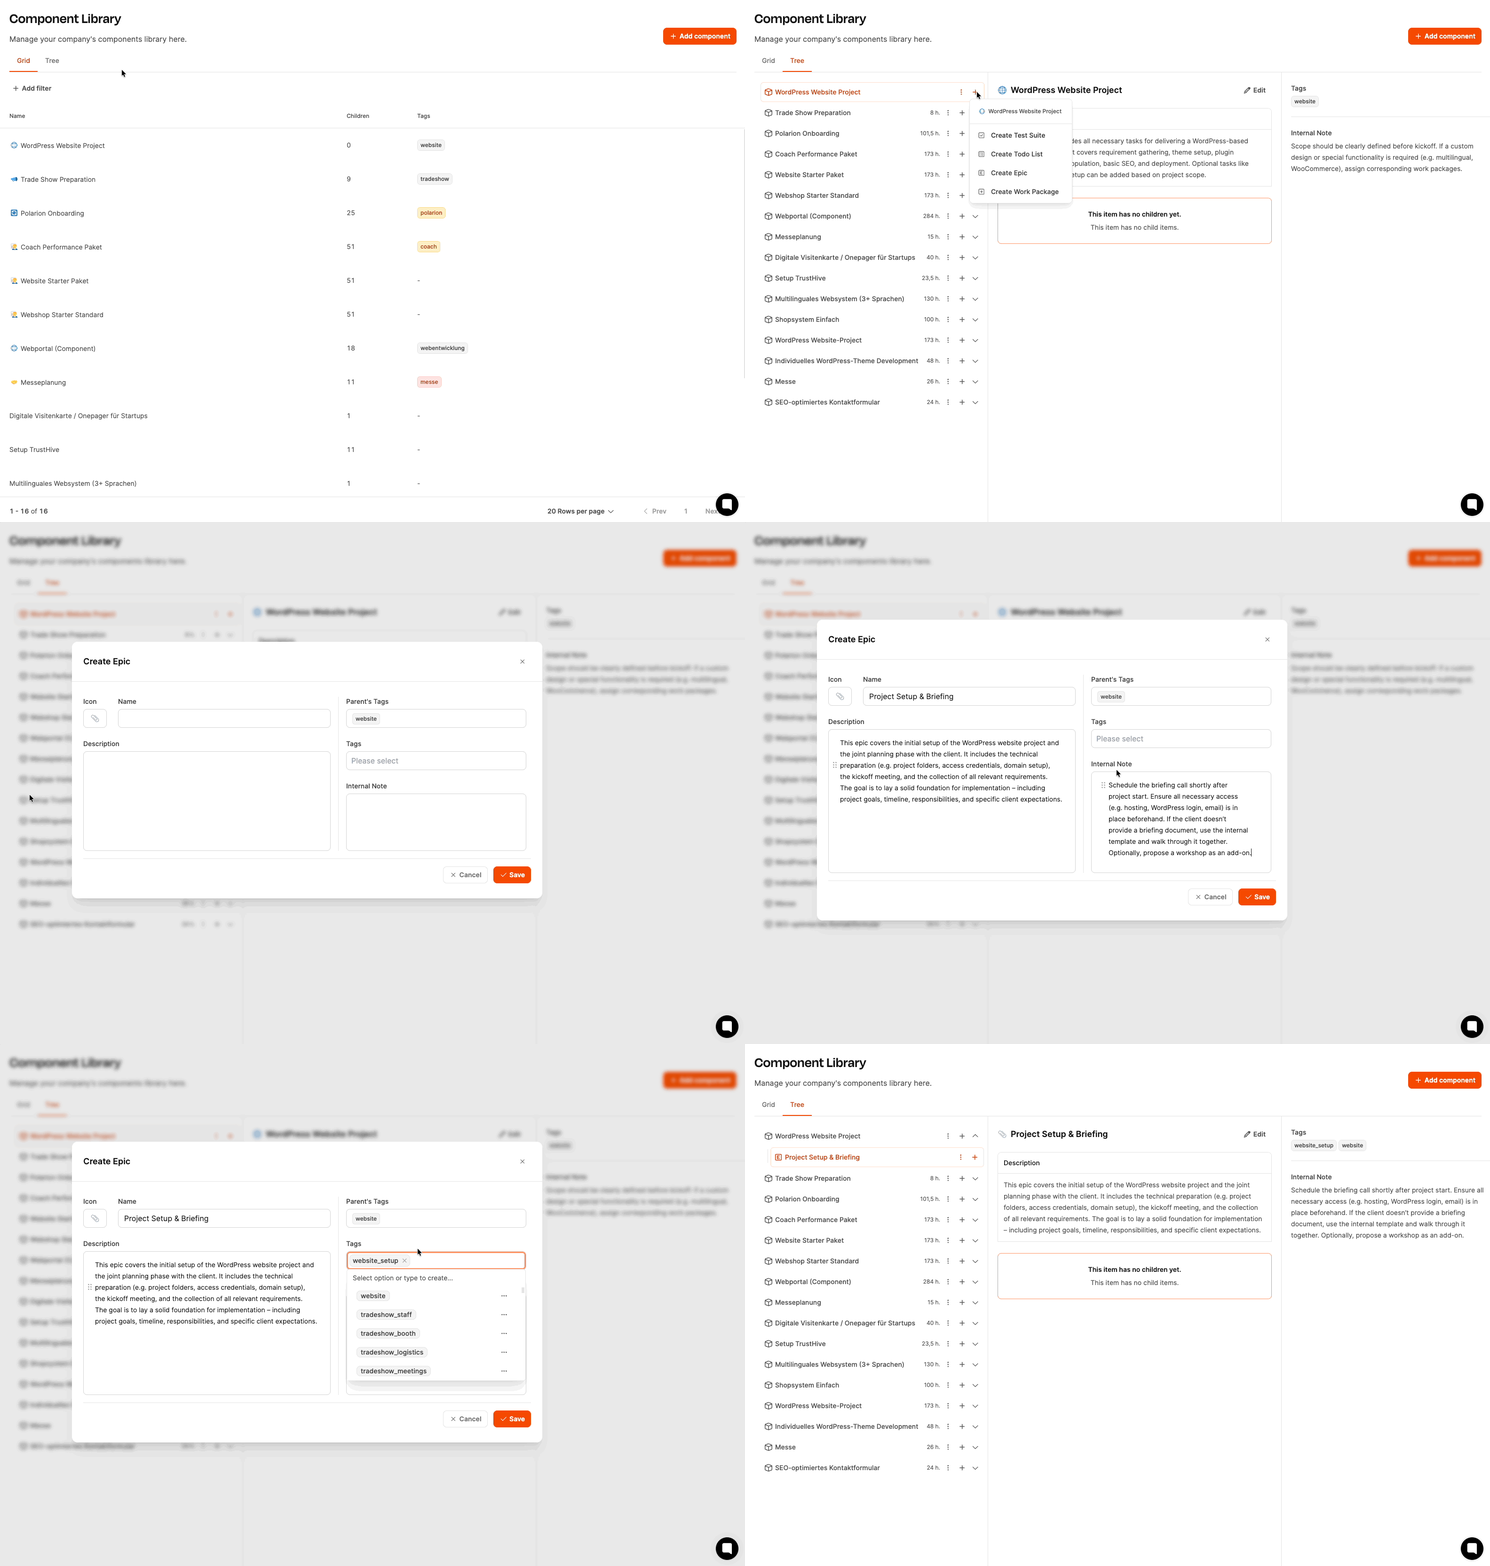
- Select the newly created component in the overview.
- Switch to Tree View (the default view for the rest of the work).
- Click the plus icon to add building blocks to the component.
The building blocks of project components
3. Create the initial epics
-
Select Create Epic.
-
Complete the fields:
- Icon: Optional, for better visual distinction (e.g., clipboard for project setup)
- Name: “Project Setup & Briefing”
- Description: “This epic captures all basic project information, clarifies requirements with the client, and creates the initial project in Leadtime.”
- Tags: The component tag “website” is inherited automatically. You can also add “setup”.
- Internal Note: “This epic forms the basis for all subsequent phases. Please ensure that all questions are clarified and documented in the kickoff meeting.”
-
Save the epic.
-
Repeat the process for all other epics:
- Design & Concept Development
- Frontend Development
- Backend Development & Integration
- Testing & Quality Assurance
- Go-Live & Deployment
4. Optimize the structure
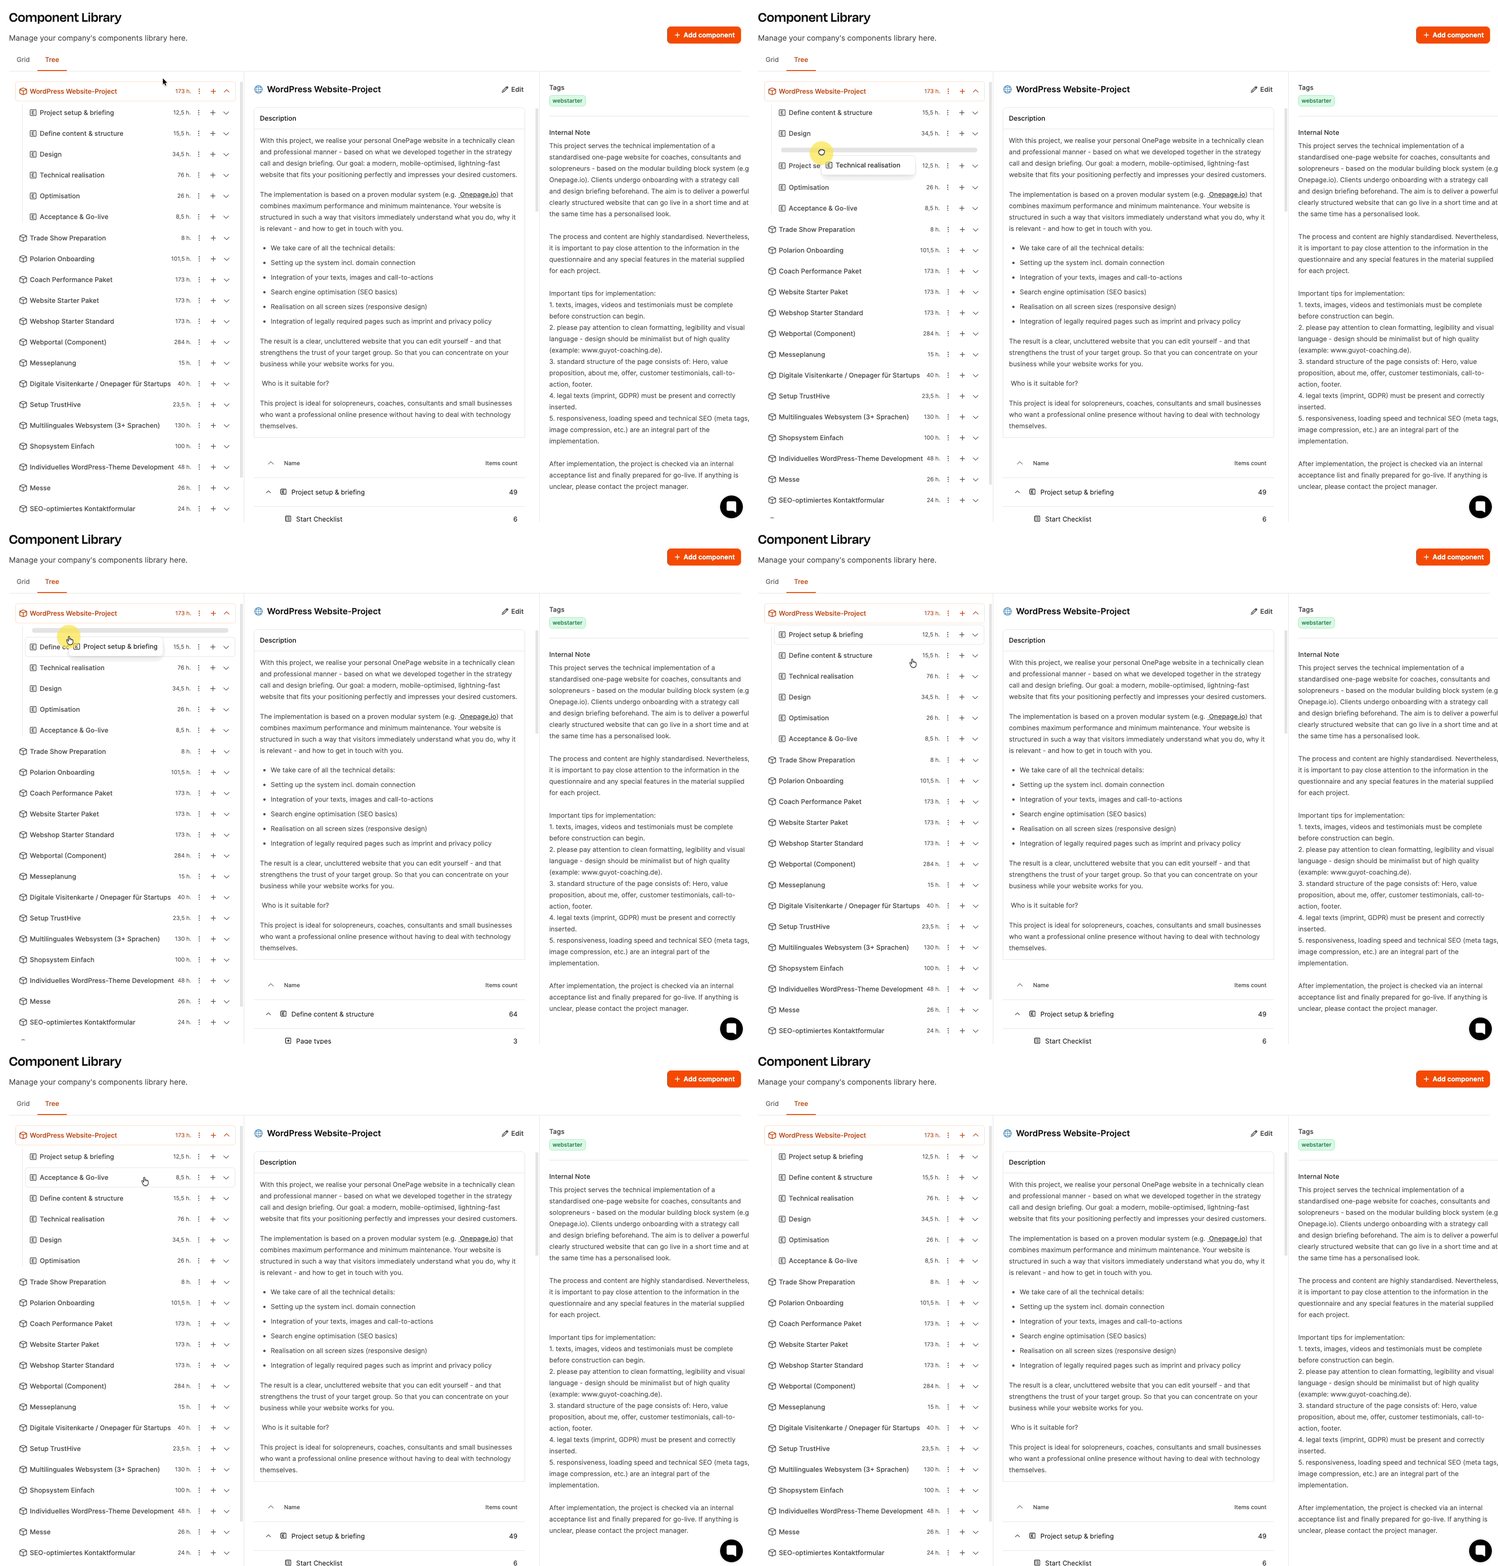
- The epics can be reordered in the tree view using drag & drop.
- Make sure the order reflects the actual project process.
- The final order should follow the project’s chronological sequence.
Workshop Phase 2: Developing the work packages of an epic
Team discussion
[!WARNING] Excerpt from the workshop transcript
Sarah: “All right, now we’ll go through the individual work packages. We’ll start with the first epic, ‘Project Setup & Briefing’. What are the specific tasks in this phase?”
Julia: “First, we need a kickoff meeting with the client. That’s where we clarify all requirements, goals, the target audience, and desired features.”
Daniel: “Okay, I’ll create ‘Conduct Kickoff Meeting’ as a work package.”
(Daniel creates the work package.)
Sarah: “Good. What comes next?”
Julia: “We should carry out a requirements analysis—in other words, document all the information from the kickoff in a structured way. That will then be our basis for further planning.”
Daniel: “Understood. ‘Document Requirements Analysis’—done.”
Max: “We also need a work package for the hosting setup. Depending on the client, we either host the website ourselves or the client already has hosting. That needs to be clarified early on.”
Daniel: “Good, ‘Prepare Hosting Infrastructure’ created as a work package.”
Julia: “And right at the beginning, we should also create the project in Leadtime—with all team members, deadlines, and the component.”
Daniel: “Yes, that’s important. ‘Initialize Project in Leadtime’—done.”
Sarah: “Perfect. That gives us the most important work packages for the first epic. Before we continue: Daniel, explain again which fields we should complete for work packages.”
Daniel: “Gladly. Every work package has these fields:
- Description: This states WHAT needs to be done—the task itself.
- Tags: The tags from the epic are inherited automatically. You can add specific tags for the work package as well.
- Internal Note: This is often the most important part. Here you explain HOW the task should be approached—essentially the work instructions for the person who will handle the package later.
- Minimum Effort: An estimate in hours. We need this for budgeting and scheduling.“
Sarah: “Exactly. And this is important: the minimum effort helps us calculate realistic quotes and compare them with the actual effort later.”
Tom: “Can we now go through this specifically for the work packages? I’d like to make sure we document all the information correctly.”
Sarah: “Yes, let’s use the ‘Conduct Kickoff Meeting’ work package as an example.”
Daniel: “Okay, I’ll open the package. What should go in the description?”
Julia: “The description could be: ‘Conduct a kickoff meeting with the client to clarify all project requirements, goals, the target audience, and desired features.’”
Daniel: “Good. And the Internal Note—the HOW?”
Julia: “In the Internal Note, I would write: ‘Preparation: Create an agenda covering project goals, target audience, desired features, technical requirements, timeline, and budget. Execution: Facilitate the meeting, document all requirements, and clarify open questions. Follow-up: Create minutes and send them to everyone involved.’”
Daniel: “Perfect. And minimum effort?”
Julia: “I’d say that including preparation and follow-up, it’s about 3 hours.”
Sarah: “Good. But we need to be careful here: if several people participate, the actual effort is higher. Can’t we solve that with a multiplier?”
Daniel: “Yes, exactly! Later in Phase 3, we can add a question with the ‘Multiplier’ question type—for example, ‘How many people will participate in the kickoff meeting?’. The effort is then multiplied automatically by the number of participants.”
Sarah: “Perfect. Then we can enter 3 hours here as the base effort for now.”
Tom: “Let’s do the same for the other work packages.”
(The team works through the remaining work packages.)
Daniel: “Okay, for ‘Document Requirements Analysis’:
- Description: ‘Structured documentation of all requirements captured during the kickoff meeting’
- Internal Note: ‘Compile all requirements in a central document. Categories: Functional requirements, design preferences, technical requirements, content structure. Save the document in the project folder and share it with the team.’
- Minimum Effort: 2 hours“
Max: “For ‘Prepare Hosting Infrastructure’:
- Description: ‘Clarify the hosting requirements and prepare the server infrastructure’
- Internal Note: ‘Check whether the client has its own hosting or whether we will host. If we host: Set up the server, install WordPress, create a staging environment, configure the backup system.’
- Minimum Effort: 3 hours—but that depends heavily on whether we host or the client does. We should solve that with a condition as well.“
Sarah: “Right, we’ll do that in Phase 4. First build the structure, then refine it.”
Julia: “And for ‘Initialize Project in Leadtime’:
- Description: ‘Create the website project in Leadtime with all team members and the component’
- Internal Note: ‘Create a new project, load the "WordPress Website Development" component, add the team, set a deadline, create the project folder.’
- Minimum Effort: 1 hour“
Sarah: “Perfect. That completes the first epic. Now we can continue with the next epic, ‘Design & Concept Development’—or should we first create a checklist for preparing the kickoff meeting?”
Tom: “Yes, a checklist would be good! That way we can make sure we don’t forget anything.”
Implementation in Leadtime
The building blocks of project components
1. Create work packages
-
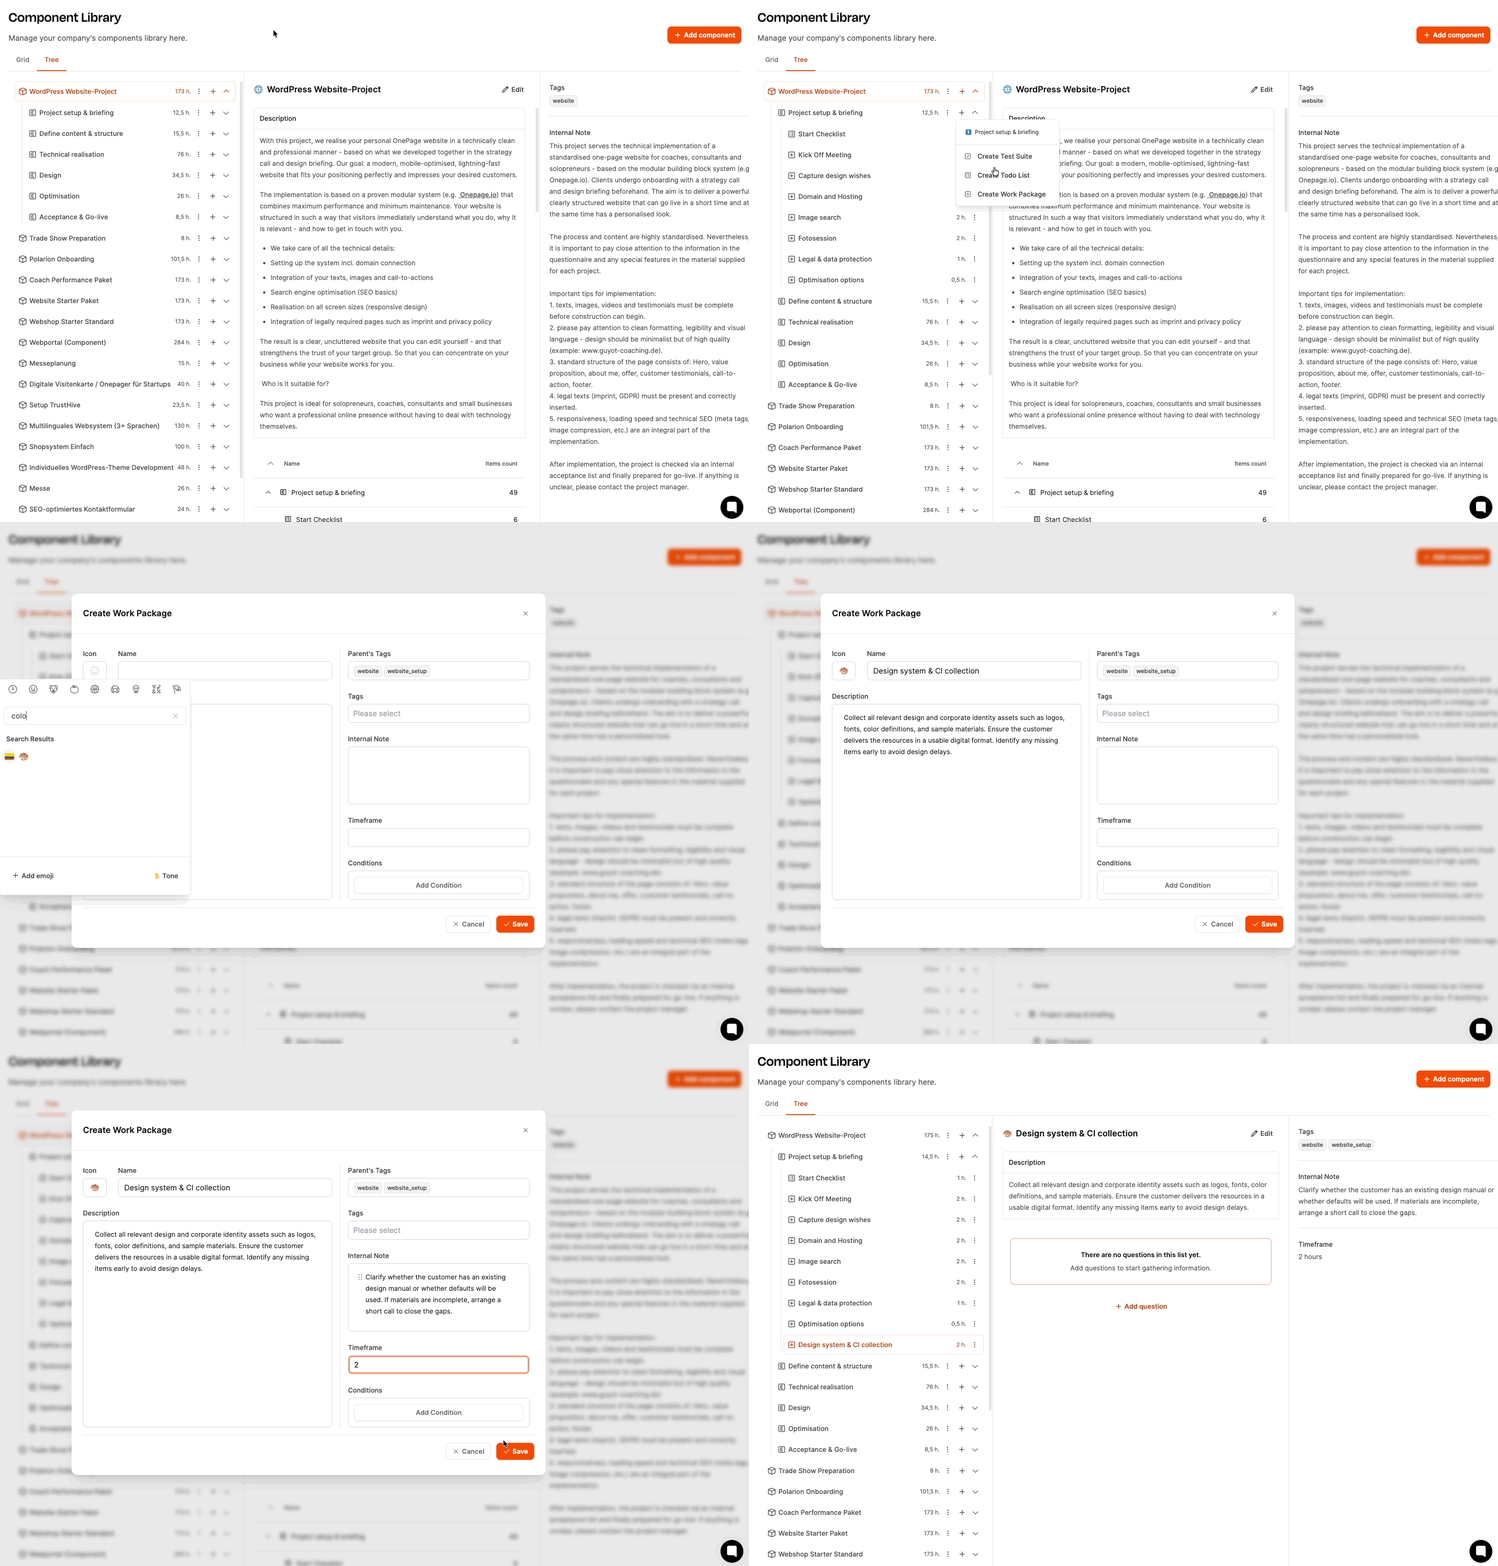
In the component’s tree view, click the plus icon in the row of the desired epic (e.g., “Project Setup & Briefing”).
-
A context menu opens with three options:
- Create Acceptance Test
- Create Checklist
- Create Work Package
-
Select “Create Work Package”.
-
A dialog window opens with the following fields:
- Icon: Optional icon for visual identification (e.g., bullseye for kickoff).
- Name: Title of the work package, e.g., “Conduct Kickoff Meeting”.
- Description: Explanation of the task, e.g., “Conduct a kickoff meeting with the client to clarify all project requirements, goals, the target audience, and desired features.”
- Tags: Optional, but automatically inherited from the epic and the component.
- Internal Note: Implementation guidance, e.g., “Preparation: Create an agenda covering project goals, target audience, desired features, technical requirements, timeline, and budget. Execution: Facilitate the meeting, document all requirements, and clarify open questions. Follow-up: Create minutes and send them to everyone involved.”
- Minimum Effort: Estimated minimum effort in hours, e.g., “3”.
-
Click “Save”.
2. Create additional work packages
Additional work packages are created in the same way as the first task:
- “Document Requirements Analysis” (enter the description and minimum effort as needed)
- “Prepare Hosting Infrastructure”
- “Initialize Project in Leadtime”
3. Create a checklist
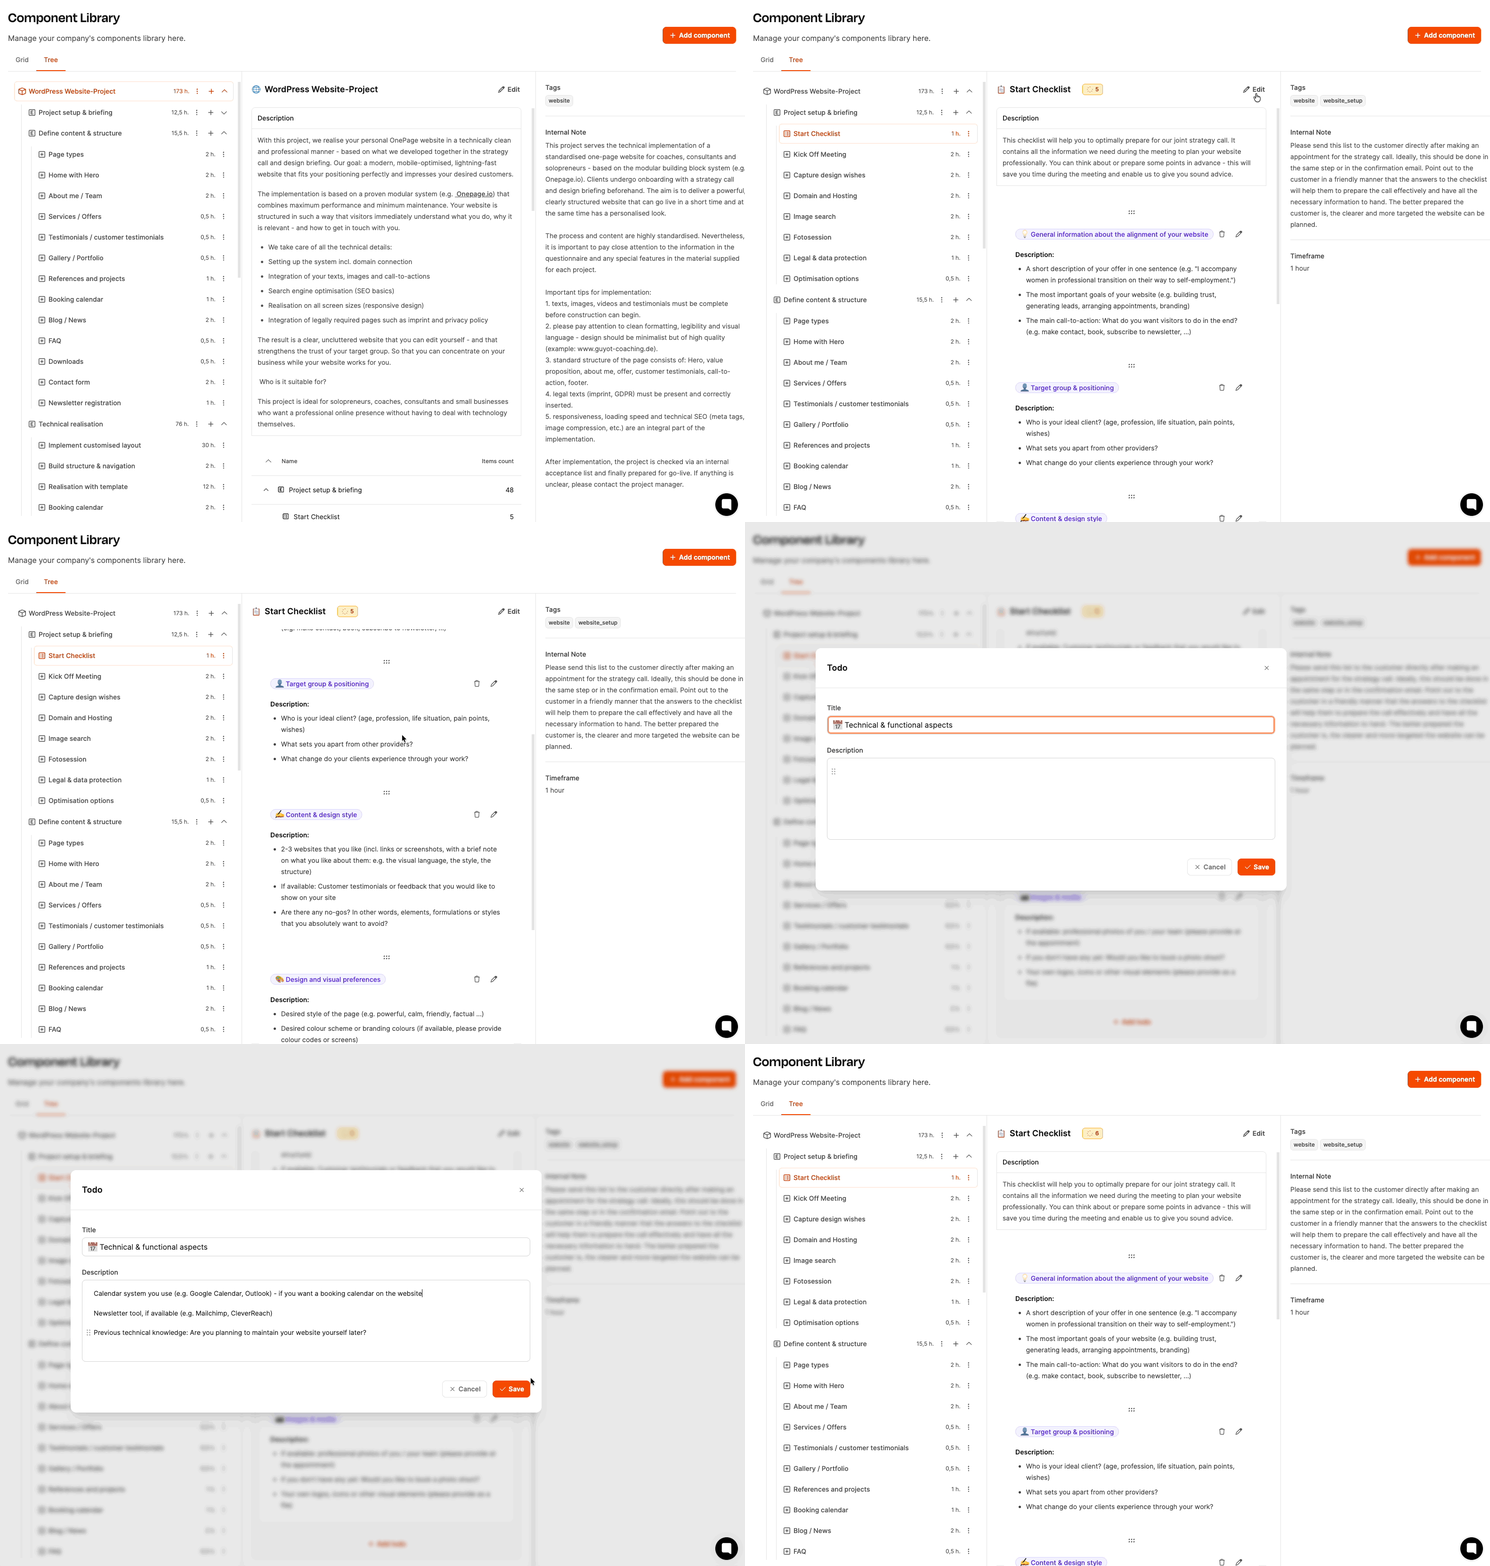
-
Select “Create Checklist” in the same context menu.
-
Define the title and individual task items (to-dos) for the checklist.
-
Example: “Kickoff Meeting Preparation” with tasks such as:
- Create an agenda for the kickoff meeting
- Invite participants (client + internal team)
- Research the client’s previous projects / references
- Prepare a template for requirements documentation
- Prepare questions about the target audience
- Create a technical checklist (hosting, plugins, etc.)
- Book a meeting room or create a video conference link
4. Sort the component tree
- The newly created work packages and checklist can be reordered in the component tree using drag & drop.
- In this example, the “Kickoff Meeting Preparation” checklist should be moved before the “Conduct Kickoff Meeting” work package because it needs to be completed first.
Workshop Phase 3: Specifying the work packages with forms
Team discussion
[!WARNING] Excerpt from the workshop transcript
Sarah: “Now it’s getting exciting. We’ve created the epics and work packages—but now we need to specify them. Every website project is different: Some clients want e-commerce, others need multilingual websites, and still others prioritize elaborate animations. Form questions allow us to adapt the component flexibly to each project.”
Daniel: “Exactly. We ask the form questions during the kickoff meeting or directly when the project is created. The answers then determine which work packages are relevant and how much effort we need to plan.”
Tom: “Can we go through this using the kickoff meeting as an example?”
Daniel: “Yes, perfect. Let’s look at which questions we should ask there.”
(Daniel opens the “Conduct Kickoff Meeting” work package in Leadtime.)
Sarah: “What information do we need to set up the project correctly?”
Julia: “First: Who is the internal project lead? That needs to be clear.”
Daniel: “Okay, that will be a Person question. This lets us select someone directly from the team. The question is: ‘Who will take over the project lead?’”
(Daniel creates the question.)
Tom: “We should also ask:Which designers and developers are working on the project?”
Daniel: “Also Person—but multiple people can be selected here. ‘Which team members are working on the project?’”
Max: “Important:Does the client handle the hosting, or do we? That has a huge impact on our effort.”
Daniel: “That will be a Radio Button with the options ‘Client hosts’ and ‘We host’. The question: ‘Who will handle the hosting?’”
Lisa: “And we need to know:Will the website be monolingual or multilingual? Multilingual support means significantly more effort.”
Daniel: “Also a Radio Button: ‘How many languages should the website have?’ with the options ‘Monolingual’, ‘Bilingual’, ‘Multilingual (3+)’”
Tom: “Does the client need e-commerce functionality? WooCommerce or another shop?”
Daniel: “Radio Button: ‘Does the website require e-commerce features?’—Yes/No”
Lisa: “And if so: Should it be just a simple shop, or does the client need complex features such as variable products, subscriptions, or multi-vendor functionality?”
Daniel: “We can solve that later in Phase 4 with a condition—the follow-up question only appears if e-commerce was selected.”
Max: “It’s also important to ask:Are there any special plugin requirements? Sometimes clients want to integrate very specific tools.”
Daniel: “That will be a Short Text field: ‘Are there any special plugin requirements? (e.g., booking system, CRM integration, etc.)’”
Sarah: “And we should ask:How many pages should the website have? That is a major factor in determining the effort.”
Daniel: “Good idea. That will be a Number field: ‘How many pages/subpages should the website have?’”
Tom: “We also need information about the design style. Are there already corporate design guidelines? Or should we develop everything completely from scratch?”
Daniel: “Radio Button: ‘Are there existing corporate design guidelines?’—Yes/No. Plus a File Upload: ‘If available, please upload the corporate design guidelines.’”
Lisa: “One more question:Responsive design—that is, mobile optimization—is standard, but sometimes there are special requirements for mobile devices.”
Daniel: “Yes, we can make that a Checkbox: ‘Special requirements for mobile devices (e.g., progressive web app, app-like features)?’”
Max: “And very importantly:Performance requirements. Some clients place an extremely high value on fast loading times.”
Daniel: “Radio Button: ‘What are the performance requirements?’ with the options ‘Standard’, ‘High (performance optimization required)’, ‘Very high (extensive optimization & caching)’”
Julia: “One more thing:How many people will participate in the kickoff meeting? We need that for the effort calculation.”
Daniel: “That’s a Multiplier. The question is: ‘How many people will participate in the kickoff meeting?’—and we set the duration per person to 2 hours. So if 5 people participate, Leadtime automatically calculates 5 × 2 = 10 hours.”
Sarah: “Perfect. I think that covers the most important questions for the kickoff meeting. We can add more specific questions later in the other work packages.”
Daniel: “Exactly. Each work package can have its own questions. For example, the ‘Frontend Development’ work package could have questions like ‘Should animations be included?’ or ‘Will a page builder be used?’”
Sarah: “Good. Then let’s create the questions now, and afterward we can add the conditions in Phase 4.”
Implementation in Leadtime
Questions make it possible to adapt a work package flexibly to the specific project situation.
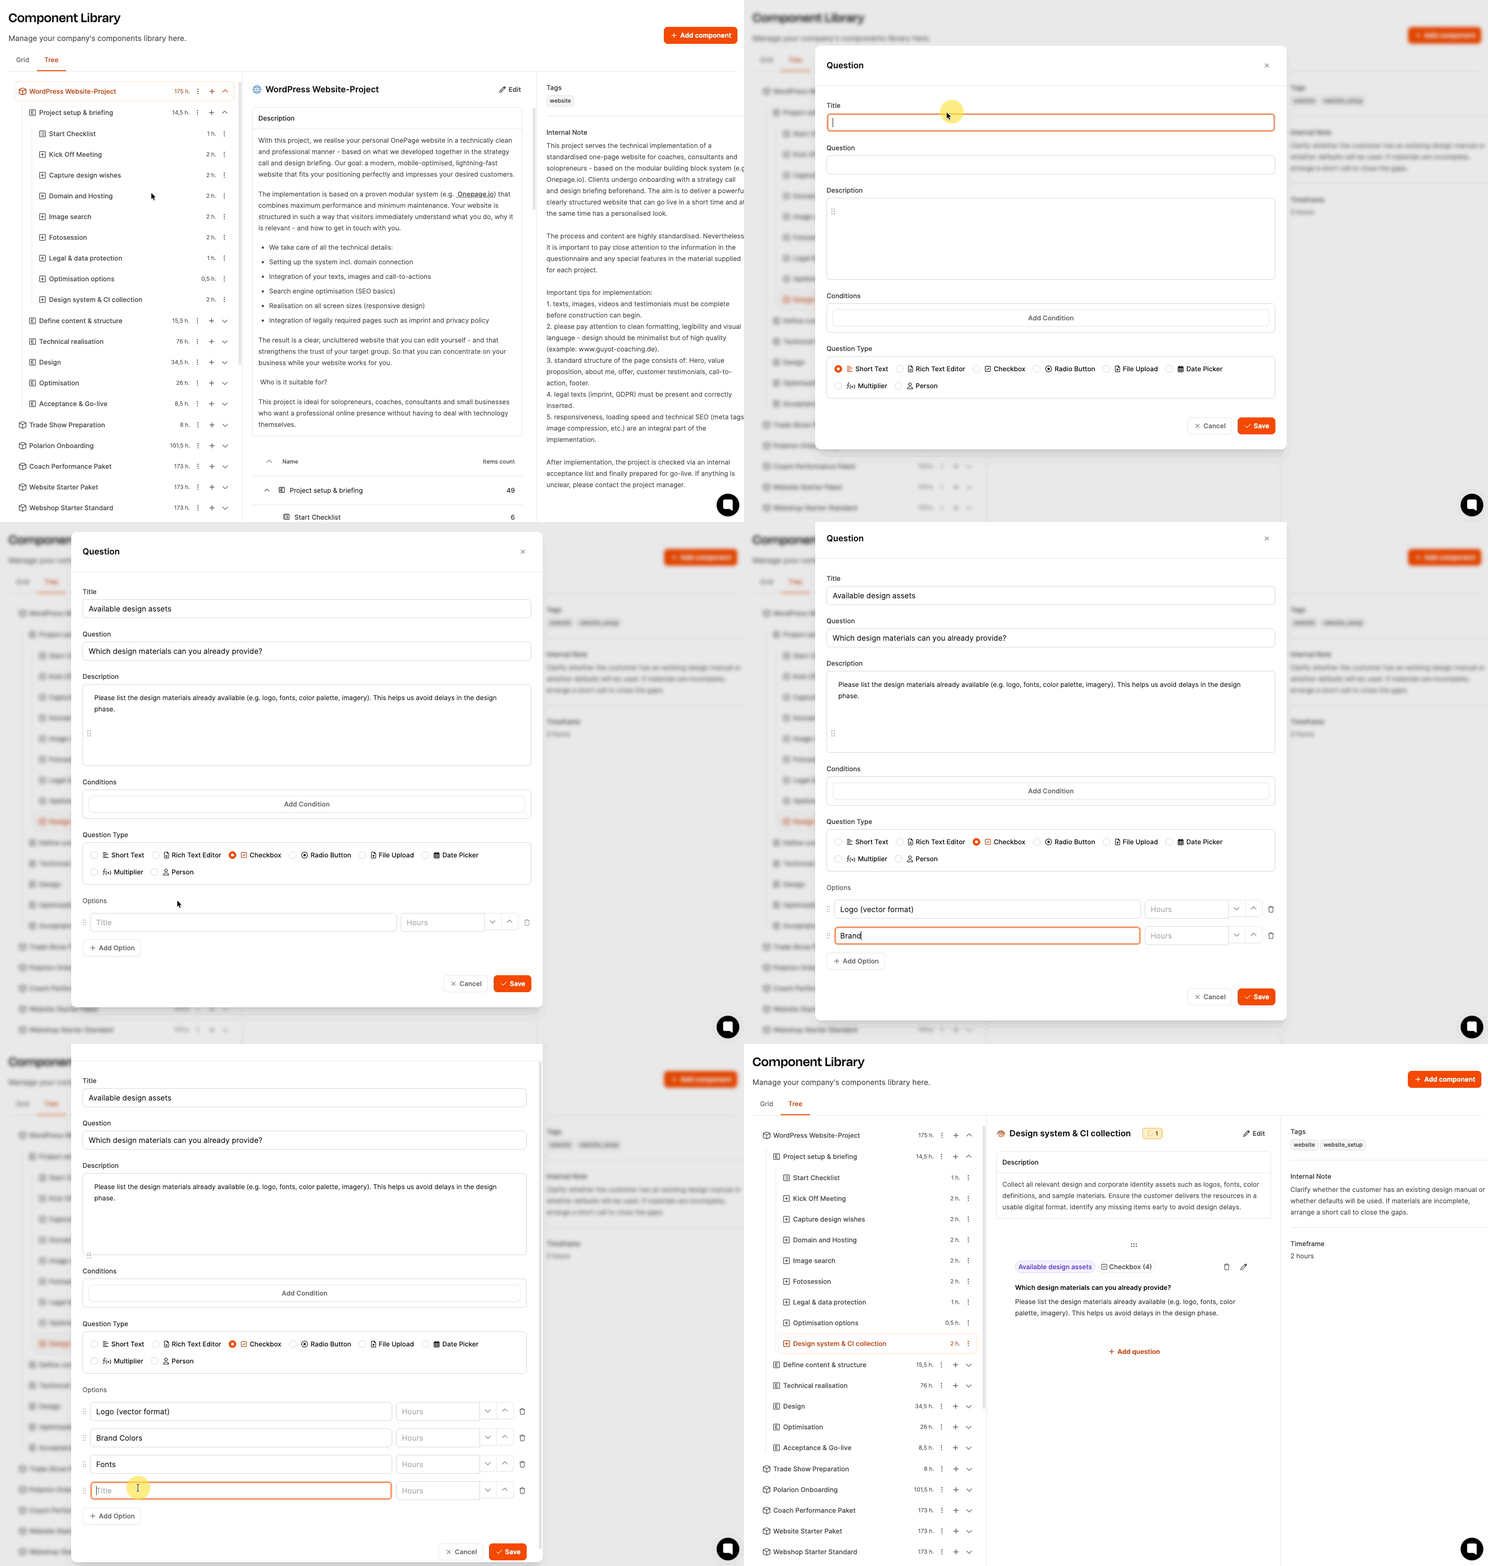
How it works:
-
Select the work package in the component tree (e.g., “Conduct Kickoff Meeting”).
-
Click “Add Question”.
-
A dialog opens:
- Title: Short name for the question (appears in the system).
- Question: Full question (shown to the user).
- Description: Explanation of the question (optional, helpful for complex questions).
- Question Type: Select the appropriate question type (see below).
-
Save.
The question is added to the work package and completed later when the project starts.
Available question types
| Question type | Use | Example |
|---|---|---|
| Short Text | Short text input | “Which domain should be used?” |
| Rich Text Editor | Longer formatted text | “Describe the website’s target audience” |
| Checkbox | Multiple selection | “Which social media channels should be integrated?” |
| Radio Button | Single selection | “Hosting by the client or by us?” |
| File Upload | Upload files | “Please upload the corporate design guidelines” |
| Date Picker | Select a date | “Desired go-live date?” |
| Multiplier | Number that multiplies the effort | “Number of participants in the meeting?” |
| Person | Select a team member | “Who will take over the project lead?” |
Special features: Multiplier question
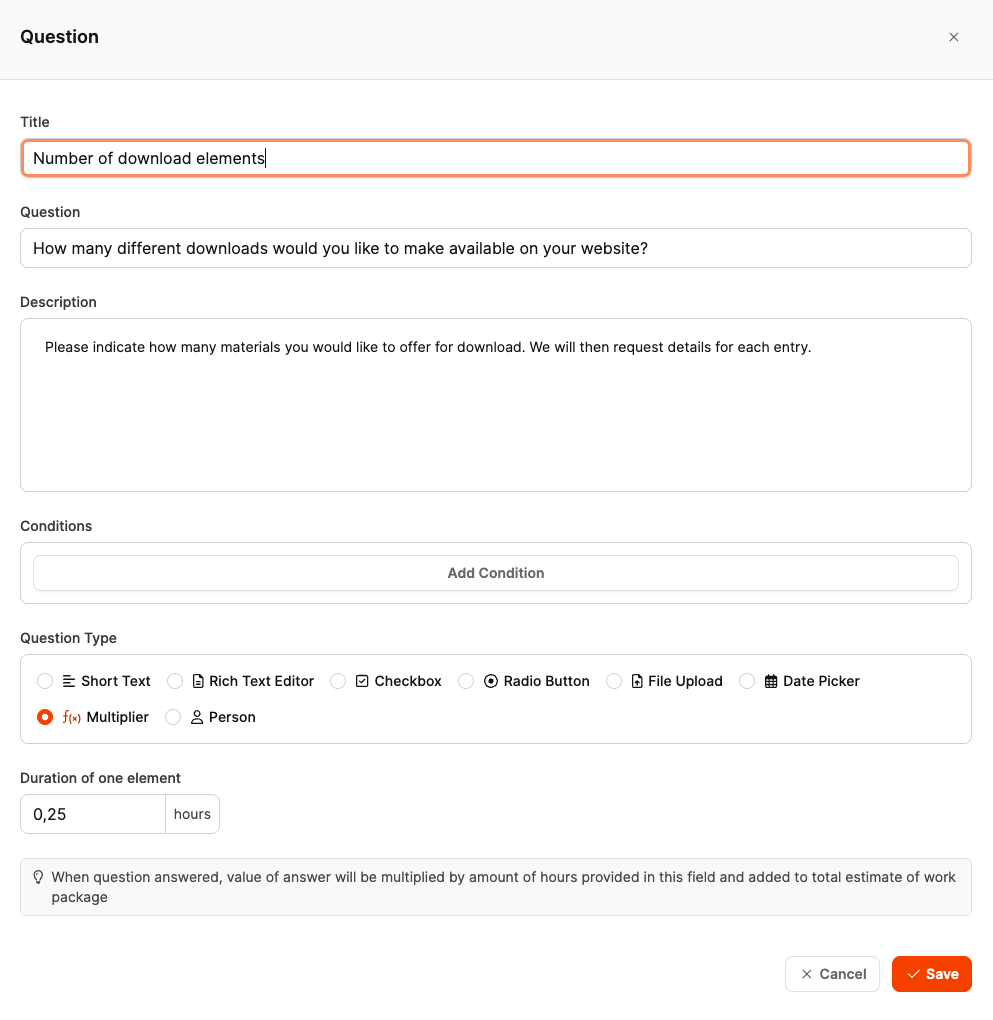
The Multiplier question type affects the work package’s effort estimate:
- Example: Question “How many files need to be maintained in the download area?”
- The question specifies that 0.25 hours of effort should be planned per file.
- If the user later enters “4 files”, the effort is automatically set to 1 hour.
Sort questions
The order of the questions can be changed using drag & drop. For example, it often makes sense to place the question about the number of participants at the beginning.
Workshop Phase 4: Refining the project structure with conditions
Team discussion
[!WARNING] Excerpt from the workshop transcript
Sarah: “Now for the finishing touches. We have the structure, the work packages, and the questions—now we’ll make the component intelligent. With conditions, we can ensure that only the relevant work packages and questions appear.”
Daniel: “Exactly. Conditions work like this: When a specific question is answered with a specific value, another element appears—for example, a work package or a follow-up question.”
Lisa: “Can you give a concrete example?”
Daniel: “Sure. Let’s take the question ‘Does the website require e-commerce features?’. If the answer is ‘Yes’, the ‘Set Up WooCommerce’ work package should appear automatically. If ‘No’ is selected, the package is hidden.”
Tom: “Ah, I understand. That means we only build what is actually needed.”
Sarah: “Exactly. That reduces complexity enormously. Let’s go through a few conditions.”
Daniel: “Okay, I’ll show you in the system. First, the e-commerce condition.”
(Daniel opens the component structure and navigates to the “Backend Development & Integration” epic.)
Daniel: “I’m now creating a new work package called ‘Set Up WooCommerce’ and then adding a condition.”
(Daniel creates the work package.)
Daniel: “All right, now I’ll open the package and click ‘Add Condition’. Here I can define:
- Component: WordPress Website Development
- Element: Conduct Kickoff Meeting
- Target: Question ‘Does the website require e-commerce features?’
- Condition Type: Answer equals ‘Yes’“
(Daniel configures the condition and saves it.)
Sarah: “Perfect. And what happens now?”
Daniel: “If the question is answered with ‘Yes’ when the project is created, the ‘Set Up WooCommerce’ work package appears automatically. If ‘No’ is selected, it remains hidden.”
Max: “Cool. Can we do the same for the hosting question? If the client hosts it themselves, we don’t need the ‘Set Up Server’ work package.”
Daniel: “Exactly. I’ll create the ‘Set Up Server & Install WordPress’ work package and add the condition:
- Element: Conduct Kickoff Meeting
- Target: Question ‘Who will handle the hosting?’
- Condition Type: Answer equals ‘We handle the hosting’“
Lisa: “And what about multilingual support? If the website is to be multilingual, we’ll need additional work packages as well.”
Daniel: “Yes, exactly. I’ll create the ‘Configure WPML or Polylang’ work package and set the condition:
- Element: Conduct Kickoff Meeting
- Target: Question ‘How many languages should the website have?’
- Condition Type: Answer contains ‘Bilingual’ OR ‘Multilingual’“
Tom: “Can we also apply conditions to questions? For example, if e-commerce was selected, a follow-up question about the shop features should appear.”
Daniel: “Yes, absolutely. I’ll show you.”
(Daniel opens the “Conduct Kickoff Meeting” work package and creates a new question.)
Daniel: “I’m now creating the question ‘Which shop features are required?’—with checkboxes for:
- Simple product catalog
- Variable products (sizes, colors, etc.)
- Digital products / downloads
- Subscriptions
- Multi-vendor (multiple sellers)
And then I’ll add the condition:
- Element: Conduct Kickoff Meeting
- Target: Question ‘Does the website require e-commerce features?’
- Condition Type: Answer equals ‘Yes’“
Sarah: “Brilliant. This way, the question is only asked when it’s relevant.”
Max: “Can we also adjust the effort dynamically? For example, if ‘Performance Optimization’ is selected, the effort should increase.”
Daniel: “Yes, that’s possible. In the conditions, we can also specify that the minimum effort increases. For example, for the question ‘What are the performance requirements?’—if ‘Very high’ is selected, we can automatically add 5 hours of additional effort to the ‘Performance Optimization’ work package.”
Sarah: “That’s perfect. Now we have a truly flexible component that adapts automatically to every project.”
Julia: “One more idea: Can we also apply conditions to acceptance tests? For example, if e-commerce is enabled, a ‘Test Shop Functionality’ test should appear.”
Daniel: “Yes, that works the same way. Acceptance tests are also elements of the component, so we can show and hide them in exactly the same way.”
Sarah: “Okay, I think we’ve now defined the most important conditions. You can continue refining the system, but the basic structure is in place.”
Tom: “One last question: Can we still adapt the component after the first project? In other words, if we realize we’ve forgotten something?”
Sarah: “Yes, absolutely. The component is a living document. After each project, we should hold a ‘Lessons Learned’ meeting and optimize the component—adjust effort estimates, add new questions, refine conditions.”
Daniel: “Exactly. And that’s the value of this work: Over time, the component keeps improving and our projects run more and more smoothly.”
Sarah: “Perfect. Then thank you all for your hard work today. We now have a solid foundation for all future website projects!”
Procedure in Leadtime
Conditions make it possible to display work packages, questions, or acceptance tests only when specific prerequisites are met.
Basic principle:
- A condition links two elements: a target element (which is shown/hidden) and a source (the question whose answer triggers the condition)
- If the condition is met → the element is displayed
- If the condition is not met → the element remains hidden
Example 1: Conditional work package (e-commerce)
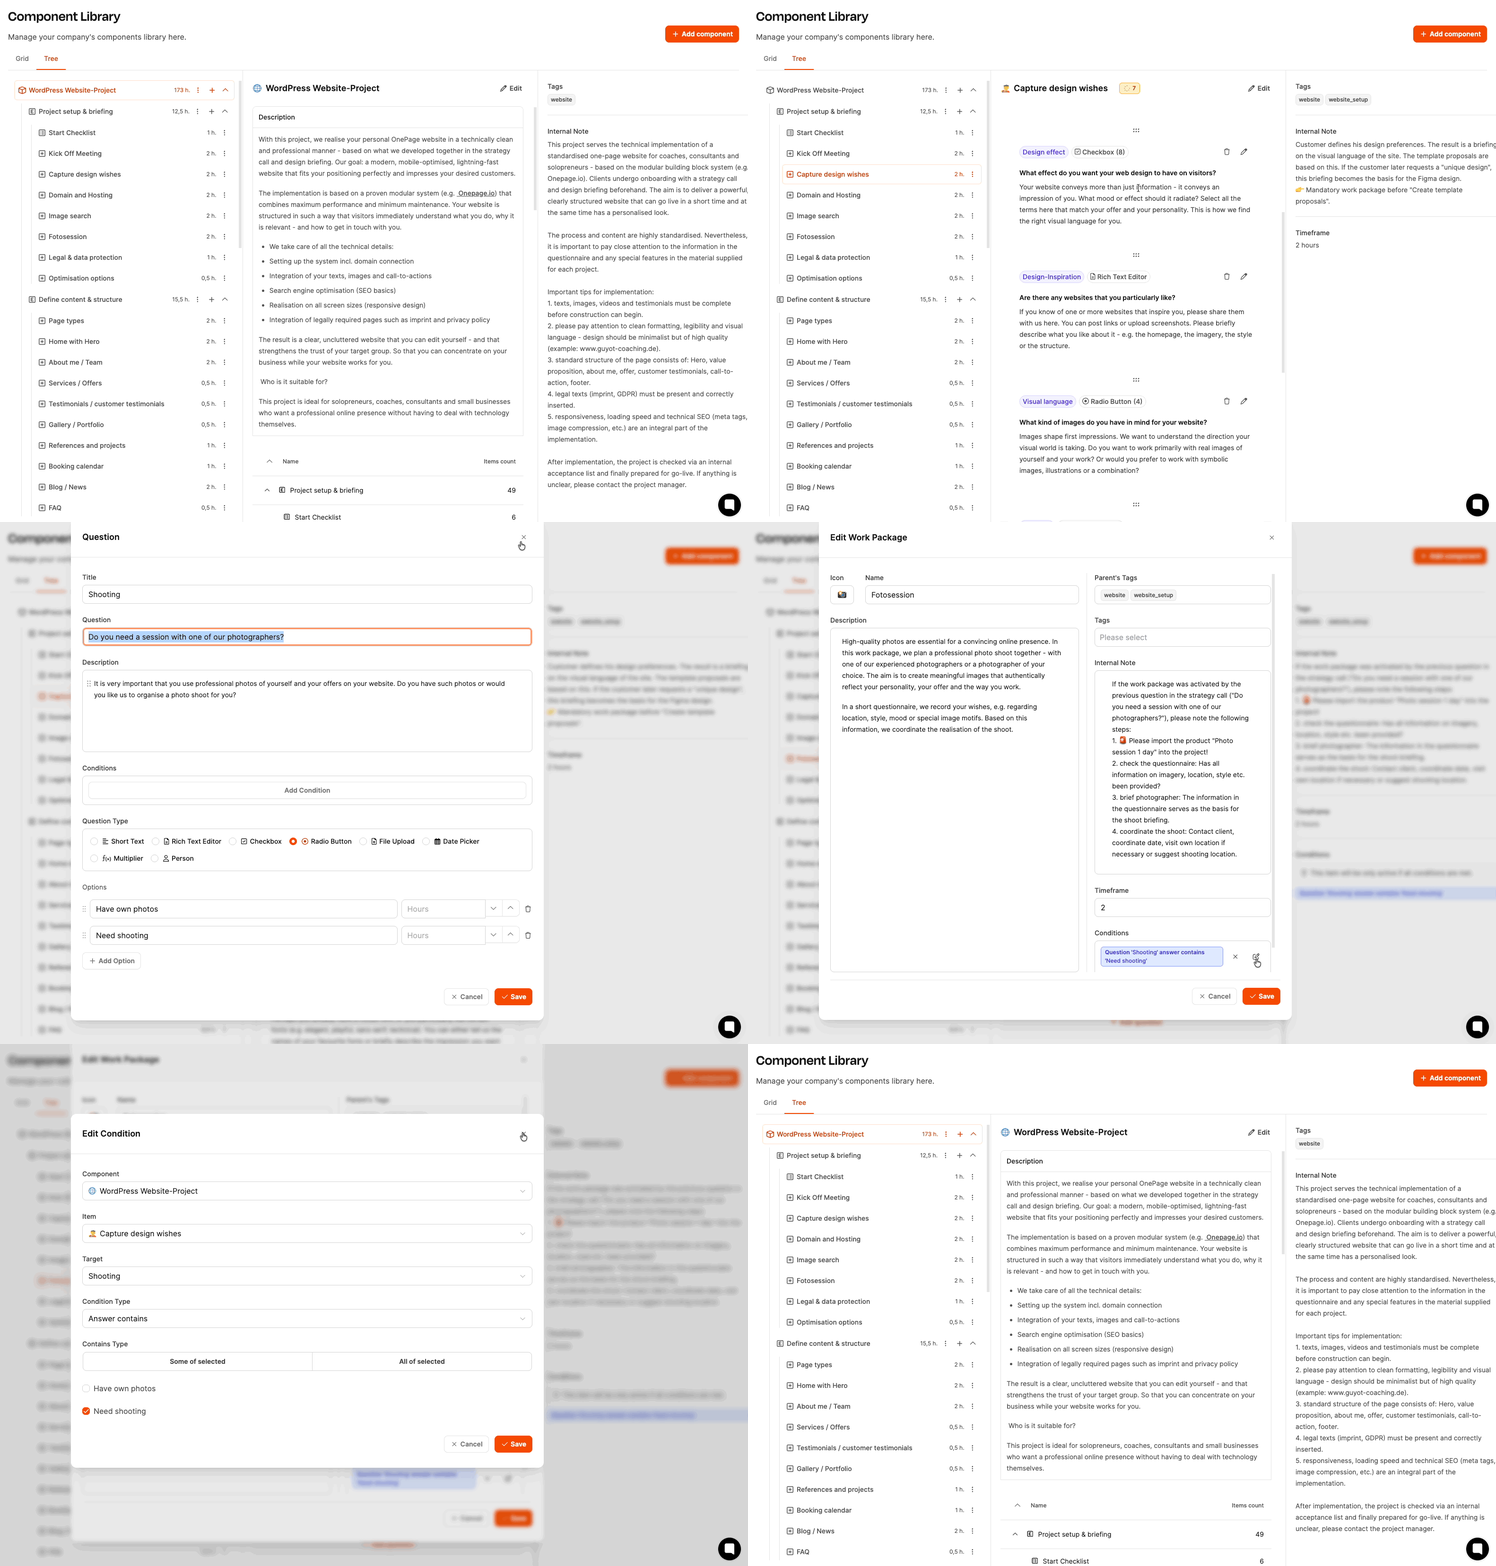
Situation: The “Photo Session” work package should only appear if “Yes” was selected for the question “Do you need a photo shoot?”.
Procedure:
-
Create the “Photo Session” work package in the “Project Setup” epic
-
Open the work package and click Add Condition in the “Conditions” section
-
Complete the condition form:
- Component: WordPress Website Development
- Element: Capture Design Preferences
- Target: Shoot (question: “Do you need an appointment with one of our photographers?”)
- Condition Type: Answer equals
- Value: Yes
-
Save
Result: The “Photo Session” work package appears only if “Yes” was selected for the e-commerce question.
Example 2: Conditional question (shop features)
Situation: A detailed question about the desired shop features should appear only if e-commerce is enabled.
Procedure:
-
Open the “Conduct Kickoff Meeting” work package
-
Add a new question:
-
Title: “Shop Features”
-
Question: “Which shop features are required?”
-
Question Type: Checkbox (multiple selection)
-
Options:
- Simple product catalog
- Variable products (sizes, colors, etc.)
- Digital products / downloads
- Subscriptions
- Multi-vendor (multiple sellers)
-
-
Click Add Condition in the “Conditions” section
-
Configure the condition:
- Component: WordPress Website Development
- Element: Conduct Kickoff Meeting
- Target: E-Commerce (question: “Does the website require e-commerce features?”)
- Condition Type: Answer equals
- Value: Yes
-
Save
Result: The question about the shop features is only asked if “Yes” was selected for the e-commerce question.
Example 3: Conditional work package (hosting)
Situation: The “Set Up Server & Install WordPress” work package should only appear if we handle the hosting (not the client).
Procedure:
-
Create the “Set Up Server & Install WordPress” work package in the “Backend Development & Integration” epic
- Description: “Set up the server infrastructure and install WordPress, including a staging environment”
- Internal Note: “Create the server with our hosting provider, configure SSH access, install WordPress, set up the staging environment, configure an SSL certificate, set up the backup system”
- Minimum Effort: 3 hours
-
Add a condition:
- Component: WordPress Website Development
- Element: Conduct Kickoff Meeting
- Target: Hosting (question: “Who will handle the hosting?”)
- Condition Type: Answer equals
- Value: We handle the hosting
-
Save
Example 4: Multilingual condition
Situation: The “Configure WPML/Polylang” work package should appear if the website is to be bilingual or multilingual.
Procedure:
-
Create the “Configure WPML/Polylang” work package in the “Backend Development & Integration” epic
- Description: “Configure a multilingual plugin for WordPress”
- Internal Note: “Install the plugin (WPML or Polylang), create languages, set up the translation workflow, translate menus and widgets, add a language switcher”
- Minimum Effort: 3 hours
-
Add a condition:
- Component: WordPress Website Development
- Element: Conduct Kickoff Meeting
- Target: Languages (question: “How many languages should the website have?”)
- Condition Type: Answer contains
- Values: Bilingual, Multilingual (select both)
-
Save
Note: The “Answer contains” condition type makes it possible to select multiple options. The work package appears if one of the options applies.
Complex conditions
You can also define multiple conditions for an element:
- Example: A work package should only appear if both e-commerce is enabled and multilingual support was selected
- Simply add multiple conditions—all of them must be met (AND operation)
Acceptance tests with conditions
Acceptance tests can also have conditions:
Example: The “Test Shop Functionality” test should only appear if e-commerce is enabled.
-
Create a “Test Shop Functionality” acceptance test in the “Testing & Quality Assurance” epic
-
Description: “Verify all e-commerce features before go-live”
-
Steps:
- Add a product to the shopping cart
- Complete the checkout process
- Place a test order using different payment methods
- Check the order confirmation
- Check the backend order overview
-
Expected Result: “All shop features work correctly, and orders are recorded correctly”
-
-
Add a condition:
- Element: Conduct Kickoff Meeting
- Target: E-Commerce
- Condition Type: Answer equals “Yes”
Lessons learned & continuous improvement
Team discussion
[!WARNING] Excerpt from the workshop transcript
Sarah: “Perfect! We now have a complete project component for our WordPress projects. But one thing is still important: This component is not a static document. We should revise it after every project.”
Julia: “What exactly do you mean?”
Sarah: “After every go-live, we hold a lessons learned meeting. There, we discuss:
- Which work packages took longer than estimated?
- Did we forget any tasks?
- Which conditions work well, and which do not?
- Are there new requirements we should incorporate?“
Daniel: “And then we adapt the component accordingly. That means the effort estimates become more realistic, the structure improves, and over time we have a perfectly optimized template.”
Sarah: “Exactly. Let’s create the final work package: ‘Conduct Lessons Learned Meeting’—at the end of every project.”
(Daniel creates the work package.)
Sarah: “Thank you all for your hard work today. I’m convinced that this component will save us an enormous amount of time and stress. With the next website project, we’ll see how well it works!”
Procedure: Implement lessons learned
After completing a project:
-
Call a meeting: All project participants meet
-
Analyze execution: Compare planned vs. actual effort in Leadtime
-
Adapt the component:
- Update effort estimates
- Add missing work packages
- Remove unnecessary packages or mark them as optional
- Define new conditions
- Clarify or add questions
-
Document: Record changes in the component description or in a separate changelog