
Document Templates
Standardization of documents that can be automated with the Leadtime platform.
In Leadtime, the “Document Templates” section is located in the main menu under Administration → Document Templates.
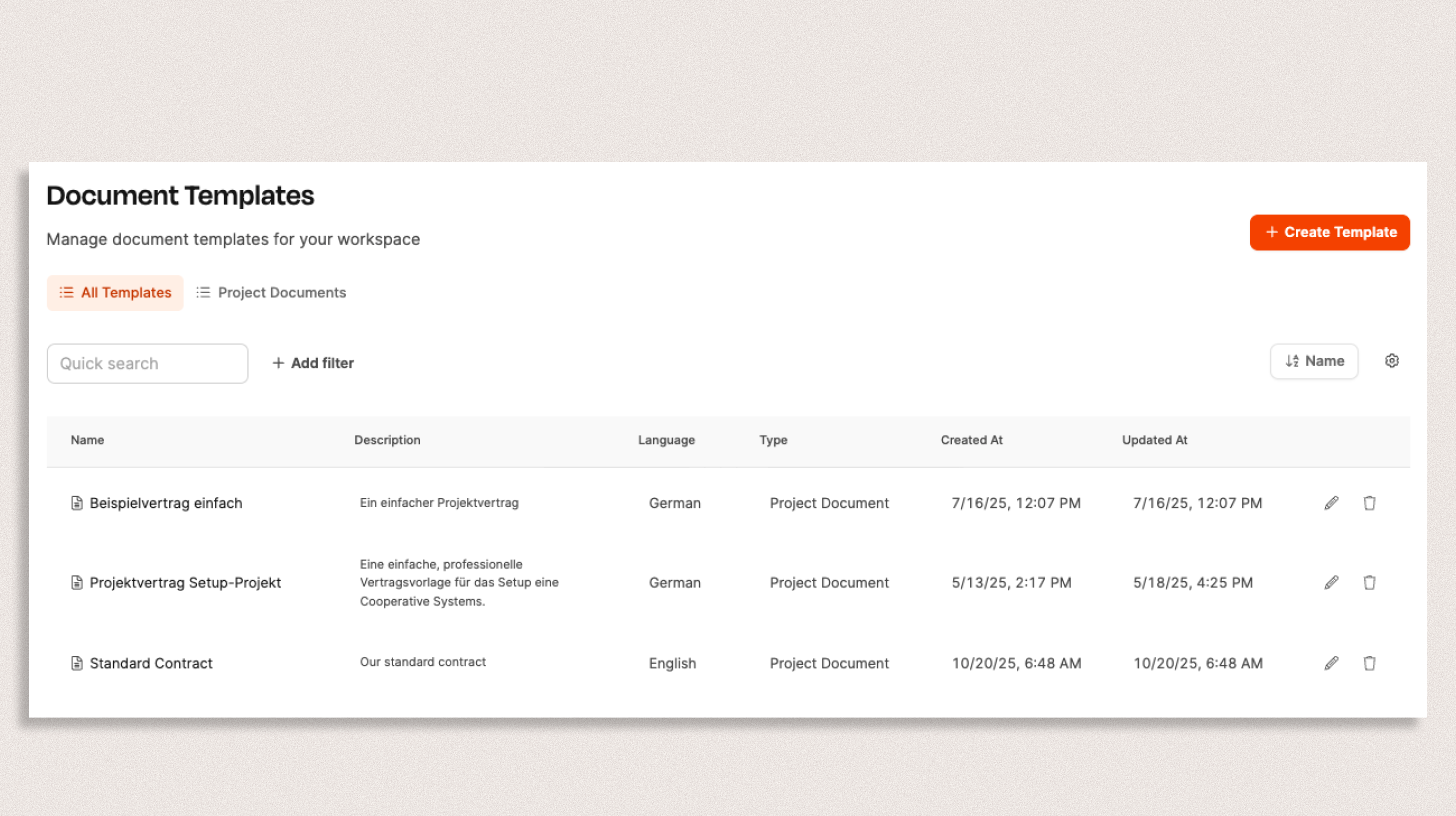
The Document Templates section standardizes recurring documents, such as contracts, cover letters, and requirement specifications, and automatically fills them with project, customer, and company data when they are generated.
What are document templates?
Document templates combine static text with variables. When a document is generated, Leadtime replaces those variables with the appropriate values, such as the customer, project, contact, or company. This produces consistent, personalized documents without manual rework.
Document templates are used in projects: Projects – Documents tab (single projects only)
Overview of templates
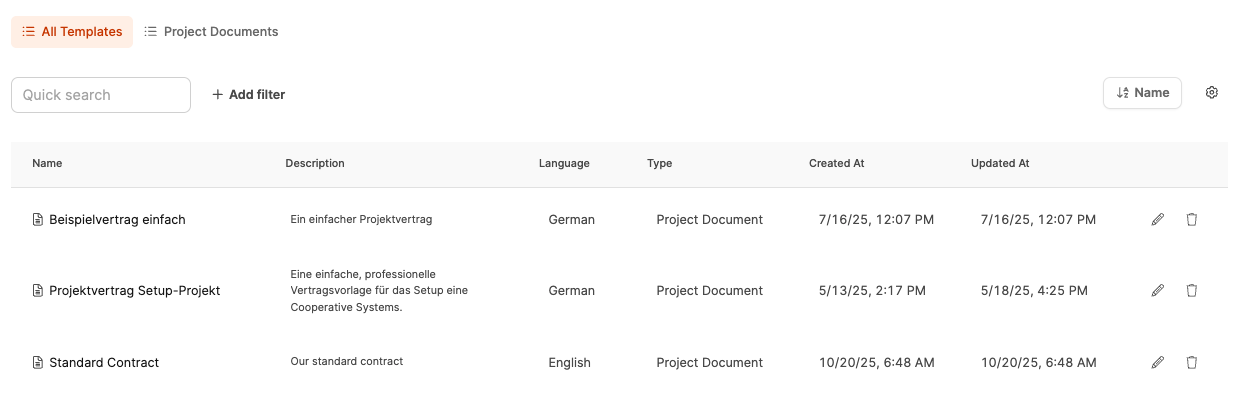
Opening the section displays a table containing all templates. It includes the following columns:
- Name: Title of the template
- Description: Brief information about the template’s content or purpose
- Language: German or English
- Type: Currently available: Project document
- Created on: Date of creation
- Last updated: Date of the most recent change
Two icons are also available:
- pencil to edit the template
- trashcan to delete the template
Create template
Click “+ Create template” to open a dialog with three columns:
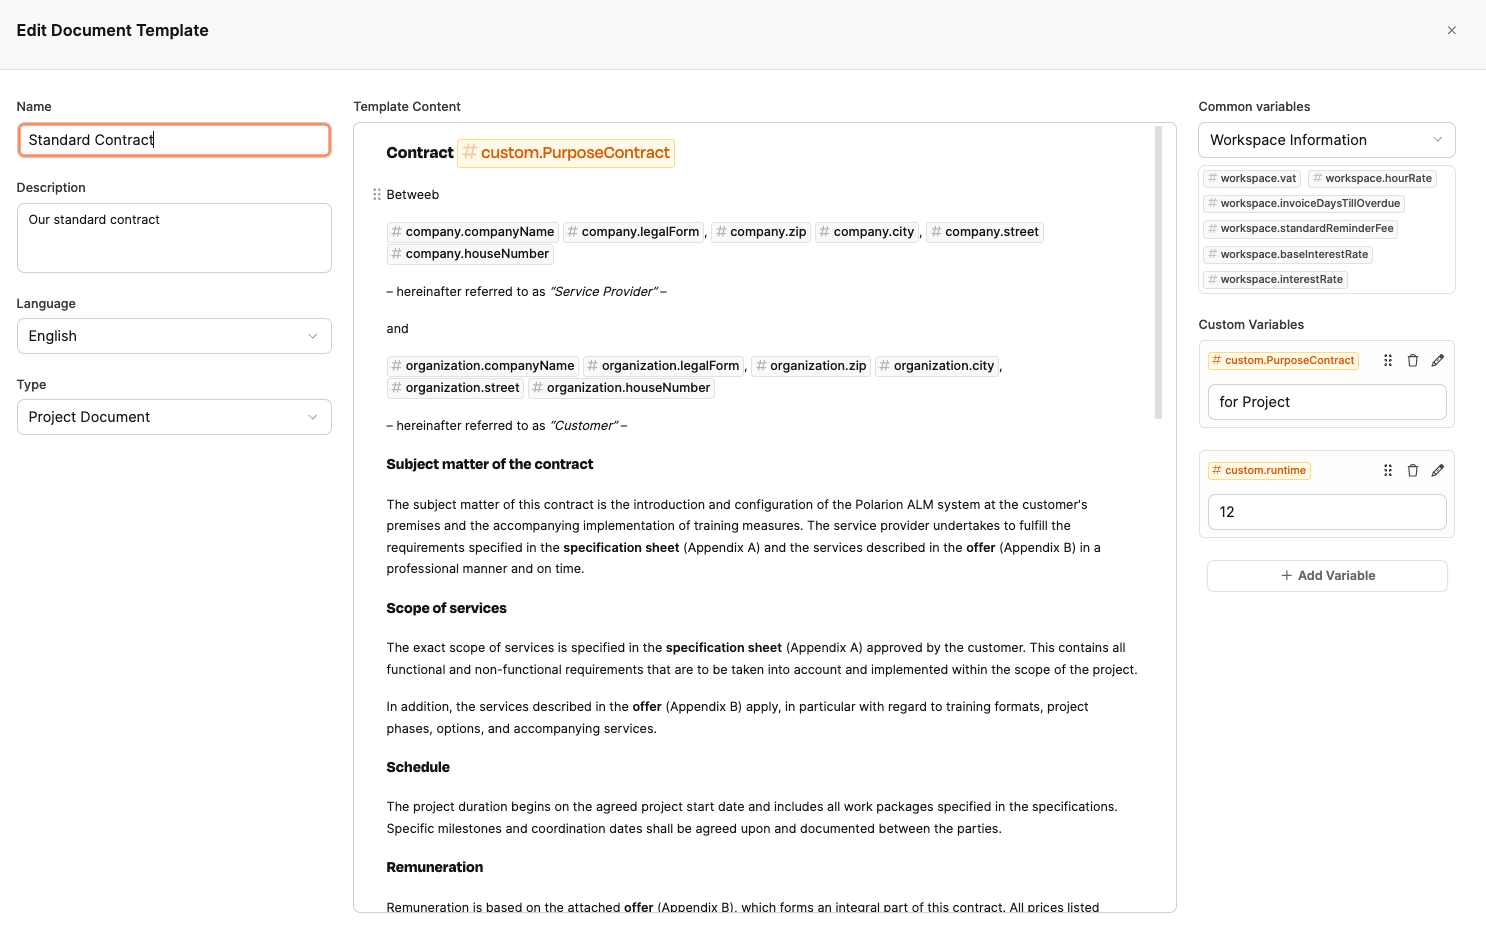
Left: Metadata
Define the template’s general properties here:
- Name: Title of the template
- Description: Optional explanation of the purpose
- Language: Dropdown, for example, German or English
- Type: Currently only Project document available
Middle: Document content
The document text editor is located here. You can:
- enter static text
- format text through the
/menu or context menu, including headings, lists, and tables - insert variables to make text dynamic, such as
#organization.companyName - define conditional sections that appear only when specific conditions are met
Example of a condition:
The following notice appears only when the variable #custom.Testzeitraum is greater than 0:
“You are not permitted to use the data created in the system during the trial period for commercial purposes.”
Insert these conditions directly in the editor through the “Condition” menu item.
Right: Variables
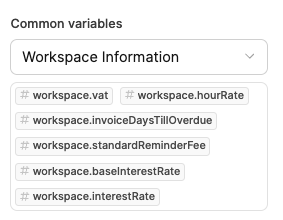
The right column contains two types of variables:
General variables
These variables are available throughout the system and can be inserted with a click. They cover the following areas:
- Workspace information (e.g.
#workspace.vat,#workspace.hourRate) - Company details
- Organization details (the customer’s company)
- Project details
- User details (current user)
- Recipient details (e.g.
#customer.firstname) - Macros (for example,
#dearCustomer, which automatically accounts for the customer’s gender)
Custom variables
In Leadtime, custom variables let you add project- or template-specific values flexibly when those values are not covered by standard variables such as customer, project, or company.
They extend the template with custom fields that you define yourself, including a name, data type, and value.
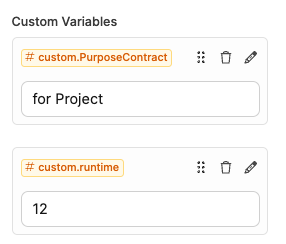
Create them separately for each template, for example, #custom.runtime or #custom.PurposeContract. They appear in the right column below the general variables, where you can define their names and values.
Instead of finding and editing the relevant place in a contract manually, change the variable value and the text updates automatically.
Available general variables
To add a variable to the document, first select the data object from the dropdown in the right column. The selection field then displays the variables associated with that object. Click a variable to insert it into the document.
Insert variables with the # shortcut
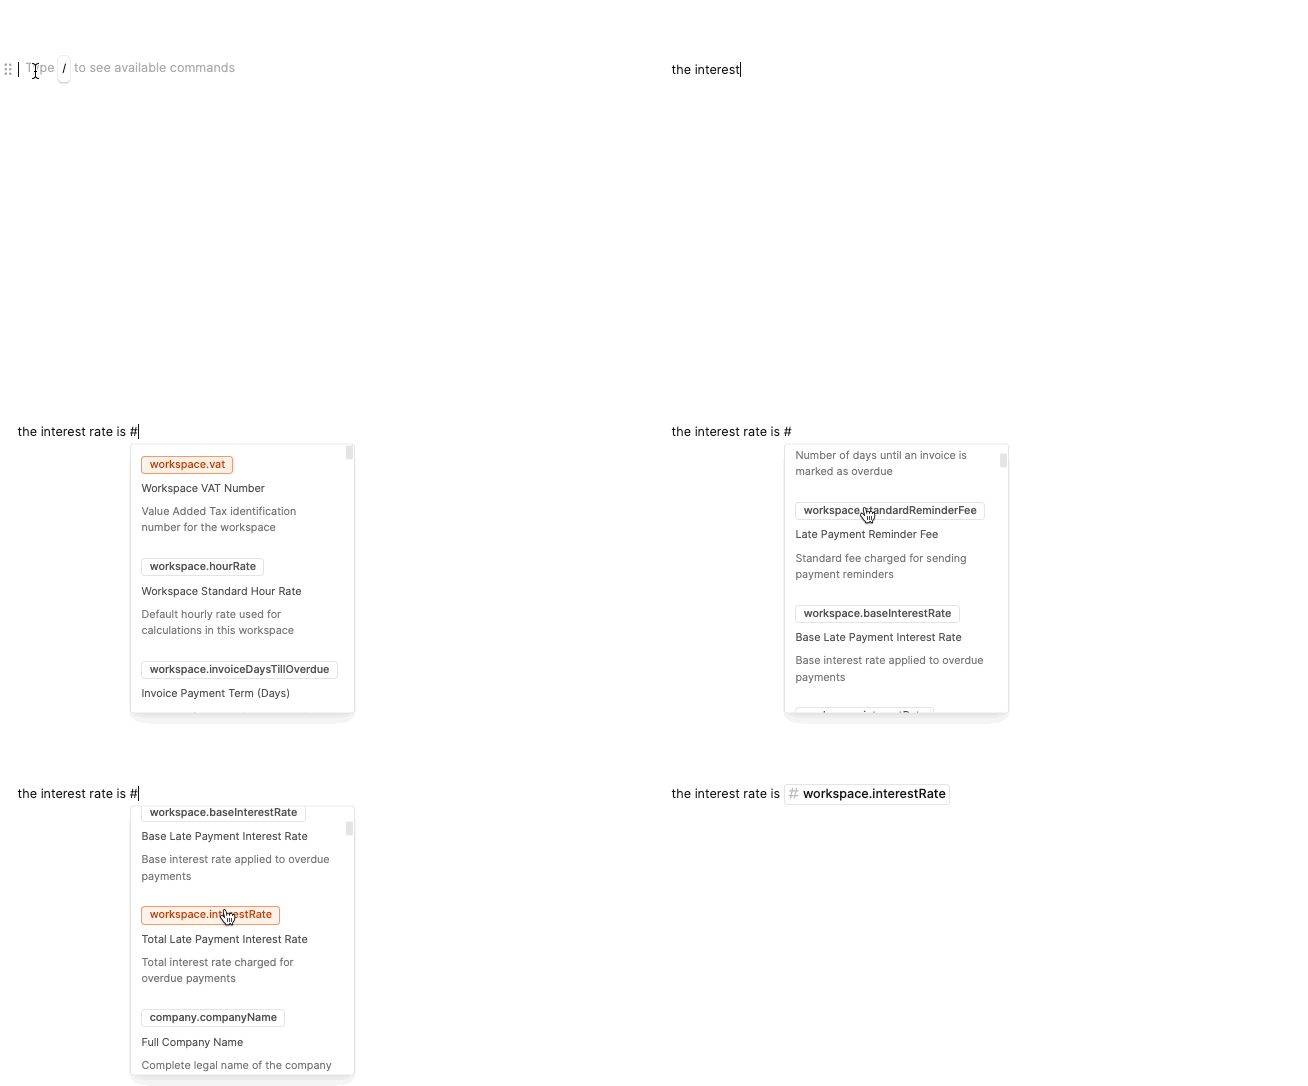
You can also press the hash key in the text editor to open a context menu containing the available variables.
Workspace information
Information relating to the entire workspace.
| #workspace.vat | The VAT rate that applies to the workspace |
|---|---|
| #workspace.hourRate | The default hourly rate for the workspace |
| #workspace.invoiceDaysTillOverdue | The default value in the workspace for when invoices should be considered overdue |
| #workspace.standardReminderFee | The standard reminder fees for the workspace |
| #workspace.baseInterestRate | Base interest rate for overdue invoices |
| #workspace.InterestRate | Total interest rate for overdue invoices |
Company details
Information that relates to your company.
| #company.companyName | Your company’s name |
|---|---|
| #company.legalForm | Your company’s legal form |
#company.country |
Your company’s country |
#company.zip |
Your company’s zip code |
#company.city |
Your company’s city |
| #company.street | Your company’s street |
| #company.houseNumber | Your company’s house number |
#company.phone |
Your company’s phone number |
#company.email |
Your company’s email |
#company.website |
Your company’s website |
| #company.fax | Your company’s fax number |
Organization details
Information about the organization for which the project linked to this document is being carried out.
| #organization.companyName | The name of the target organization |
|---|---|
| #organization.shortName | The short name of the target organization |
| #organization.legalForm | The legal form of the target organization |
| #organization.description | The description of the target organization |
#organization.country |
The country of the target organization |
#organization.zip |
The postal code of the target organization |
#organization.city |
The city of the target organization |
| #organization.street | The street of the target organization |
| #organization.houseNumber | The house number of the target organization |
#organization.phone |
The phone number of the target organization |
#organization.email |
The email address of the target organization |
#organization.website |
The website of the target organization |
| #organization.fax | The fax number of the target organization |
| #organization.taxNumber | The tax number of the target organization |
| #organization.registrationNumber | The commercial register number of the target organization |
| #organization.registrationCourt | The registration court of the target organization |
| #organization.hourRate | The hourly rate that applies to the target organization |
| #organization.invoiceDaysTillOverdue | The payment term that applies to the target organization |
| #organization.standardReminderFee | The reminder fee that applies to the target organization |
| #organization.baseInterestRate | The base interest rate that applies to the target organization |
| #organization.interestRate | The interest rate that applies to the target organization |
Project details
Information about the project linked to this document.
| #project.name | The name of the project where the template is used |
|---|---|
| #project.category | The project category of the project where the template is used |
| #project.status | The project status of the project where the template is used |
| #project.defaultAccountable | The default responsible person for the project where the template is used |
#project.country |
The country where the project is happening |
| #project.projectid | The project ID of the project where the template is used |
| #project.activeVersionId | The ID of the current project version of the project where the template is used |
| #project.activeVersionName | The name of the current version of the project where the template is used |
Current user details
Information about the user who created this document.
| #currentUser.title | The current user’s title |
|---|---|
#currentUser.degree |
The current user’s academic degree |
#currentUser.email |
The current user’s email |
| #currentUser.firstName | The current user’s first name |
| #currentUser.lastName | The current user’s last name |
#currentUser.country |
The current user’s country |
#currentUser.zip |
The current user’s postal code |
#currentUser.city |
The current user’s city |
| #currentUser.street | The current user’s street |
| #currentUser.houseNr | The current user’s house number |
| #currentUser.birthday | The current user’s birthday |
#currentUser.phone |
The current user’s phone number |
Recipient
Information about the document’s recipient.
| #recipient.firstName | Recipient’s first name |
|---|---|
| #recipient.lastName | Recipient’s last name |
| #recipient.position | Recipient’s position in the company |
| #recipient.gender | Recipient’s gender |
| #recipient.title | Recipient’s title |
#recipient.degree |
Recipient’s academic degree |
| #recipient.birthdate | Recipient’s birthday |
| #recipient.activeVersionName | Recipient’s active project version |
#recipient.country |
Recipient’s country |
#recipient.zip |
Recipient’s zip code |
#recipient.city |
Recipient’s city |
| #recipient.street | Recipient’s street |
| #recipient.houseNumber | Recipient’s house number |
#recipient.phone |
Recipient’s phone number |
#recipient.email |
Recipient’s email |
| #recipient.socialNetwork | Recipient’s LinkedIn |
Macros
Helper variables
| #macros.todaysDate | Inserts the current date |
|---|---|
| #macros.dearCustomer | Inserts a gender-specific greeting: “Dear Mr. Maier” OR “Dear Ms. Maier”. |
Conditions in document templates
Using conditions is one of the most powerful features in Leadtime’s document templates. With them, you can make text sections show up only under certain circumstances in a final document. This way, the same template works flexibly for different scenarios – and you don’t have to manually adjust it yourself.
What are conditions?
Conditions are rules that work with variables inside the document.
Only if the set condition is met, the related text block will be shown when you create the document.
If it is not met, that section in the final document will be invisible.
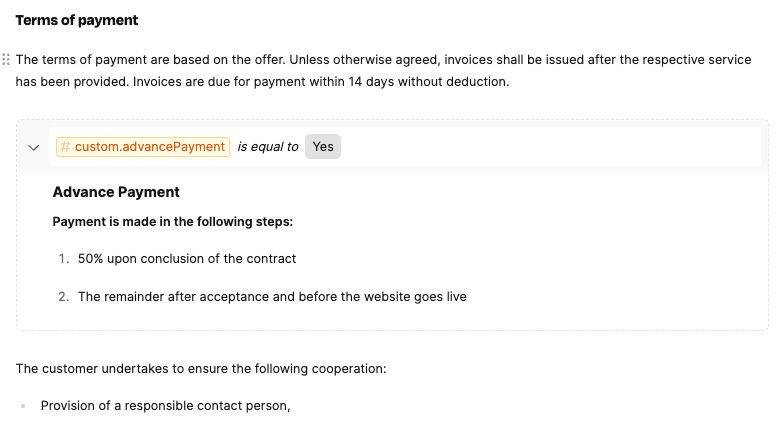
In this example, an advance payment clause is only added to the contract if the custom variable “advancePayment” is set to “Yes”. This way, when you create a contract, you can decide if a specific customer needs to pay in advance – no need to change the contract wording yourself.
Insert condition
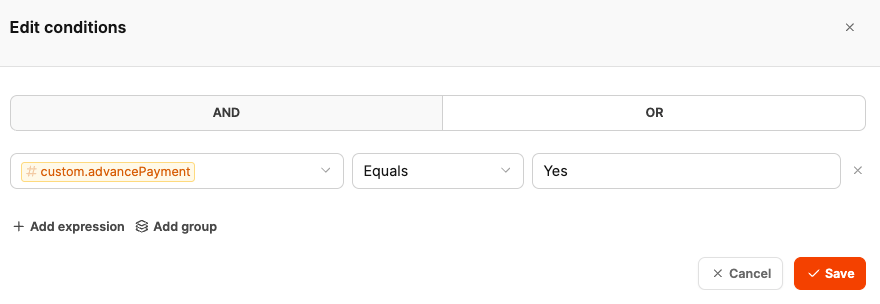
To add a condition to the document, do the following:
-
Open the editor of the document template you want.
-
Place the cursor at the spot where you want to add the condition.
-
Open the menu via / or using the context menu.
-
Select the block “Condition”.
-
In the dialog, set the following points:
- Which variable should be checked?
- Which operator will be used? (e.g. “is equal”, “is greater than”, “contains”, etc.)
- Compared to which value should it be?
-
Then enter the text block that should show up if the condition is met.
Available condition types
Depending on the variable type (text, number, selection), different operators are available to you:
- is equal to (e.g., when language = “English”)
- contains (e.g., for checkbox selections)
- is greater than / less than (e.g., for durations or quantities)
- is not empty (e.g., when a value has been entered)
Multiple conditions can be linked with AND or OR.
Automatic numbering from section headlines
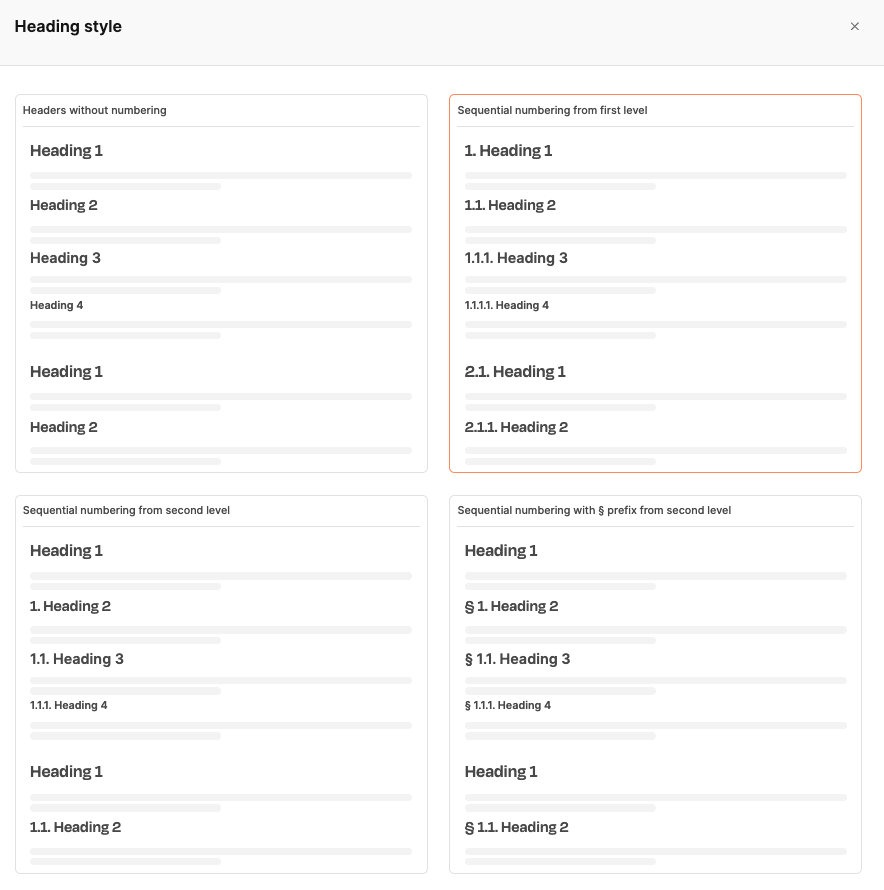
The document template system in Leadtime supports automatic numbering for headings. This feature makes sure that headings in the final document are numbered correctly and consistently, without users having to take care of numbering manually.
Why is this important?
Since Leadtime also works with conditional sections — so, text blocks that only show up when certain conditions are met — manually numbering the headings would be error-prone. For example, if a condition changes the order or the number of chapters, a manually managed numbering could become inconsistent or even misleading.
Automatic numbering makes sure the logical structure of the document is always represented correctly — even when sections get shown or hidden because of conditions.
How it works
When editing a document template, the user can pick the desired numbering style under the menu item Heading Style. The following options are available:
-
Headings without numbering
The chosen heading levels (H1, H2, H3…) are shown visually only, with no automatic numbering.
-
Sequential numbering from the first level
Each heading automatically gets a running number:
1. Heading 11.1. Heading 21.1.1. Heading 3Perfect for structured documents with numbered chapters and subchapters.
-
Sequential numbering from the second level
The first heading level (H1) stays without a number, automatic numbering starts with H2:
Heading 11.1. Heading 21.1.1. Heading 3Handy if you want, for example, a cover page or introduction without numbering.
-
Sequential numbering with §-prefix starting from level 2
Same as above, but with a paragraph sign as prefix:
§ 1. Heading 2§ 1.1. Heading 3Especially great for legal documents or terms and conditions.
This feature ensures that even with complex, dynamically generated documents a correct structure and orientation is maintained for the reader.
Document templates are used in projects: Projects – Documents tab (Single projects only)